

Instruction Book Libro de Instrucciones Livret d'Instructions ... - Singer
Instruction Book Libro de Instrucciones Livret d'Instructions ... - Singer
Instruction Book Libro de Instrucciones Livret d'Instructions ... - Singer

Create successful ePaper yourself
Turn your PDF publications into a flip-book with our unique Google optimized e-Paper software.
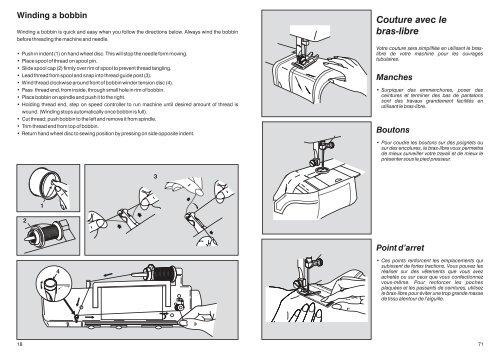
Winding a bobbin<br />
Winding a bobbin is quick and easy when you follow the directions below. Always wind the bobbin<br />
before threading the machine and needle.<br />
Push in in<strong>de</strong>nt (1) on hand wheel disc. This will stop the needle form moving.<br />
Place spool of thread on spool pin.<br />
Sli<strong>de</strong> spool cap (2) firmly over rim of spool to prevent thread tangling.<br />
Lead thread from spool and snap into thread gui<strong>de</strong> post (3).<br />
Wind thread clockwise around front of bobbin win<strong>de</strong>r tension disc (4).<br />
Pass thread end, from insi<strong>de</strong>, through small hole in rim of bobbin.<br />
Place bobbin on spindle and push it to the right.<br />
Holding thread end, step on speed controller to run machine until <strong>de</strong>sired amount of thread is<br />
wound. (Winding stops automatically once bobbin is full).<br />
Cut thread; push bobbin to the left and remove it from spindle.<br />
Trim thread end from top of bobbin.<br />
Return hand wheel disc to sewing position by pressing on si<strong>de</strong> opposite in<strong>de</strong>nt.<br />
2<br />
1<br />
4<br />
3<br />
Couture avec le<br />
bras-libre<br />
Votre couture sera simplifiée en utilisant le braslibre<br />
<strong>de</strong> votre machine pour les ouvrages<br />
tubulaires.<br />
Manches<br />
Surpiquer <strong>de</strong>s emmanchures, poser <strong>de</strong>s<br />
ceintures et terminer <strong>de</strong>s bas <strong>de</strong> pantalons<br />
sont <strong>de</strong>s travaux gran<strong>de</strong>ment facilités en<br />
utilisant le bras-libre.<br />
Boutons<br />
Pour coudre les boutons sur <strong>de</strong>s poignets ou<br />
sur <strong>de</strong>s encolures, le bras-libre vous permettra<br />
<strong>de</strong> mieux surveiller votre travail et <strong>de</strong> mieux le<br />
présenter sous le pied presseur.<br />
Point d’arret<br />
Ces points renforcent les emplacements qui<br />
subissent <strong>de</strong> fortes tractions. Vous pouvez les<br />
réaliser sur <strong>de</strong>s vêtements que vous avez<br />
achetés ou sur ceux que vous confectionnez<br />
vous-même. Pour renforcer les poches<br />
plaquées et les passants <strong>de</strong> ceintures, utilisez<br />
le bras-libre pour éviter une trop gran<strong>de</strong> masse<br />
<strong>de</strong> tissu alentour <strong>de</strong> l’aiguille.<br />
18 71


