

Instruction Book Libro de Instrucciones Livret d'Instructions ... - Singer
Instruction Book Libro de Instrucciones Livret d'Instructions ... - Singer
Instruction Book Libro de Instrucciones Livret d'Instructions ... - Singer

You also want an ePaper? Increase the reach of your titles
YUMPU automatically turns print PDFs into web optimized ePapers that Google loves.
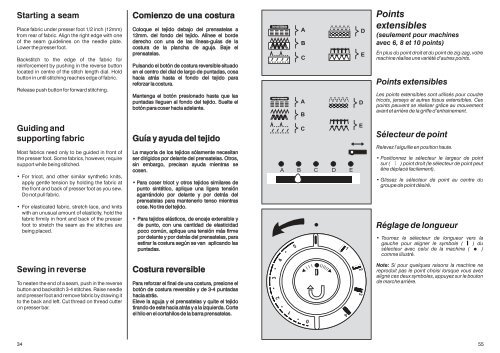
Starting a seam<br />
Place fabric un<strong>de</strong>r presser foot 1/2 inch (12mm)<br />
from rear of fabric. Align the right edge with one<br />
of the seam gui<strong>de</strong>lines on the needle plate.<br />
Lower the presser foot.<br />
Backstitch to the edge of the fabric for<br />
reinforcement by pushing in the reverse button<br />
located in centre of the stitch length dial. Hold<br />
button in until stitching reaches edge of fabric.<br />
Release push button for forward stitching.<br />
Guiding and<br />
supporting fabric<br />
Most fabrics need only to be gui<strong>de</strong>d in front of<br />
the presser foot. Some fabrics, however, require<br />
support while being stitched.<br />
For tricot, and other similar synthetic knits,<br />
apply gentle tension by holding the fabric at<br />
the front and back of presser foot as you sew.<br />
Do not pull fabric.<br />
For elasticated fabric, stretch lace, and knits<br />
with an unusual amount of elasticity, hold the<br />
fabric firmily in front and back of the presser<br />
foot to stretch the seam as the stitches are<br />
being placed.<br />
Sewing in reverse<br />
To neaten the end of a seam, push in the reverse<br />
button and backstitch 3-4 stitches. Raise needle<br />
and presser foot and remove fabric by drawing it<br />
to the back and left. Cut thread on thread cutter<br />
on presser bar.<br />
Comienzo <strong>de</strong> una costura<br />
Coloque el tejido <strong>de</strong>bajo <strong>de</strong>l prensatelas a<br />
12mm. <strong>de</strong>l fondo <strong>de</strong>l tejido. Alínee el bor<strong>de</strong><br />
<strong>de</strong>recho con una <strong>de</strong> las líneas-guías <strong>de</strong> la<br />
costura <strong>de</strong> la plancha <strong>de</strong> aguja. Baje el<br />
prensatelas.<br />
Pulsando el botón <strong>de</strong> costura reversible situado<br />
en el centro <strong>de</strong>l dial <strong>de</strong> largo <strong>de</strong> puntadas, cosa<br />
hacia atrás hasta el fondo <strong>de</strong>l tejido para<br />
reforzar la costura.<br />
Mantenga el botón presionado hasta que las<br />
puntadas lleguen al fondo <strong>de</strong>l tejido. Suelte el<br />
botón para coser hacia a<strong>de</strong>lante.<br />
Guía y ayuda <strong>de</strong>l tejido<br />
La mayoría <strong>de</strong> los tejidos sólamente necesitan<br />
ser dirigidos por <strong>de</strong>lante <strong>de</strong>l prensatelas. Otros,<br />
sin embargo, precisan ayuda mientras se<br />
cosen.<br />
Para coser tricot y otros tejidos similares <strong>de</strong><br />
punto sintético, aplique una ligera tensión<br />
agarrándolo por <strong>de</strong>lante y por <strong>de</strong>trás <strong>de</strong>l<br />
prensatelas para mantenerlo tenso mientras<br />
cose. No tire <strong>de</strong>l tejido.<br />
Para tejidos elásticos, <strong>de</strong> encaje extensible y<br />
<strong>de</strong> punto, con una cantidad <strong>de</strong> elasticidad<br />
poco común, aplique una tensión más firme<br />
por <strong>de</strong>lante y por <strong>de</strong>trás <strong>de</strong>l prensatelas, para<br />
estirar la costura según se van aplicando las<br />
puntadas.<br />
Costura reversible<br />
Para Para reforzar el final <strong>de</strong> <strong>de</strong> una una costura, presione el<br />
botón botón <strong>de</strong> costura costura reversible y <strong>de</strong> 3-4 puntadas<br />
hacia atrás.<br />
Eleve Eleve la aguja y el el prensatelas y quite el tejido<br />
tirando <strong>de</strong> <strong>de</strong> este hacia atrás y a la izquierda. Corte<br />
el hilo hilo en el cortahilos <strong>de</strong> <strong>de</strong> la la barra prensatelas.<br />
34 55<br />
3<br />
2<br />
4<br />
1<br />
5<br />
A<br />
B<br />
C<br />
A<br />
B<br />
C<br />
A B C D E<br />
0<br />
1<br />
4<br />
2<br />
D<br />
E<br />
D<br />
E<br />
3<br />
Points<br />
extensibles<br />
(seulement pour machines<br />
avec 6, 8 et 10 points)<br />
En plus du point droit et du point <strong>de</strong> zig-zag, votre<br />
machine réalise une varièté d’autres points.<br />
Points extensibles<br />
Les points extensibles sont utilisés pour coudre<br />
tricots, jerseys et autres tissus extensibles. Ces<br />
points peuvent se réaliser grâce au mouvement<br />
avant et arrière <strong>de</strong> la griffe d’entrainement.<br />
Sélecteur <strong>de</strong> point<br />
Relevez l’aiguille en position haute.<br />
Positionnez le sélecteur le largeur <strong>de</strong> point<br />
sur ( ) point droit (le sélecteur <strong>de</strong> point peut<br />
être déplacé facilement).<br />
Glissez le sélecteur <strong>de</strong> point au centre du<br />
groupe <strong>de</strong> point désiré.<br />
Réglage <strong>de</strong> longueur<br />
Tournez le sélecteur <strong>de</strong> longueur vers la<br />
gauche pour aligner le symbole ( ) du<br />
sélecteur avec celui <strong>de</strong> la machine ( )<br />
comme illustré.<br />
Note: Si pour quelques raisons la machine ne<br />
reproduit pas le point choisi lorsque vous avez<br />
aligné ces <strong>de</strong>ux symboles, appuyez sur le bouton<br />
<strong>de</strong> marche arrière.


