

Instruction Book Libro de Instrucciones Livret d'Instructions ... - Singer
Instruction Book Libro de Instrucciones Livret d'Instructions ... - Singer
Instruction Book Libro de Instrucciones Livret d'Instructions ... - Singer

You also want an ePaper? Increase the reach of your titles
YUMPU automatically turns print PDFs into web optimized ePapers that Google loves.
1Getting to know your machine<br />
Conocimiento <strong>de</strong> su máquina<br />
Faites connaissance avec votre machine<br />
Principal<br />
parts<br />
Partes<br />
principales<br />
principales<br />
Pièces<br />
principales<br />
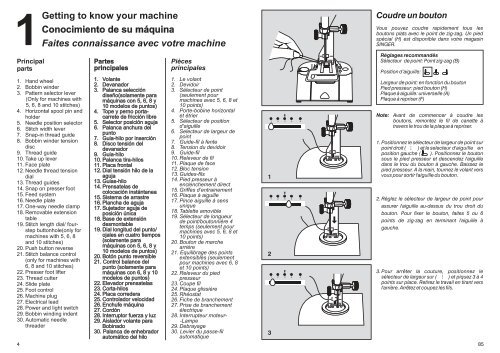
Coudre un bouton<br />
Vous pouvez coudre rapi<strong>de</strong>ment tous les<br />
boutons plats avec le point <strong>de</strong> zig-zag. Un pied<br />
spécial (H) est disponible dans votre magasin<br />
SINGER.<br />
Réglages recommandés<br />
Sélecteur <strong>de</strong> point: Point zig-zag (B)<br />
1. Hand wheel<br />
2. Bobbin win<strong>de</strong>r<br />
3. Pattern selector lever<br />
(Only for machines with<br />
5, 6, 8 and 10 stitches)<br />
4. Horizontal spool pin and<br />
hol<strong>de</strong>r<br />
5. Needle position selector<br />
6. Stitch width lever<br />
7. Snap-in thread gui<strong>de</strong><br />
8. Bobbin win<strong>de</strong>r tension<br />
disc<br />
9. Thread gui<strong>de</strong><br />
10. Take up lever<br />
11. Face plate<br />
12. Needle thread tension<br />
dial<br />
13. Thread gui<strong>de</strong>s<br />
14. Snap on presser foot<br />
15. Feed system<br />
16. Needle plate<br />
17. One-way needle clamp<br />
18. Removable extension<br />
table<br />
19. Stitch length dial/ fourstep<br />
buttonhole(only for<br />
machines with 5, 6, 8<br />
and 10 stitches)<br />
20. Push button reverse<br />
21. Stitch balance control<br />
(only for machines with<br />
6, 8 and 10 stitches)<br />
22. Presser foot lifter<br />
23. Thread cutter<br />
24. Sli<strong>de</strong> plate<br />
25. Foot control<br />
26. Machine plug<br />
27. Electrical lead<br />
28. Power and light switch<br />
29. Bobbin winding in<strong>de</strong>nt<br />
30. Automatic needle<br />
threa<strong>de</strong>r<br />
1. Volante<br />
2. Devanador<br />
3. Palanca selección<br />
diseño(solamente para<br />
máquinas con 5, 6, 8 y<br />
10 mo<strong>de</strong>los <strong>de</strong> puntos)<br />
4. Tope y perno portacarrete<br />
<strong>de</strong> fricción libre<br />
5. Selector posición aguja<br />
6. Palanca anchura <strong>de</strong>l<br />
punto<br />
7. Guia-hilo por inserción<br />
8. Disco tensión <strong>de</strong>l<br />
<strong>de</strong>vanador<br />
9. Guia-hilo<br />
10. Palanca tira-hilos<br />
11. Placa frontal<br />
12. Dial tensión hilo <strong>de</strong> la<br />
aguja<br />
13. Guias-hilo<br />
14. Prensatelas <strong>de</strong><br />
colocación instántanea<br />
15. Sistema <strong>de</strong> arrastre<br />
16. Plancha <strong>de</strong> aguja<br />
17. Sujetador aguja <strong>de</strong><br />
posición única<br />
18. Base <strong>de</strong> extensión<br />
<strong>de</strong>smontable<br />
19. Dial longitud <strong>de</strong>l punto/<br />
ojales en cuatro tiempos<br />
(solamente para<br />
máquinas con 5, 6, 8 y<br />
10 mo<strong>de</strong>los <strong>de</strong> puntos)<br />
20. Botón punto reversible<br />
21. Control balance <strong>de</strong>l<br />
punto (solamente para<br />
máquinas con 6, 88y10 y 10<br />
mo<strong>de</strong>los <strong>de</strong> puntos)<br />
22. Elevador prensatelas<br />
23. Corta-hilos<br />
24. Placa corre<strong>de</strong>ra<br />
25. Controlador velocidad<br />
26. Enchufe máquina<br />
27. Cordón<br />
28. Interruptor fuerza y luz<br />
29. Aislador volante para<br />
Bobinado<br />
1. Le volant<br />
2. Devidoir<br />
3. Sélecteur <strong>de</strong> point<br />
(seulement pour<br />
machines avec 5, 6, 8 et<br />
10 points)<br />
4. Porte-bobine horizontal<br />
et étrier<br />
5. Sélecteur <strong>de</strong> position<br />
d’aiguille<br />
6. Selecteur <strong>de</strong> largeur <strong>de</strong><br />
point<br />
7. Gui<strong>de</strong>-fil à fente<br />
8. Tension du <strong>de</strong>vidoir<br />
9. Gui<strong>de</strong>-fil<br />
10. Releveur <strong>de</strong> fil<br />
11. Plaque <strong>de</strong> face<br />
12. Bloc tension<br />
13. Gui<strong>de</strong>s-fils<br />
14. Pied presseur à<br />
enclenchement direct<br />
15. Griffes d’entrainement<br />
16. Plaque à aiguille<br />
17. Pince aiguille à sens<br />
unique<br />
18. Tablette amovible<br />
19. Sélecteur <strong>de</strong> longueur<br />
<strong>de</strong> point/boutonnière 4<br />
temps (seulement pour<br />
machines avec 5, 6, 8 et<br />
10 points)<br />
20. Bouton <strong>de</strong> marche<br />
arrière<br />
21. Equilibrage <strong>de</strong>s points<br />
extensibles (seulement<br />
pour machines avec 6, 8<br />
et 10 points)<br />
22. Releveur du pied<br />
presseur<br />
23. Coupe fil<br />
24. Plaque glissière<br />
25. Rhéostat<br />
26. Fiche <strong>de</strong> branchement<br />
27. Prise <strong>de</strong> branchement<br />
électrique<br />
28. Interrupteur moteur-<br />
-Lampe<br />
29. Debrayage<br />
1<br />
1<br />
1<br />
2<br />
1<br />
2<br />
2<br />
2<br />
3<br />
3<br />
3<br />
4<br />
4<br />
4<br />
5<br />
5<br />
5<br />
Position d’aiguille:<br />
Largeur <strong>de</strong> point: en fonction du bouton<br />
Pied presseur: pied bouton (H)<br />
Plaque à aiguille: universelle (A)<br />
Plaque à repriser (F)<br />
Note: Avant <strong>de</strong> commencer à coudre les<br />
boutons, remontez le fil <strong>de</strong> canette à<br />
travers le trou <strong>de</strong> la plaque à repriser.<br />
1. Positionnez le sélecteur <strong>de</strong> largeur <strong>de</strong> point sur<br />
point droit ( ) et le selecteur d'aiguille en<br />
position gauche ( ). Positionnez le bouton<br />
sous le pied presseur et <strong>de</strong>scen<strong>de</strong>z l'aiguille<br />
dans le trou du bouton à gauche. Baissez le<br />
pied presseur. A la main, tournez le volant vers<br />
vous pour sortir l'aiguille du bouton.<br />
2. Réglez le sélecteur <strong>de</strong> largeur <strong>de</strong> point pour<br />
assurer l'aiguille au-<strong>de</strong>ssus du trou droit du<br />
bouton. Pour fixer le bouton, faites 5 ou 6<br />
points <strong>de</strong> zig-zag en terminant l'aiguille à<br />
gauche.<br />
3. Pour arrêter la couture, positionnez le<br />
sélecteur <strong>de</strong> largeur sur ( ) et piquez 3 à 4<br />
points sur place. Retirez le travail en tirant vers<br />
l'arrière. Arrêtez et coupez les fils.<br />
30. Palanca <strong>de</strong> enhebrador<br />
automático <strong>de</strong>l hilo<br />
30. Levier du passe-fil<br />
automatique<br />
3<br />
4 85


