RADIO CONTROLLED 3D HELICOPTER - Tamiya
RADIO CONTROLLED 3D HELICOPTER - Tamiya
RADIO CONTROLLED 3D HELICOPTER - Tamiya
- No tags were found...

Create successful ePaper yourself
Turn your PDF publications into a flip-book with our unique Google optimized e-Paper software.
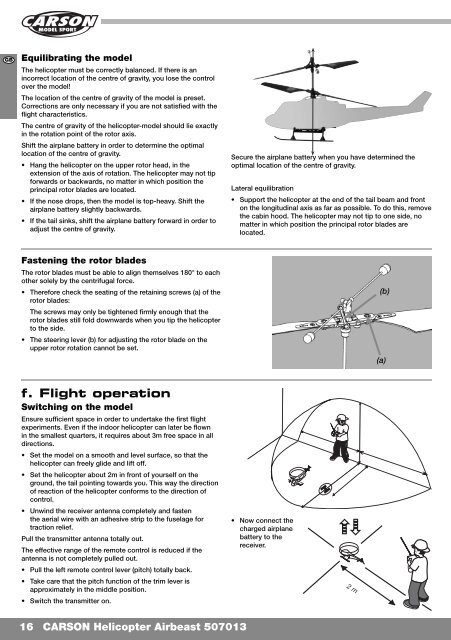
GBEquilibrating the modelThe helicopter must be correctly balanced. If there is anincorrect location of the centre of gravity, you lose the controlover the model!The location of the centre of gravity of the model is preset.Corrections are only necessary if you are not satisfied with theflight characteristics.The centre of gravity of the helicopter-model should lie exactlyin the rotation point of the rotor axis.Shift the airplane battery in order to determine the optimallocation of the centre of gravity.• Hang the helicopter on the upper rotor head, in theextension of the axis of rotation. The helicopter may not tipforwards or backwards, no matter in which position theprincipal rotor blades are located.• If the nose drops, then the model is top-heavy. Shift theairplane battery slightly backwards.• If the tail sinks, shift the airplane battery forward in order toadjust the centre of gravity.Secure the airplane battery when you have determined theoptimal location of the centre of gravity.Lateral equilibration• Support the helicopter at the end of the tail beam and fronton the longitudinal axis as far as possible. To do this, removethe cabin hood. The helicopter may not tip to one side, nomatter in which position the principal rotor blades arelocated.Fastening the rotor bladesThe rotor blades must be able to align themselves 180° to eachother solely by the centrifugal force.• Therefore check the seating of the retaining screws (a) of therotor blades:The screws may only be tightened firmly enough that therotor blades still fold downwards when you tip the helicopterto the side.• The steering lever (b) for adjusting the rotor blade on theupper rotor rotation cannot be set.(b)(a)f. Flight operationSwitching on the modelEnsure sufficient space in order to undertake the first flightexperiments. Even if the indoor helicopter can later be flownin the smallest quarters, it requires about 3m free space in alldirections.• Set the model on a smooth and level surface, so that thehelicopter can freely glide and lift off.• Set the helicopter about 2m in front of yourself on theground, the tail pointing towards you. This way the directionof reaction of the helicopter conforms to the direction ofcontrol.• Unwind the receiver antenna completely and fastenthe aerial wire with an adhesive strip to the fuselage fortraction relief.Pull the transmitter antenna totally out.The effective range of the remote control is reduced if theantenna is not completely pulled out.• Pull the left remote control lever (pitch) totally back.• Take care that the pitch function of the trim lever isapproximately in the middle position.• Switch the transmitter on.• Now connect thecharged airplanebattery to thereceiver.2 m16CARSON Helicopter Airbeast 507013