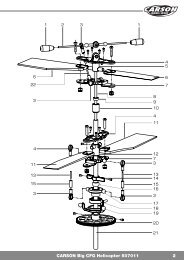
RADIO CONTROLLED 3D HELICOPTER - Tamiya
RADIO CONTROLLED 3D HELICOPTER - Tamiya
RADIO CONTROLLED 3D HELICOPTER - Tamiya
- No tags were found...

Create successful ePaper yourself
Turn your PDF publications into a flip-book with our unique Google optimized e-Paper software.
The LED (1) on the receiver begins to blink. This indicates thatthe electric circuit of the electronic gyro is calibrating itself.The model may now not be moved!When the process is concluded and the receiver is receivingcorrect signals the LED lights up continuously.If the LED blinks slowly, then the battery voltage is too low.Recharge the battery or replace it with an original replacementbattery!Bring all control levers into the neutralposition.• Move the left control lever slightly forward, until the modeljust lifts off from the ground.• Pull the control lever slowly back again, so that the modelgently alights.Move thecontrolextremelydelicately!GB(1)Check the effective range of the remotecontrol transmitterBefore every first start or after a crash, check the function andeffective range of the RC equipment!In the neutral position of the control lever of nick and roll, thewobble plate should also be in neutral position.If this is not the case, correct the position with the trim levers ofthe respective control channel on the transmitter.• Move slowly away from the model (motor is not running!).• Consecutively press the remote control levers nick and rolland• observe the reactions of the model.The RC equipment works faultlessly if from about 30 mdistance the model still correctly responds to the remotecontrol signals. The maximum range of the transmitter is about100 m.Never drive the model if the remote control does not workproperly! A malfunction of the radio may cause damage to themodel, property and/or serious injury.Trimming the helicoptersAlready shortly before the helicopter takes off, you canrecognize whether it wants to turn or glide in a particulardirection.Correct the deviations from the vertical ascent with the trimslider of the tail function.Tip of the fuselage turns to the right:• Reduce speed and push the trim slider of the tail function onthe left remote control lever stepwise to the left.• Push the pitch-lever forward again and check whether thecorrection was sufficient, if necessary shift the trim further tothe left.• Repeat the process until the helicopter no longer shows atendency to turn to the right.Tip of the fuselage turns to the left:• Proceed as described above, but push the trim slider of thetail function stepwise to the right.CARSON Helicopter Airbeast 50701317