

Pioneer KRL-46V - User manual - allemand, anglais, espagnol, français, italien, néerlandais, russe
Pioneer KRL-46V - User manual - allemand, anglais, espagnol, français, italien, néerlandais, russe
Pioneer KRL-46V - User manual - allemand, anglais, espagnol, français, italien, néerlandais, russe

You also want an ePaper? Increase the reach of your titles
YUMPU automatically turns print PDFs into web optimized ePapers that Google loves.
TV<br />
INPUT<br />
1 2 3 4<br />
5 6 7 8<br />
TV DTV RADIO<br />
1 2 3<br />
4 5 6<br />
7 8 9<br />
INFO<br />
0 P.INFO<br />
CH RETURN<br />
P<br />
DVD TOPMENU/<br />
EXIT<br />
GUIDE<br />
EPG<br />
ENTER<br />
HOME<br />
MENU<br />
RETURN<br />
MENU<br />
HDMI<br />
REC STOP<br />
CTRL<br />
SCREEN AV<br />
CM SKIP<br />
SIZE SELECTION<br />
TOOLS DVD HDD<br />
SOURCE<br />
SELECT<br />
TV DVD<br />
STB DVR VCR<br />
Preparation<br />
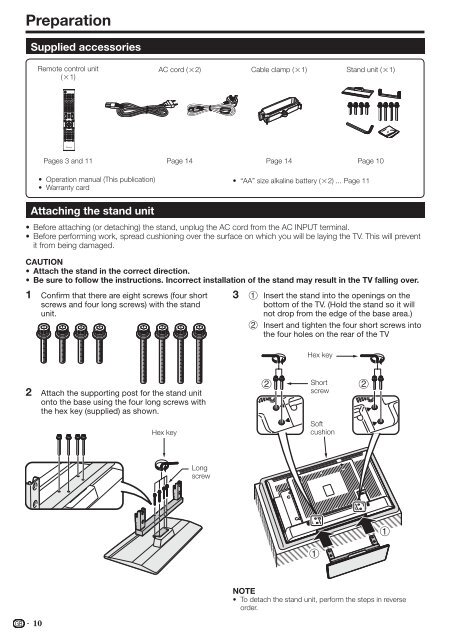
Supplied accessories<br />
Remote control unit<br />
(g1)<br />
AC cord (g2)<br />
Cable clamp (g1)<br />
Stand unit (g1)<br />
Pages 3 and 11 Page 14<br />
Page 14<br />
Page 10<br />
•<br />
•<br />
Operation <strong>manual</strong> (This publication)<br />
Warranty card<br />
• “AA” size alkaline battery (g2) ... Page 11<br />
•<br />
•<br />
1<br />
Attaching the stand unit<br />
Before attaching (or detaching) the stand, unplug the AC cord from the AC INPUT terminal.<br />
Before performing work, spread cushioning over the surface on which you will be laying the TV. This will prevent<br />
it from being damaged.<br />
CAUTION<br />
• Attach the stand in the correct direction.<br />
• Be sure to follow the instructions. Incorrect installation of the stand may result in the TV falling over.<br />
Confirm that there are eight screws (four short<br />
screws and four long screws) with the stand<br />
unit.<br />
3<br />
1<br />
2<br />
Insert the stand into the openings on the<br />
bottom of the TV. (Hold the stand so it will<br />
not drop from the edge of the base area.)<br />
Insert and tighten the four short screws into<br />
the four holes on the rear of the TV<br />
Hex key<br />
2<br />
Attach the supporting post for the stand unit<br />
onto the base using the four long screws with<br />
the hex key (supplied) as shown.<br />
Hex key<br />
Short<br />
screw<br />
Soft<br />
cushion<br />
Long<br />
screw<br />
10<br />
NOTE<br />
• To detach the stand unit, perform the steps in reverse<br />
order.


