

Sony DTC-ZE700 - DTC-ZE700 Consignes d’utilisation Anglais
Sony DTC-ZE700 - DTC-ZE700 Consignes d’utilisation Anglais
Sony DTC-ZE700 - DTC-ZE700 Consignes d’utilisation Anglais

You also want an ePaper? Increase the reach of your titles
YUMPU automatically turns print PDFs into web optimized ePapers that Google loves.
POWER<br />
TIMER<br />
REC OFF PLAY<br />
AUTO<br />
RENUMBER<br />
START ID<br />
REHEARSAL<br />
WRITE<br />
ERASE<br />
MODE<br />
RESET<br />
MARGIN<br />
RESET<br />
OPEN/CLOSE<br />
AMS<br />
ANALOG<br />
OPTICAL<br />
COAXIAL<br />
INPUT<br />
•<br />
48 kHz<br />
44.1 kHz<br />
LONG<br />
REC MODE<br />
STANDARD<br />
•<br />
• •<br />
SBM<br />
ON<br />
OFF<br />
REC MUTE<br />
REC<br />
•<br />
•<br />
3<br />
REC LEVEL<br />
5<br />
4<br />
PHONES<br />
PHONE LEVEL<br />
0<br />
L<br />
R<br />
2 8<br />
1<br />
•<br />
•<br />
0<br />
•<br />
•<br />
6<br />
10<br />
•<br />
•<br />
7<br />
9<br />
•<br />
•<br />
10<br />
POWER<br />
TIMER<br />
REC OFF PLAY<br />
AUTO<br />
RENUMBER<br />
START ID<br />
REHEARSAL<br />
WRITE<br />
ERASE<br />
MODE<br />
RESET<br />
MARGIN<br />
RESET<br />
OPEN/CLOSE<br />
AMS<br />
ANALOG<br />
OPTICAL<br />
COAXIAL<br />
INPUT<br />
•<br />
48 kHz<br />
44.1 kHz<br />
LONG<br />
REC MODE<br />
STANDARD<br />
•<br />
• •<br />
SBM<br />
ON<br />
OFF<br />
REC MUTE<br />
REC<br />
•<br />
•<br />
3<br />
1<br />
REC LEVEL<br />
5<br />
4<br />
•<br />
0<br />
PHONES<br />
•<br />
L<br />
PHONE LEVEL<br />
0<br />
6<br />
10<br />
R<br />
2 8<br />
•<br />
•<br />
•<br />
•<br />
7<br />
•<br />
9<br />
•<br />
10<br />
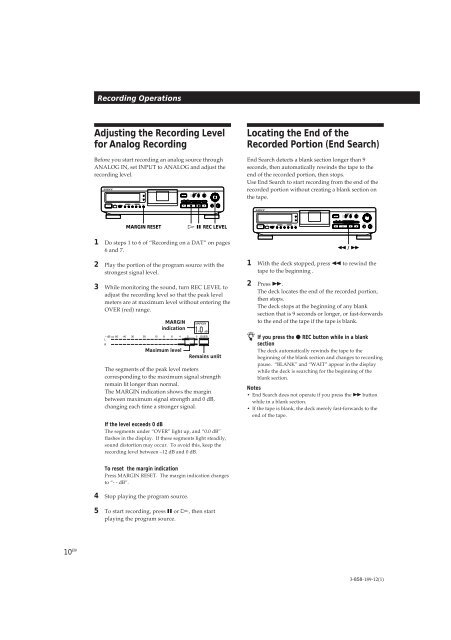
Adjusting the Recording Level<br />
for Analog Recording<br />
Before you start recording an analog source through<br />
ANALOG IN, set INPUT to ANALOG and adjust the<br />
recording level.<br />
Recording Operations<br />
g<br />
MARGIN RESET<br />
Maximum level<br />
10 EN<br />
§<br />
≠<br />
±<br />
• •<br />
0<br />
)<br />
p · P r<br />
• •<br />
· P REC LEVEL<br />
1 Do steps 1 to 6 of “Recording on a DAT” on pages<br />
6 and 7.<br />
2 Play the portion of the program source with the<br />
strongest signal level.<br />
3 While monitoring the sound, turn REC LEVEL to<br />
adjust the recording level so that the peak level<br />
meters are at maximum level without entering the<br />
OVER (red) range.<br />
MARGIN<br />
indication<br />
1.0<br />
The segments of the peak level meters<br />
corresponding to the maximum signal strength<br />
remain lit longer than normal.<br />
The MARGIN indication shows the margin<br />
between maximum signal strength and 0 dB,<br />
changing each time a stronger signal.<br />
If the level exceeds 0 dB<br />
The segments under “OVER” light up, and “0.0 dB”<br />
flashes in the display. If these segments light steadily,<br />
sound distortion may occur. To avoid this, keep the<br />
recording level between –12 dB and 0 dB.<br />
To reset the margin indication<br />
Press MARGIN RESET. The margin indication changes<br />
to “- - dB”.<br />
4 Stop playing the program source.<br />
R<br />
Remains unlit<br />
5 To start recording, press P or ·, then start<br />
playing the program source.<br />
Locating the End of the<br />
Recorded Portion (End Search)<br />
End Search detects a blank section longer than 9<br />
seconds, then automatically rewinds the tape to the<br />
end of the recorded portion, then stops.<br />
Use End Search to start recording from the end of the<br />
recorded portion without creating a blank section on<br />
the tape.<br />
g<br />
§<br />
≠<br />
±<br />
• •<br />
0<br />
)<br />
p · P r<br />
0 / )<br />
1 With the deck stopped, press 0 to rewind the<br />
tape to the beginning .<br />
2 Press ).<br />
The deck locates the end of the recorded portion,<br />
then stops.<br />
The deck stops at the beginning of any blank<br />
section that is 9 seconds or longer, or fast-forwards<br />
to the end of the tape if the tape is blank.<br />
z If you press the r REC button while in a blank<br />
section<br />
The deck automatically rewinds the tape to the<br />
beginning of the blank section and changes to recording<br />
pause. “BLANK” and “WAIT” appear in the display<br />
while the deck is searching for the beginning of the<br />
blank section.<br />
Notes<br />
• End Search does not operate if you press the ) button<br />
while in a blank section.<br />
• If the tape is blank, the deck merely fast-forwards to the<br />
end of the tape.<br />
• •<br />
R<br />
3-858-189-12(1)


