B-DUAL - Britax Römer
B-DUAL - Britax Römer
B-DUAL - Britax Römer

You also want an ePaper? Increase the reach of your titles
YUMPU automatically turns print PDFs into web optimized ePapers that Google loves.
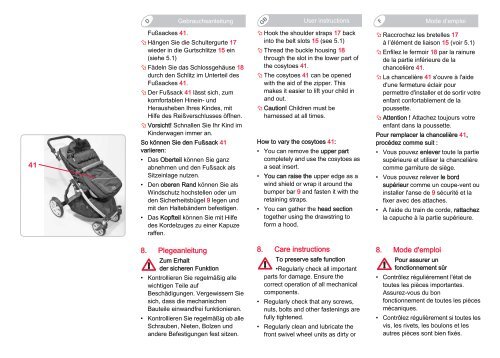
Fußsackes 41.<br />
� Hängen Sie die Schultergurte 17<br />
wieder in die Gurtschlitze 15 ein<br />
(siehe 5.1)<br />
� Fädeln Sie das Schlossgehäuse 18<br />
durch den Schlitz im Unterteil des<br />
Fußsackes 41.<br />
� Der Fußsack 41 lässt sich, zum<br />
komfortablen Hinein- und<br />
Herausheben Ihres Kindes, mit<br />
Hilfe des Reißverschlusses öffnen.<br />
� Vorsicht! Schnallen Sie Ihr Kind im<br />
Kinderwagen immer an.<br />
So können Sie den Fußsack 41<br />
variieren:<br />
• Das Oberteil können Sie ganz<br />
abnehmen und den Fußsack als<br />
Sitzeinlage nutzen.<br />
• Den oberen Rand können Sie als<br />
Windschutz hochstellen oder um<br />
den Sicherheitsbügel 9 legen und<br />
mit den Haltebändern befestigen.<br />
• Das Kopfteil können Sie mit Hilfe<br />
des Kordelzuges zu einer Kapuze<br />
raffen.<br />
8. Plegeanleitung<br />
Zum Erhalt<br />
der sicheren Funktion<br />
• Kontrollieren Sie regelmäßig alle<br />
wichtigen Teile auf<br />
Beschädigungen. Vergewissern Sie<br />
sich, dass die mechanischen<br />
Bauteile einwandfrei funktionieren.<br />
• Kontrollieren Sie regelmäßig ob alle<br />
Schrauben, Nieten, Bolzen und<br />
andere Befestigungen fest sitzen.<br />
� Hook the shoulder straps 17 back<br />
into the belt slots 15 (see 5.1)<br />
� Thread the buckle housing 18<br />
through the slot in the lower part of<br />
the cosytoes 41.<br />
� The cosytoes 41 can be opened<br />
with the aid of the zipper. This<br />
makes it easier to lift your child in<br />
and out.<br />
� Caution! Children must be<br />
harnessed at all times.<br />
How to vary the cosytoes 41:<br />
• You can remove the upper part<br />
completely and use the cosytoes as<br />
a seat insert.<br />
• You can raise the upper edge as a<br />
wind shield or wrap it around the<br />
bumper bar 9 and fasten it with the<br />
retaining straps.<br />
• You can gather the head section<br />
together using the drawstring to<br />
form a hood.<br />
8. Care instructions<br />
To preserve safe function<br />
•Regularly check all important<br />
parts for damage. Ensure the<br />
correct operation of all mechanical<br />
components.<br />
• Regularly check that any screws,<br />
nuts, bolts and other fastenings are<br />
fully tightened.<br />
• Regularly clean and lubricate the<br />
front swivel wheel units as dirty or<br />
� Raccrochez les bretelles 17<br />
à l’élément de liaison 15 (voir 5.1)<br />
� Enfilez le fermoir 18 par la rainure<br />
de la partie inférieure de la<br />
chancelière 41.<br />
� La chancelière 41 s'ouvre à l'aide<br />
d'une fermeture éclair pour<br />
permettre d'installer et de sortir votre<br />
enfant confortablement de la<br />
poussette.<br />
� Attention ! Attachez toujours votre<br />
enfant dans la poussette.<br />
Pour remplacer la chancelière 41,<br />
procédez comme suit :<br />
• Vous pouvez enlever toute la partie<br />
supérieure et utiliser la chancelière<br />
comme garniture de siège.<br />
• Vous pouvez relever le bord<br />
supérieur comme un coupe-vent ou<br />
installer l'anse de 9 sécurité et la<br />
fixer avec des attaches.<br />
• A l'aide du train de corde, rattachez<br />
la capuche à la partie supérieure.<br />
8. Mode d'emploi<br />
Pour assurer un<br />
fonctionnement sûr<br />
• Contrôlez régulièrement l'état de<br />
toutes les pièces importantes.<br />
Assurez-vous du bon<br />
fonctionnement de toutes les pièces<br />
mécaniques.<br />
• Contrôlez régulièrement si toutes les<br />
vis, les rivets, les boulons et les<br />
autres pièces sont bien fixés.