

MEGA® IAB CATHETER INSTRUCTIONS FOR USE - Maquet
MEGA® IAB CATHETER INSTRUCTIONS FOR USE - Maquet
MEGA® IAB CATHETER INSTRUCTIONS FOR USE - Maquet

You also want an ePaper? Increase the reach of your titles
YUMPU automatically turns print PDFs into web optimized ePapers that Google loves.
| 4 | MEGA <strong>IAB</strong> | Instructions for Use |<br />
8. Ensure that the balloon membrane is inflating and deflating in<br />
an unrestrained manner and not restrained as a result of lodging<br />
beneath a plaque, within a subintimal space, within the subclavian<br />
artery, aortic arch, abdominal aorta, or if the balloon membrane<br />
volume is too large for the specific patient's aorta.<br />
WARNING<br />
If you note any restraint, unusual folding patterns of the balloon<br />
membrane or flexing of the inner lumen immediately reposition the<br />
<strong>IAB</strong> catheter. The life of a balloon membrane may be unpredictably<br />
shortened as a result of restraint, which could lead to a leak.<br />
9. If you observe unusual bleeding or subcutaneous hematoma at the<br />
insertion site, treat appropriately.<br />
10. Evaluate peripheral pulses. If the distal pulse is not satisfactory or<br />
signs of limb ischemia are present, exercise discretion concerning<br />
the continuation of <strong>IAB</strong> pumping.<br />
11. Restrain movement of the <strong>IAB</strong> catheter by securing the suture pads<br />
and the Y-fitting to the skin using the STATLOCK® Stabilization<br />
Device (See Figure 13) or sutures. You also may secure the Y-fitting<br />
to the patient with tape. (See Figure 14)<br />
12. Apply a dressing to the insertion site using sterile technique<br />
according to hospital policy.<br />
NOTE: If using the STATLOCK® Stabilization Device, please refer to the<br />
STATLOCK® Stabilization Device Instructions for Use included in the MEGA<br />
balloon box.<br />
Figure 13<br />
Figure 14<br />
STATLOCK®<br />
STABILIZATION DEVICE<br />
TAPE<br />
SUTURE PADS<br />
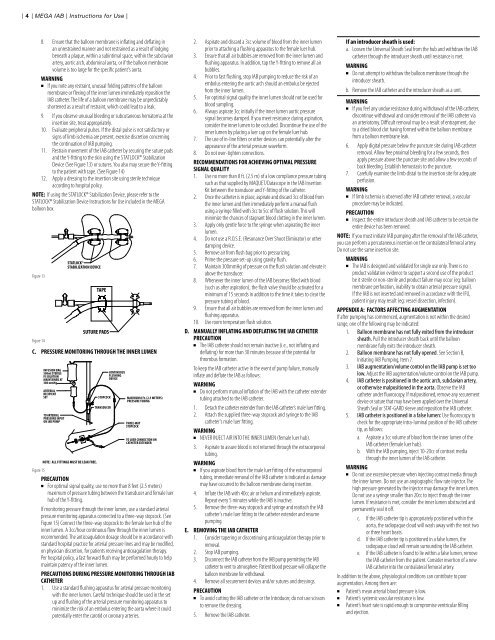
C. PRESSURE MONITORING THROUGH THE INNER LUMEN<br />
Figure 15<br />
INFUSION BAG<br />
500ml STERILE<br />
IV SOLUTION<br />
MAINTAINED AT<br />
300 mmHg<br />
ARTERIAL<br />
RECIPIENT<br />
SET<br />
TO ARTERIAL<br />
PRESSURE INPUT<br />
ON <strong>IAB</strong> PUMP<br />
NOTE: ALL FITTINGS MUST BE LEAK FREE.<br />
STOPCOCK<br />
TRANSDUCER<br />
CONTINUOUS<br />
FLUSHING<br />
DEVICE<br />
MAXIMUM 8 Ft. (2.5 METERS)<br />
PRESSURE TUBING<br />
THREE-WAY<br />
STOPCOCK<br />
TO LUER CONNECTION ON<br />
<strong>CATHETER</strong> EXTENDER<br />
PRECAUTION<br />
For optimal signal quality, use no more than 8 feet (2.5 meters)<br />
maximum of pressure tubing between the transducer and female luer<br />
hub of the Y-fitting.<br />
If monitoring pressure through the inner lumen, use a standard arterial<br />
pressure monitoring apparatus connected to a three-way stopcock. (See<br />
Figure 15) Connect the three-way stopcock to the female luer hub of the<br />
inner lumen. A 3cc/hour continuous flow through the inner lumen is<br />
recommended. The anticoagulation dosage should be in accordance with<br />
standard hospital practice for arterial pressure lines and may be modified,<br />
on physician discretion, for patients receiving anticoagulation therapy.<br />
Per hospital policy, a fast forward flush may be performed hourly to help<br />
maintain patency of the inner lumen.<br />
PRECAUTIONS DURING PRESSURE MONITORING THROUGH <strong>IAB</strong><br />
<strong>CATHETER</strong><br />
1. Use a standard flushing apparatus for arterial pressure monitoring<br />
with the inner lumen. Careful technique should be used in the set<br />
up and flushing of the arterial pressure monitoring apparatus to<br />
minimize the risk of an embolus entering the aorta where it could<br />
potentially enter the carotid or coronary arteries.<br />
2. Aspirate and discard a 3cc volume of blood from the inner lumen<br />
prior to attaching a flushing apparatus to the female luer hub.<br />
3. Ensure that all air bubbles are removed from the inner lumen and<br />
flushing apparatus. In addition, tap the Y-fitting to remove all air<br />
bubbles.<br />
4. Prior to fast flushing, stop <strong>IAB</strong> pumping to reduce the risk of an<br />
embolus entering the aortic arch should an embolus be ejected<br />
from the inner lumen.<br />
5. For optimal signal quality the inner lumen should not be used for<br />
blood sampling.<br />
6. Always aspirate 3cc initially if the inner lumen aortic pressure<br />
signal becomes damped. If you meet resistance during aspiration,<br />
consider the inner lumen to be occluded. Discontinue the use of the<br />
inner lumen by placing a luer cap on the female luer hub.<br />
7. The use of in-line filters or other devices can potentially alter the<br />
appearance of the arterial pressure waveform.<br />
8. Do not over-tighten connections.<br />
RECOMMENDATIONS <strong>FOR</strong> ACHIEVING OPTIMAL PRESSURE<br />
SIGNAL QUALITY<br />
1. Use no more than 8 ft. (2.5 m) of a low compliance pressure tubing<br />
such as that supplied by MAQUET/Datascope in the <strong>IAB</strong> Insertion<br />
Kit between the transducer and Y-fitting of the catheter.<br />
2. Once the catheter is in place, aspirate and discard 3cc of blood from<br />
the inner lumen and then immediately perform a manual flush<br />
using a syringe filled with 3cc to 5cc of flush solution. This will<br />
minimize the chances of stagnant blood clotting in the inner lumen.<br />
3. Apply only gentle force to the syringe when aspirating the inner<br />
lumen.<br />
4. Do not use a R.O.S.E. (Resonance Over Shoot Eliminator) or other<br />
damping device.<br />
5. Remove air from flush bag prior to pressurizing.<br />
6. Prime the pressure set-up using gravity flush.<br />
7. Maintain 300mmHg of pressure on the flush solution and elevate it<br />
above the transducer.<br />
8. Whenever the inner lumen of the <strong>IAB</strong> becomes filled with blood<br />
(such as after aspiration), the flush valve should be activated for a<br />
minimum of 15 seconds in addition to the time it takes to clear the<br />
pressure tubing of blood.<br />
9. Ensure that all air bubbles are removed from the inner lumen and<br />
flushing apparatus.<br />
10. Use room temperature flush solution.<br />
D. MANUALLY INFLATING AND DEFLATING THE <strong>IAB</strong> <strong>CATHETER</strong><br />
PRECAUTION<br />
The <strong>IAB</strong> catheter should not remain inactive (i.e., not inflating and<br />
deflating) for more than 30 minutes because of the potential for<br />
thrombus formation.<br />
To keep the <strong>IAB</strong> catheter active in the event of pump failure, manually<br />
inflate and deflate the <strong>IAB</strong> as follows:<br />
WARNING<br />
Do not perform manual inflation of the <strong>IAB</strong> with the catheter extender<br />
tubing attached to the <strong>IAB</strong> catheter.<br />
1. Detach the catheter extender from the <strong>IAB</strong> catheter’s male luer fitting.<br />
2. Attach the supplied three-way stopcock and syringe to the <strong>IAB</strong><br />
catheter's male luer fitting.<br />
WARNING<br />
NEVER INJECT AIR INTO THE INNER LUMEN (female luer hub).<br />
3. Aspirate to assure blood is not returned through the extracorporeal<br />
tubing.<br />
WARNING<br />
If you aspirate blood from the male luer fitting of the extracorporeal<br />
tubing, immediate removal of the <strong>IAB</strong> catheter is indicated as damage<br />
may have occurred to the balloon membrane during insertion.<br />
4. Inflate the <strong>IAB</strong> with 40cc air or helium and immediately aspirate.<br />
Repeat every 5 minutes while the <strong>IAB</strong> is inactive.<br />
5. Remove the three-way stopcock and syringe and reattach the <strong>IAB</strong><br />
catheter's male luer fitting to the catheter extender and resume<br />
pumping.<br />
E. REMOVING THE <strong>IAB</strong> <strong>CATHETER</strong><br />
1. Consider tapering or discontinuing anticoagulation therapy prior to<br />
removal.<br />
2. Stop <strong>IAB</strong> pumping.<br />
3. Disconnect the <strong>IAB</strong> catheter from the <strong>IAB</strong> pump permitting the <strong>IAB</strong><br />
catheter to vent to atmosphere. Patient blood pressure will collapse the<br />
balloon membrane for withdrawal.<br />
4. Remove all securement devices and/or sutures and dressings.<br />
PRECAUTION<br />
To avoid cutting the <strong>IAB</strong> catheter or the Introducer, do not use scissors<br />
to remove the dressing.<br />
5. Remove the <strong>IAB</strong> catheter.<br />
If an introducer sheath is used:<br />
a. Loosen the Universal Sheath Seal from the hub and withdraw the <strong>IAB</strong><br />
catheter through the introducer sheath until resistance is met.<br />
WARNING<br />
Do not attempt to withdraw the balloon membrane through the<br />
introducer sheath.<br />
b. Remove the <strong>IAB</strong> catheter and the introducer sheath as a unit.<br />
WARNING<br />
If you feel any undue resistance during withdrawal of the <strong>IAB</strong> catheter,<br />
discontinue withdrawal and consider removal of the <strong>IAB</strong> catheter via<br />
an arteriotomy. Difficult removal may be a result of entrapment, due<br />
to a dried blood clot having formed within the balloon membrane<br />
from a balloon membrane leak.<br />
6. Apply digital pressure below the puncture site during <strong>IAB</strong> catheter<br />
removal. Allow free proximal bleeding for a few seconds, then<br />
apply pressure above the puncture site and allow a few seconds of<br />
back bleeding. Establish hemostasis to the puncture.<br />
7. Carefully examine the limb distal to the insertion site for adequate<br />
perfusion.<br />
WARNING<br />
If limb ischemia is observed after <strong>IAB</strong> catheter removal, a vascular<br />
procedure may be indicated.<br />
PRECAUTION<br />
Inspect the entire introducer sheath and <strong>IAB</strong> catheter to be certain the<br />
entire device has been removed.<br />
NOTE: If you must initiate <strong>IAB</strong> pumping after the removal of the <strong>IAB</strong> catheter,<br />
you can perform a percutaneous insertion on the contralateral femoral artery.<br />
Do not use the same insertion site.<br />
WARNING<br />
The <strong>IAB</strong> is designed and validated for single use only. There is no<br />
product validation evidence to support a second use of the product<br />
be it sterile or non-sterile and product failure may occur (eg: balloon<br />
membrane perforation, inability to obtain arterial pressure signal).<br />
If the <strong>IAB</strong> is not inserted and removed in accordance with the IFU,<br />
patient injury may result (eg: vessel dissection, infection).<br />
APPENDIX A: FACTORS AFFECTING AUGMENTATION<br />
If after pumping has commenced, augmentation is not within the desired<br />
range, one of the following may be indicated:<br />
1. Balloon membrane has not fully exited from the introducer<br />
sheath. Pull the introducer sheath back until the balloon<br />
membrane fully exits the introducer sheath.<br />
2. Balloon membrane has not fully opened. See Section B,<br />
Initiating <strong>IAB</strong> Pumping, Item 7.<br />
3. <strong>IAB</strong> augmentation/volume control on the <strong>IAB</strong> pump is set too<br />
low. Adjust the <strong>IAB</strong> augmentation/volume control on the <strong>IAB</strong> pump.<br />
4. <strong>IAB</strong> catheter is positioned in the aortic arch, subclavian artery,<br />
or otherwise malpositioned in the aorta. Observe the <strong>IAB</strong><br />
catheter under fluoroscopy. If malpositioned, remove any securement<br />
device or suture that may have been applied over the Universal<br />
Sheath Seal or STAT-GARD sleeve and reposition the <strong>IAB</strong> catheter.<br />
5. <strong>IAB</strong> catheter is positioned in a false lumen: Use fluoroscopy to<br />
check for the appropriate intra-luminal position of the <strong>IAB</strong> catheter<br />
tip, as follows:<br />
a. Aspirate a 3cc volume of blood from the inner lumen of the<br />
<strong>IAB</strong> catheter (female luer hub).<br />
b. With the <strong>IAB</strong> pumping, inject 10-20cc of contrast media<br />
through the inner lumen of the <strong>IAB</strong> catheter.<br />
WARNING<br />
Do not use excessive pressure when injecting contrast media through<br />
the inner lumen. Do not use an angiographic flow rate injector. The<br />
high pressure generated by the injector may damage the inner lumen.<br />
Do not use a syringe smaller than 20cc to inject through the inner<br />
lumen. If resistance is met, consider the inner lumen obstructed and<br />
permanently seal it off.<br />
c. If the <strong>IAB</strong> catheter tip is appropriately positioned within the<br />
aorta, the radiopaque cloud will wash away with the next two<br />
or three heart beats.<br />
d. If the <strong>IAB</strong> catheter tip is positioned in a false lumen, the<br />
radiopaque cloud will remain surrounding the <strong>IAB</strong> catheter.<br />
e. If the <strong>IAB</strong> catheter is found to lie within a false lumen, remove<br />
the <strong>IAB</strong> catheter from the patient. Consider insertion of a new<br />
<strong>IAB</strong> catheter into the contralateral femoral artery.<br />
In addition to the above, physiological conditions can contribute to poor<br />
augmentation. Among them are:<br />
Patient’s mean arterial blood pressure is low.<br />
Patient’s systemic vascular resistance is low.<br />
Patient’s heart rate is rapid enough to compromise ventricular filling<br />
and ejection.
