ME 545, ME 545 C, ME 545 V - Castorama
ME 545, ME 545 C, ME 545 V - Castorama
ME 545, ME 545 C, ME 545 V - Castorama

You also want an ePaper? Increase the reach of your titles
YUMPU automatically turns print PDFs into web optimized ePapers that Google loves.
Electrical connection<br />
Power supply and operating<br />
voltage must correspond (see<br />
identification plate).<br />
The mains supply voltage<br />
must correspond to the<br />
specified rated voltage of the<br />
appliance.<br />
The power supply cord must<br />
be adequately protected by<br />
fuse (see section “Technical<br />
specifications”).<br />
Only connection cords which<br />
are no lighter than rubber<br />
sheathed cables H07 RN-F<br />
DIN/VDE 0282 and have a<br />
minimum cross section of 3 x<br />
1.5 mm 2 for cable lengths up<br />
to 25 m and 3 x 2.5 mm 2 for<br />
cable lengths up to 50 m<br />
must be used.<br />
The connectors of the<br />
connection cord must be<br />
made of rubber or have a<br />
rubber cover and conform to<br />
the standard DIN/VDE 0620.<br />
This machine is intended for<br />
operation with a power supply<br />
having a system impedance<br />
of Z max at the transfer point<br />
(house connection) of<br />
maximum 0.47 ohms<br />
(at 50Hz).<br />
The user must ensure that<br />
the machine is only operated<br />
with a power supply which<br />
meets this requirement. If<br />
necessary, this information<br />
can be obtained from the<br />
local electric power company.<br />
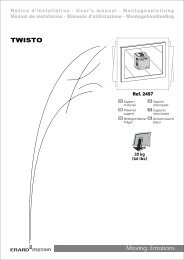
Strain relief<br />
11<br />
During mowing work, the<br />
strain relief prevents any<br />
unintentional disconnection of<br />
the connection cord and<br />
resulting possible damage to<br />
the mains connection on the<br />
appliance.<br />
For this reason, the<br />
connection cord must be fed<br />
through the strain relief.<br />
Form a loop with the<br />
10= connection cord and<br />
guide it through the<br />
11= opening.<br />
Pass the loop over the<br />
12= hook and tighten.<br />
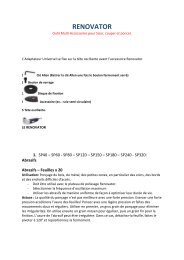
Switching on the lawn<br />
mower<br />
NOTE<br />
12<br />
Do not start the motor in<br />
high grass or when the<br />
mower is set to the lowest<br />
cutting height, as this<br />
makes starting difficult.<br />
Step 1 :<br />
Press<br />
S= start button and hold it<br />
down.<br />
Step 2 :<br />
Press<br />
R= Motorstop lever to the<br />
handlebar and hold.<br />
• The start button can be<br />
released again after<br />
moving the motorstop<br />
lever.<br />
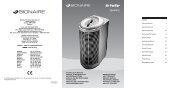
Switching off the lawn<br />
mower<br />
Release the<br />
R= motorstop lever.<br />
The motor and blade<br />
come to a standstill<br />
following a brief rundown<br />
time.<br />
13<br />
CAUTION<br />
Risk of injury!<br />
Always disconnect the<br />
mains plug when leaving<br />
the lawn mower<br />
unattended.<br />
Switching on the<br />
wheel drive <strong>ME</strong> <strong>545</strong> V 14<br />
NOTE<br />
The wheel drive functions<br />
only when the motor is<br />
running.<br />
The vario drive lever (U)<br />
must not be operated when<br />
the motor is stopped as this<br />
may result in damage to the<br />
drive mechanism (lever is<br />
blocked).<br />
Step 1 :<br />
Pull the<br />
T= wheel drive lever to the<br />
handlebar and hold.<br />
The wheel drive<br />
engages.<br />
10 0478 121 9909 E - EN