You also want an ePaper? Increase the reach of your titles
YUMPU automatically turns print PDFs into web optimized ePapers that Google loves.
BDAL 6906_116306906 05.08.13 17:32 Seite 44<br />
t<br />
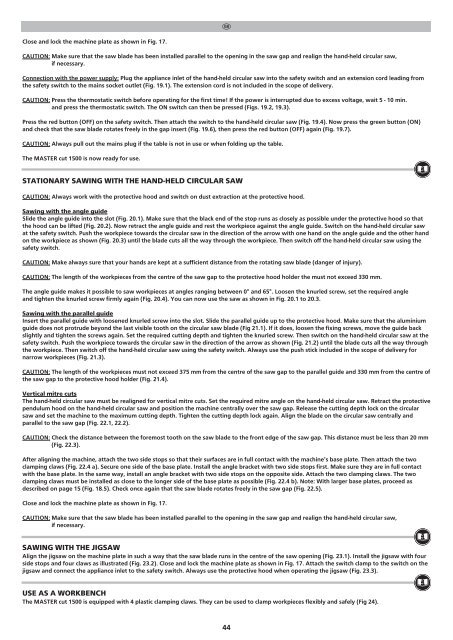
Close and lock the machine plate as shown in Fig. 17.<br />
CAUTION: Make sure that the saw blade has been installed parallel to the opening in the saw gap and realign the hand-held circular saw,<br />
if necessary.<br />
Connection with the power supply: Plug the appliance inlet of the hand-held circular saw into the safety switch and an extension cord leading from<br />
the safety switch to the mains socket outlet (Fig. 19.1). The extension cord is not included in the scope of delivery.<br />
CAUTION: Press the thermostatic switch before operating for the first time! If the power is interrupted due to excess voltage, wait 5 - 10 min.<br />
and press the thermostatic switch. The ON switch can then be pressed (Figs. 19.2, 19.3).<br />
Press the red button (OFF) on the safety switch. Then attach the switch to the hand-held circular saw (Fig. 19.4). Now press the green button (ON)<br />
and check that the saw blade rotates freely in the gap insert (Fig. 19.6), then press the red button (OFF) again (Fig. 19.7).<br />
CAUTION: Always pull out the mains plug if the table is not in use or when folding up the table.<br />
The MASTER cut 1500 is now ready for use.<br />
STATIONARY SAWING WITH THE HAND-HELD CIRCULAR SAW<br />
CAUTION: Always work with the protective hood and switch on dust extraction at the protective hood.<br />
Sawing with the angle guide<br />
Slide the angle guide into the slot (Fig. 20.1). Make sure that the black end of the stop runs as closely as possible under the protective hood so that<br />
the hood can be lifted (Fig. 20.2). Now retract the angle guide and rest the workpiece against the angle guide. Switch on the hand-held circular saw<br />
at the safety switch. Push the workpiece towards the circular saw in the direction of the arrow with one hand on the angle guide and the other hand<br />
on the workpiece as shown (Fig. 20.3) until the blade cuts all the way through the workpiece. Then switch off the hand-held circular saw using the<br />
safety switch.<br />
CAUTION: Make always sure that your hands are kept at a sufficient distance from the rotating saw blade (danger of injury).<br />
CAUTION: The length of the workpieces from the centre of the saw gap to the protective hood holder the must not exceed 330 mm.<br />
The angle guide makes it possible to saw workpieces at angles ranging between 0° and 65°. Loosen the knurled screw, set the required angle<br />
and tighten the knurled screw firmly again (Fig. 20.4). You can now use the saw as shown in Fig. 20.1 to 20.3.<br />
Sawing with the parallel guide<br />
Insert the parallel guide with loosened knurled screw into the slot. Slide the parallel guide up to the protective hood. Make sure that the aluminium<br />
guide does not protrude beyond the last visible tooth on the circular saw blade (Fig 21.1). If it does, loosen the fixing screws, move the guide back<br />
slightly and tighten the screws again. Set the required cutting depth and tighten the knurled screw. Then switch on the hand-held circular saw at the<br />
safety switch. Push the workpiece towards the circular saw in the direction of the arrow as shown (Fig. 21.2) until the blade cuts all the way through<br />
the workpiece. Then switch off the hand-held circular saw using the safety switch. Always use the push stick included in the scope of delivery for<br />
narrow workpieces (Fig. 21.3).<br />
CAUTION: The length of the workpieces must not exceed 375 mm from the centre of the saw gap to the parallel guide and 330 mm from the centre of<br />
the saw gap to the protective hood holder (Fig. 21.4).<br />
Vertical mitre cuts<br />
The hand-held circular saw must be realigned for vertical mitre cuts. Set the required mitre angle on the hand-held circular saw. Retract the protective<br />
pendulum hood on the hand-held circular saw and position the machine centrally over the saw gap. Release the cutting depth lock on the circular<br />
saw and set the machine to the maximum cutting depth. Tighten the cutting depth lock again. Align the blade on the circular saw centrally and<br />
parallel to the saw gap (Fig. 22.1, 22.2).<br />
CAUTION: Check the distance between the foremost tooth on the saw blade to the front edge of the saw gap. This distance must be less than 20 mm<br />
(Fig. 22.3).<br />
After aligning the machine, attach the two side stops so that their surfaces are in full contact with the machine’s base plate. Then attach the two<br />
clamping claws (Fig. 22.4 a). Secure one side of the base plate. Install the angle bracket with two side stops first. Make sure they are in full contact<br />
with the base plate. In the same way, install an angle bracket with two side stops on the opposite side. Attach the two clamping claws. The two<br />
clamping claws must be installed as close to the longer side of the base plate as possible (Fig. 22.4 b). Note: With larger base plates, proceed as<br />
described on page 15 (Fig. 18.5). Check once again that the saw blade rotates freely in the saw gap (Fig. 22.5).<br />
Close and lock the machine plate as shown in Fig. 17.<br />
CAUTION: Make sure that the saw blade has been installed parallel to the opening in the saw gap and realign the hand-held circular saw,<br />
if necessary.<br />
SAWING WITH THE JIGSAW<br />
Align the jigsaw on the machine plate in such a way that the saw blade runs in the centre of the saw opening (Fig. 23.1). Install the jigsaw with four<br />
side stops and four claws as illustrated (Fig. 23.2). Close and lock the machine plate as shown in Fig. 17. Attach the switch clamp to the switch on the<br />
jigsaw and connect the appliance inlet to the safety switch. Always use the protective hood when operating the jigsaw (Fig. 23.3).<br />
USE AS A WORKBENCH<br />
The MASTER cut 1500 is equipped with 4 plastic clamping claws. They can be used to clamp workpieces flexibly and safely (Fig 24).<br />
44


