gb use and maintenance manual blast chiller/shock freezer
gb use and maintenance manual blast chiller/shock freezer
gb use and maintenance manual blast chiller/shock freezer

You also want an ePaper? Increase the reach of your titles
YUMPU automatically turns print PDFs into web optimized ePapers that Google loves.
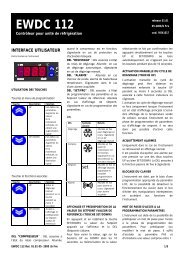
Alarms are also indicated by a message on the display.For certain critical alarms, the message remains on the display permanently until the ca<strong>use</strong> of the alarm has beeneliminated.Critical alarms are:- pressure switch alarm- compartment sensor alarm.For the other alarms, the messages flashes on the display in alternation with other functional signals (e.g.:temperature or execution time).These alarms or signals are as follows:- <strong>blast</strong> chilling / <strong>shock</strong> freezing cycle end;- incorrect <strong>blast</strong> chilling / <strong>shock</strong> freezing cycle end alarm;- prolonged door open alarm;- fan input alarm;- prolonged power failure alarm;- high or low compartment temperature alarm;- 7evaporator sensor or core temperature probe alarm.Some of these alarms are cancelled as soon as the ca<strong>use</strong> is eliminated, whereas other alarms (prolonged powerfailure) remain until the end of the operating cycle (appliance stop) to ensure the <strong>use</strong>r is informed of any anomaloussituations that have occurred during the cycle.4.1.5 ALARM DISPLAY CODESCOMPARTMENT SENSOR FAULT ALARMCORE TEMPERATURE PROBE FAULT ALARMEVAPORATOR SENSOR ALARMCOMPARTMENT LOW TEMPERATURE ALARMCOMPARTMENT HIGH TEMPERATURE ALARMPRESSURE SWITCH ALARMFAN INPUT ALARMDOOR OPEN ALARMPOWER FAILURE ALARMOVER TIME ALARMCPIPEPLiHiALFAOdPFtEr5. OPERATION5.1 STANDARD OPERATIONWhen the control unit is switched ON (ON/OFF) the last cycle to be <strong>use</strong>d flashes on the display; the LEDs relativeto selected functions will also flash.To confirm the last cycle <strong>use</strong>d, press the relative button (button -21- cycles CC1/CC2/CC3, button -23- cyclesCA1/CA2/CA3) followed by the START button (25).Hold down buttons (21) or (23) to select the preset <strong>blast</strong> chilling / <strong>shock</strong> freezing cycles <strong>and</strong> press button (19) toactivate or deactivate the storage function (functions deactivated = LEDs flashing, functions activated = LEDssteadily illuminated).Press the TIME button (17) to select timer-controlled <strong>blast</strong> chilling / <strong>shock</strong> freezing <strong>and</strong> press START to begin the cycle.When the timer-controlled cycle is in progress the display shows the minutes remaining; pressing SET (19) displaysthe set storage temperature; pressing TIME (17) displays the time elapsed since the beginning of the cycle;pressing DISPLAY (14) displays the compartment or core probe temperature, indicated by the two LEDs above the button.If the TIME button (17) is not pressed, the core temperature probe is automatically activated after START. If, afterapproximately 2 minutes, the control unit fails to acknowledge the core temperature probe, timer-controlledoperation is automatically selected: the LED above the TIME button illuminates <strong>and</strong> the core temperature probeLED (5) flashes.At the end of the <strong>blast</strong> chilling / <strong>shock</strong> freezing cycle, the message “END” appears on the display <strong>and</strong> the beepersounds for 10 seconds.The control unit now starts a defrost cycle <strong>and</strong> then switches to storage mode (if selected).The display shows the total duration of the <strong>blast</strong> chilling / <strong>shock</strong> freezing cycle; pressing the TIME button (17) againdisplays the function currently in progress (e.g.: DEF = defrosting).5.1.1 BLAST CHILLING / SHOCK FREEZING PROGRAMS- CC1 hard freezing- CC2 soft freezing- CC3 medium freezing (personalized program)21