istruzioni di installazione e uso calandre mcm use and ... - IMESA SpA
istruzioni di installazione e uso calandre mcm use and ... - IMESA SpA
istruzioni di installazione e uso calandre mcm use and ... - IMESA SpA

You also want an ePaper? Increase the reach of your titles
YUMPU automatically turns print PDFs into web optimized ePapers that Google loves.
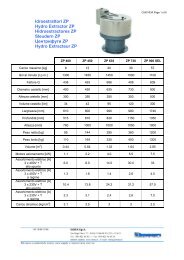
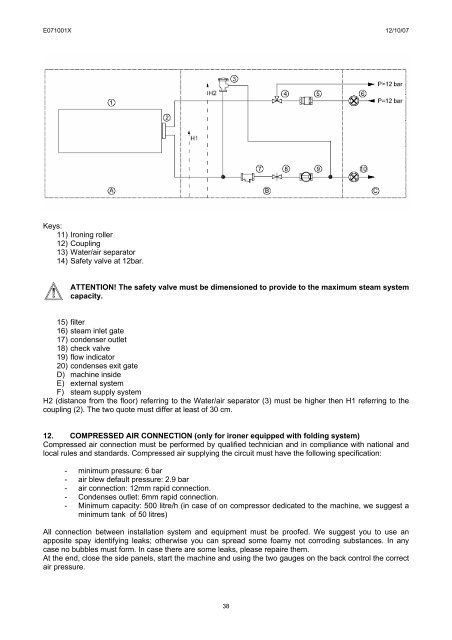
E071001X 12/10/07<br />
Keys:<br />
11) Ironing roller<br />
12) Coupling<br />
13) Water/air separator<br />
14) Safety valve at 12bar.<br />
ATTENTION! The safety valve must be <strong>di</strong>mensioned to provide to the maximum steam system<br />
capacity.<br />
15) filter<br />
16) steam inlet gate<br />
17) condenser outlet<br />
18) check valve<br />
19) flow in<strong>di</strong>cator<br />
20) condenses exit gate<br />
D) machine inside<br />
E) external system<br />
F) steam supply system<br />
H2 (<strong>di</strong>stance from the floor) referring to the Water/air separator (3) must be higher then H1 referring to the<br />
coupling (2). The two quote must <strong>di</strong>ffer at least of 30 cm.<br />
12. COMPRESSED AIR CONNECTION (only for ironer equipped with fol<strong>di</strong>ng system)<br />
Compressed air connection must be performed by qualified technician <strong>and</strong> in compliance with national <strong>and</strong><br />
local rules <strong>and</strong> st<strong>and</strong>ards. Compressed air supplying the circuit must have the following specification:<br />
- minimum pressure: 6 bar<br />
- air blew default pressure: 2.9 bar<br />
- air connection: 12mm rapid connection.<br />
- Condenses outlet: 6mm rapid connection.<br />
- Minimum capacity: 500 litre/h (in case of on compressor de<strong>di</strong>cated to the machine, we suggest a<br />
minimum tank of 50 litres)<br />
All connection between installation system <strong>and</strong> equipment must be proofed. We suggest you to <strong>use</strong> an<br />
apposite spay identifying leaks; otherwise you can spread some foamy not corro<strong>di</strong>ng substances. In any<br />
case no bubbles must form. In case there are some leaks, please repaire them.<br />
At the end, close the side panels, start the machine <strong>and</strong> using the two gauges on the back control the correct<br />
air pressure.<br />
38