istruzioni di installazione e uso calandre mcm use and ... - IMESA SpA
istruzioni di installazione e uso calandre mcm use and ... - IMESA SpA
istruzioni di installazione e uso calandre mcm use and ... - IMESA SpA

You also want an ePaper? Increase the reach of your titles
YUMPU automatically turns print PDFs into web optimized ePapers that Google loves.
E071001X 12/10/07<br />
15. WHAT TO DO IN CASE OF BLACK OUT<br />
In case the electric supply is suddenly cut, one or more clothes may remain between the roller <strong>and</strong> the<br />
ironing belts <strong>and</strong> risck to be burn.<br />
In the set temperature is above 80°C, also the ironing belts may burn.<br />
In this case, please, follow the following procedure.<br />
Insert the crank in the apposite hole on the left side.<br />
Turn the crank in a no clockwise sense, so that the roller turn in the ironing sense.<br />
In the mean time insert wet linen on all the roller length, as when you are normally working, so that the<br />
temperature fall down.<br />
ATTENTION! If the roller temperature is high (over 80°C), insert wet linen on all the roller length, <strong>and</strong> make<br />
the roller turn in order to avoid the ironing belts burn. Stop only when the roller is cold.<br />
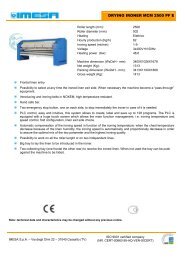
16. WORKING: TURN ON<br />
Before to turn on the machine, please, be sure that the <strong>use</strong>r well underst<strong>and</strong> the machine safety devices.<br />
Turn on the machine following the here below procedure:<br />
- Be sure the emergency crank is on the back of the left side: in case the crank is not there, do no<br />
start to work.<br />
- Close the magneto thermal switch <strong>and</strong> the <strong>di</strong>fferential at the bottom of the supply system, then:<br />
o For ironer with fol<strong>di</strong>ng system:<br />
� Open the compressed air supply<br />
� Be sure that the compressed air pressure is correct<br />
� Be sure that the collecting table are correctly positioned.<br />
o For ironer gas heated:<br />
� Close the electric switch on the back left side (change from position 0 to position 1)<br />
� Be sure that the gas supply is open<br />
� Be sure that the line gas pressure is correct<br />
o For ironer steam heated:<br />
� Close the electric switch on the back left side (change from position 0 to position 1)<br />
� Be sure that the system steam pressure is correct<br />
� Slowly open the steam supply: in one minute time bring it from position OFF to<br />
position ON<br />
ATTENTION: the steam supply device final position ON is dependent on the<br />
ironing temperature reaching! Control with the installer the correct final<br />
position of the steam supply device, in order to make the machine reaching<br />
the wished temperature.<br />
o For ironer electric heated:<br />
� Close the two electric switchs on the back of the left side (change from position 0 to<br />
position 1) in the here below order:<br />
• First: the bipolar switch (on the left), then press the red RESET button<br />
• Second: the quadripole switch (on the right) an its opening coil<br />
17. WORKING: SAFETY DEVICES CONTROL<br />
After the machine is switch on, before to start to work, it is compulsory to control the safety device perfect<br />
working. Each time the machine is switch on, the <strong>use</strong>r must follow the here below procedure.<br />
ACTION to do<br />
On the machine without fol<strong>di</strong>ng system: press<br />
REACTION to obtain<br />
the ON/OFF key on the keypad<br />
On machine with fol<strong>di</strong>ng system: press START<br />
On the machine without fol<strong>di</strong>ng system: press<br />
→ Roller must turn.<br />
the ON/OFF key on the keypad<br />
On machine with fol<strong>di</strong>ng system: press STOP<br />
→ Roller must stop<br />
40