

EN DA DE ES FI FR IT NL NO PT SV - T-SPeC® Instructions For Use ...
EN DA DE ES FI FR IT NL NO PT SV - T-SPeC® Instructions For Use ...
EN DA DE ES FI FR IT NL NO PT SV - T-SPeC® Instructions For Use ...

Create successful ePaper yourself
Turn your PDF publications into a flip-book with our unique Google optimized e-Paper software.
B) Dispose of the surgical blade and capture housing using hospitalapproved<br />
policy for sharps.<br />
<strong>NO</strong>TE: If the surgical blade does not embed in the capture housing<br />
after exiting the patient, it can be removed from its connector with a<br />
hemostat.<br />
STEP 7: PREPARE TO ATTACH CATHETER TO COIL<br />
A) Unlock rear handle by rotating the lock wheel forward.<br />
B) Advance the rear handle to extend coil and bayonet fitting above<br />
the level of the positioning arm (Figure 17).<br />
<strong>FI</strong>GURE 17.<br />
C) Lock the rear handle by rotating the lock wheel rearward.<br />
STEP 8: ATTACH CATHETER TO COIL<br />
A) Align polycarbonate fitting on catheter with bayonet fitting on<br />
coil.<br />
B) Push catheter tip into bayonet fitting and rotate clockwise until<br />
fully seated (Figure 18).<br />
<strong>FI</strong>GURE 18.<br />
C) Remove positioning arm and mast and dispose of using hospitalapproved<br />
policy for potential biohazards.<br />
CAUTION: Confirm that catheter is secure to bayonet fitting on coil<br />
before placing catheter in patient.<br />
8<br />
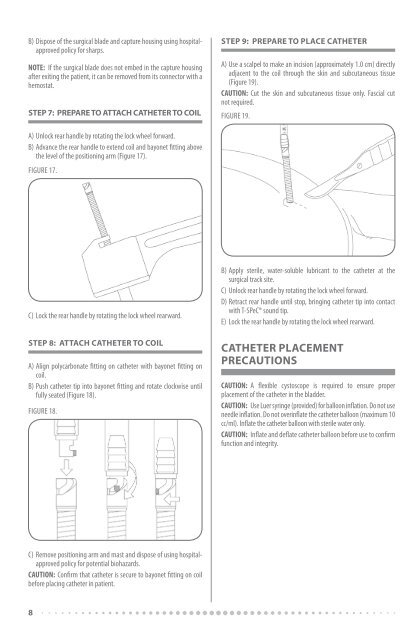
STEP 9: PREPARE TO PLACE CATHETER<br />
A) <strong>Use</strong> a scalpel to make an incision (approximately 1.0 cm) directly<br />
adjacent to the coil through the skin and subcutaneous tissue<br />
(Figure 19).<br />
CAUTION: Cut the skin and subcutaneous tissue only. Fascial cut<br />
not required.<br />
<strong>FI</strong>GURE 19.<br />
B) Apply sterile, water-soluble lubricant to the catheter at the<br />
surgical track site.<br />
C) Unlock rear handle by rotating the lock wheel forward.<br />
D) Retract rear handle until stop, bringing catheter tip into contact<br />
with T-<strong>SPeC®</strong> sound tip.<br />
E) Lock the rear handle by rotating the lock wheel rearward.<br />
CATHETER PLACEM<strong>EN</strong>T<br />
PRECAUTIONS<br />
CAUTION: A flexible cystoscope is required to ensure proper<br />
placement of the catheter in the bladder.<br />
CAUTION: <strong>Use</strong> Luer syringe (provided) for balloon inflation. Do not use<br />
needle inflation. Do not overinflate the catheter balloon (maximum 10<br />
cc/ml). Inflate the catheter balloon with sterile water only.<br />
CAUTION: Inflate and deflate catheter balloon before use to confirm<br />
function and integrity.