Manual de Instrucciones
Manual de Instrucciones
Manual de Instrucciones

You also want an ePaper? Increase the reach of your titles
YUMPU automatically turns print PDFs into web optimized ePapers that Google loves.
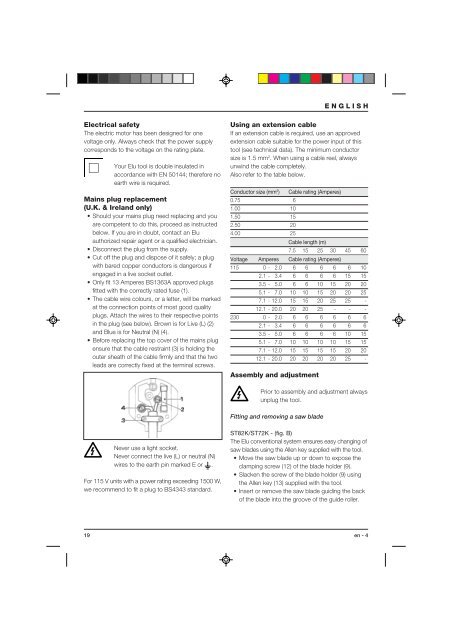
ENGLISHElectrical safetyThe electric motor has been <strong>de</strong>signed for onevoltage only. Always check that the power supplycorresponds to the voltage on the rating plate.Your Elu tool is double insulated inaccordance with EN 50144; therefore noearth wire is required.Mains plug replacement(U.K. & Ireland only)• Should your mains plug need replacing and youare competent to do this, proceed as instructedbelow. If you are in doubt, contact an Eluauthorized repair agent or a qualified electrician.• Disconnect the plug from the supply.• Cut off the plug and dispose of it safely; a plugwith bared copper conductors is dangerous ifengaged in a live socket outlet.• Only fit 13 Amperes BS1363A approved plugsfitted with the correctly rated fuse (1).• The cable wire colours, or a letter, will be markedat the connection points of most good qualityplugs. Attach the wires to their respective pointsin the plug (see below). Brown is for Live (L) (2)and Blue is for Neutral (N) (4).• Before replacing the top cover of the mains plugensure that the cable restraint (3) is holding theouter sheath of the cable firmly and that the twoleads are correctly fixed at the terminal screws.Using an extension cableIf an extension cable is required, use an approve<strong>de</strong>xtension cable suitable for the power input of thistool (see technical data). The minimum conductorsize is 1.5 mm 2 . When using a cable reel, alwaysunwind the cable completely.Also refer to the table below.Conductor size (mm 2 ) Cable rating (Amperes)0.75 61.00 101.50 152.50 204.00 25Cable length (m)7.5 15 25 30 45 60Voltage Amperes Cable rating (Amperes)115 0 - 2.0 6 6 6 6 6 102.1 - 3.4 6 6 6 6 15 153.5 - 5.0 6 6 10 15 20 205.1 - 7.0 10 10 15 20 20 257.1 - 12.0 15 15 20 25 25 -12.1 - 20.0 20 20 25 - - -230 0 - 2.0 6 6 6 6 6 62.1 - 3.4 6 6 6 6 6 63.5 - 5.0 6 6 6 6 10 155.1 - 7.0 10 10 10 10 15 157.1 - 12.0 15 15 15 15 20 2012.1 - 20.0 20 20 20 20 25 -Assembly and adjustmentPrior to assembly and adjustment alwaysunplug the tool.Fitting and removing a saw bla<strong>de</strong>Never use a light socket.Never connect the live (L) or neutral (N)wires to the earth pin marked E or .For 115 V units with a power rating exceeding 1500 W,we recommend to fit a plug to BS4343 standard.ST82K/ST72K - (fig. B)The Elu conventional system ensures easy changing ofsaw bla<strong>de</strong>s using the Allen key supplied with the tool.• Move the saw bla<strong>de</strong> up or down to expose theclamping screw (12) of the bla<strong>de</strong> hol<strong>de</strong>r (9).• Slacken the screw of the bla<strong>de</strong> hol<strong>de</strong>r (9) usingthe Allen key (13) supplied with the tool.• Insert or remove the saw bla<strong>de</strong> guiding the backof the bla<strong>de</strong> into the groove of the gui<strong>de</strong> roller.19 en - 4