Manual de Instrucciones
Manual de Instrucciones
Manual de Instrucciones

Create successful ePaper yourself
Turn your PDF publications into a flip-book with our unique Google optimized e-Paper software.
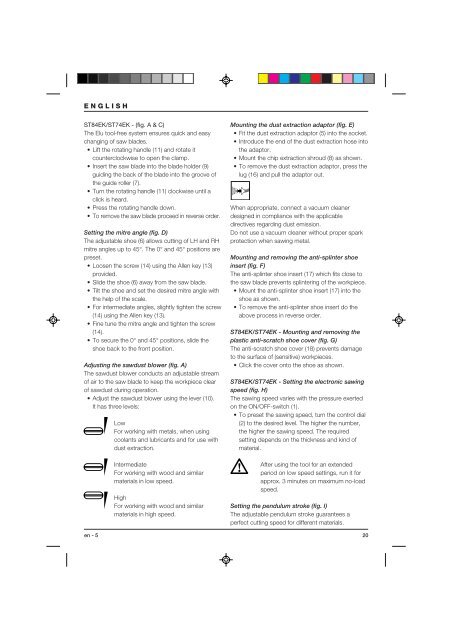
ENGLISHST84EK/ST74EK - (fig. A & C)The Elu tool-free system ensures quick and easychanging of saw bla<strong>de</strong>s.• Lift the rotating handle (11) and rotate itcounterclockwise to open the clamp.• Insert the saw bla<strong>de</strong> into the bla<strong>de</strong> hol<strong>de</strong>r (9)guiding the back of the bla<strong>de</strong> into the groove ofthe gui<strong>de</strong> roller (7).• Turn the rotating handle (11) clockwise until aclick is heard.• Press the rotating handle down.• To remove the saw bla<strong>de</strong> proceed in reverse or<strong>de</strong>r.Setting the mitre angle (fig. D)The adjustable shoe (6) allows cutting of LH and RHmitre angles up to 45°. The 0° and 45° positions arepreset.• Loosen the screw (14) using the Allen key (13)provi<strong>de</strong>d.• Sli<strong>de</strong> the shoe (6) away from the saw bla<strong>de</strong>.• Tilt the shoe and set the <strong>de</strong>sired mitre angle withthe help of the scale.• For intermediate angles, slightly tighten the screw(14) using the Allen key (13).• Fine tune the mitre angle and tighten the screw(14).• To secure the 0° and 45° positions, sli<strong>de</strong> theshoe back to the front position.Adjusting the sawdust blower (fig. A)The sawdust blower conducts an adjustable streamof air to the saw bla<strong>de</strong> to keep the workpiece clearof sawdust during operation.• Adjust the sawdust blower using the lever (10).It has three levels:LowFor working with metals, when usingcoolants and lubricants and for use withdust extraction.IntermediateFor working with wood and similarmaterials in low speed.HighFor working with wood and similarmaterials in high speed.Mounting the dust extraction adaptor (fig. E)• Fit the dust extraction adaptor (5) into the socket.• Introduce the end of the dust extraction hose intothe adaptor.• Mount the chip extraction shroud (8) as shown.• To remove the dust extraction adaptor, press thelug (16) and pull the adaptor out.When appropriate, connect a vacuum cleaner<strong>de</strong>signed in compliance with the applicabledirectives regarding dust emission.Do not use a vacuum cleaner without proper sparkprotection when sawing metal.Mounting and removing the anti-splinter shoeinsert (fig. F)The anti-splinter shoe insert (17) which fits close tothe saw bla<strong>de</strong> prevents splintering of the workpiece.• Mount the anti-splinter shoe insert (17) into theshoe as shown.• To remove the anti-splinter shoe insert do theabove process in reverse or<strong>de</strong>r.ST84EK/ST74EK - Mounting and removing theplastic anti-scratch shoe cover (fig. G)The anti-scratch shoe cover (18) prevents damageto the surface of (sensitive) workpieces.• Click the cover onto the shoe as shown.ST84EK/ST74EK - Setting the electronic sawingspeed (fig. H)The sawing speed varies with the pressure exertedon the ON/OFF-switch (1).• To preset the sawing speed, turn the control dial(2) to the <strong>de</strong>sired level. The higher the number,the higher the sawing speed. The requiredsetting <strong>de</strong>pends on the thickness and kind ofmaterial.After using the tool for an exten<strong>de</strong>dperiod on low speed settings, run it forapprox. 3 minutes on maximum no-loadspeed.Setting the pendulum stroke (fig. I)The adjustable pendulum stroke guarantees aperfect cutting speed for different materials.en - 5 20