Create successful ePaper yourself
Turn your PDF publications into a flip-book with our unique Google optimized e-Paper software.
• Spring failure safety mechanism (prevents<br />
door from dropping if springs fail).<br />
Storage<br />
When storing the door until such time as<br />
it is fitted, it must be protected against the<br />
weather.<br />
Preparation for installation<br />
The door opening and garage floor must<br />
be vertically and horizontally true.<br />
Install door in dry garages only.<br />
1<br />
1n<br />
2<br />
3<br />
NOTE: Painting must be conducted<br />
in accordance with the<br />
specifications in the technical<br />
data section and all environmental<br />
protection directives.<br />
Surface protection<br />
• Take care when using adhesive tape<br />
on painted surfaces. Adhesive tape can<br />
damage the paint.<br />
• Place the door sections on a suitable<br />
surface to protect the surfaces (cardboard<br />
or similar).<br />
• Protect painted surfaces and door skin<br />
against dirt, particularly mortar or whitewash.<br />
• Treat wood skins for long-term protection<br />
of panels with standard commercial<br />
wood preservatives or paints. Apply the<br />
inside and outside paint at the same<br />
time to prevent the wood from warping.<br />
Paint onto dry wood only.<br />
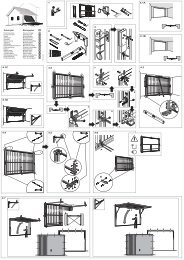
Installation<br />
The numbers next to each step relate to<br />
the figure numbers in the assembly plan.<br />
Read through the instruction manual and<br />
particularly the safety instructions very<br />
carefully and thoroughly before starting<br />
installation. If you are in doubt, contact<br />
your service partner before starting work.<br />
Small parts are important! Should<br />
be considered in the assembly!<br />
WK2-relevant parts are marked in<br />
the illustrative part of the instructions!<br />
Scope of supply<br />
(standard version)<br />
The parts marked in colour are only included<br />
in delivery with doors with a lock.<br />
Additional fastening material can be<br />
purchased.<br />
low-lintel option<br />
Tools required<br />
Preparation for assembly<br />
• Remove boxes A and B along with<br />
accessories.<br />
• Unscrew transport retainers (015) .<br />
NOTE: Pallet screws are needed<br />
when fitting the tandem<br />
holder (step 14).<br />
4 Converting architrave<br />
for the low-lintel door<br />
The low-lintel door variant requires that<br />
you relocate the torsion shaft brackets<br />
(113/117) in the side architraves (103/107).<br />
7-8<br />
8n<br />
<strong>ES</strong> <strong>100</strong> <strong>ZP</strong> N000710-01-00/05<br />
5<br />
6<br />
NOTE: Lay the door sections<br />
on a suitable surface (cardboard,<br />
felt) to prevent damage<br />
to door surfaces.<br />
NOTE: Use the transport protection<br />
also as handling protection<br />
for the panel!<br />
Assemble architrave<br />
structure<br />
• Lay both side architraves (104/108) on<br />
the garage floor in their correct positions.<br />
• Push on architrave seal (121/122).<br />
• Attach lintel architrave (130) between<br />
the side architraves using the self-tapping<br />
screws (024). Note installation position.<br />
The right-angled limb of the lintel<br />
architrave must be at the top.<br />
• Use the cross-retainer (440) with buffer<br />
bracket (445) as a spacer.<br />
In confined spaces: Fit curved elements,<br />
see Fig. 18n / 18s.<br />
Fit mounting bracket<br />
• Befestigungswinkel (150) an den<br />
Seitenzargen (103/107) vormontieren.<br />
Fit architrave structure<br />
CAUTION!<br />
Make sure the door will not fall<br />
over.<br />
• Line up the architrave structure (Fig. 6):<br />
- Position in the centre of the opening<br />
- Check diagonal measurements<br />
NOTE: Align the door using the<br />
spirit level and also check that<br />
the left (103) and right (107) side<br />
You also need to fit the lintel casing parallel<br />
to or in a straight-line with the door leaf.<br />
If necessary, underpin the central bracket<br />
mount using a spacer (252) (253).<br />
• Screw door to the brickwork and the<br />
floor, fingertight only.<br />
• Use the cross-retainer (440) with buffer<br />
bracket (445) as a spacer.<br />
• Check the alignment of the door (Fig. 6):<br />
• Tighten the door screws.<br />
• If the lintel architrave (130) is longer<br />
than 3.25 m: Screw two centre bracket<br />
mounts (251) above the lintel architrave<br />
approx. 700 mm from the centre of the<br />
door.<br />
Fit cable deflector<br />
• Slacken nut (046).<br />
• Place low-lintel cable deflector (280)<br />
from above onto the side architrave<br />
(103/107).<br />
• Tighten nut (046) and secure with selftapping<br />
screw (029).<br />
8s<br />
9s<br />
10-13<br />
14<br />
Fit right-hand<br />
torsion spring unit<br />
• Suspend the torsion shaft holder (217)<br />
of the right (red) torsion spring unit<br />
(208).<br />
NOTE: The cable end on the<br />
cable pulley must be hanging<br />
down on the outside of the<br />
garage door.<br />
Fit left-hand torsion<br />
spring unit<br />
• Fit the left (black) torsion spring unit<br />
(204) in the same way.<br />
• Push the coupling (245) in the middle<br />
over the torsion shaft ends. Check opening<br />
of the coupling (245).<br />
• Screw coupling screws (043) fingertight<br />
on one side of the coupling.<br />
• Align torsion pipe in a straight line<br />
– adjust the centre bearing (255).<br />
Fit door skin<br />
(aluminium frame door only, otherwise go<br />
to step 14)<br />
CAUTION! The torsion spring<br />
unit springs are designed to<br />
support a skin weighing up to<br />
7-8 kg/m2 . This corresponds<br />
to a 16 mm thick spruce timber<br />
skin.<br />
Doors with heavier skins (max.<br />
10 kg/m2 ) or thicker skins<br />
(max. 20 mm) can only be fitted<br />
if this was taken into account in<br />
the order. Springs could otherwise<br />
fail.<br />
Door closure finger protection:<br />
When the door skin is cut to<br />
size and attached the distance<br />
must conform to Fig. 12 / the<br />
angle must conform to Fig. 13.<br />
Fingers are not protected otherwise.<br />
Note also the lateral distance to the architrave<br />
seal, Fig. 11, when cutting the door<br />
skin to size.<br />
Skin of the lowest door section<br />
(301):<br />
• Unscrew floor profile (369) (Fig. 10).<br />
• Screw on skin.<br />
• Screw floor profile (369) back on.<br />
Fit bottom door section<br />
NOTE: The position of the holding<br />
bracket depends on the<br />
door type:<br />
- Figure 14.1 Use retaining bracket holes<br />
nearer to the door leaf with aluminium<br />
frame doors.<br />
- Figure 14.2 Use outside holes in retaining<br />
bracket for Euro doors,<br />
11 (104)