und Bedienungsanleitung für den Garagentorantrieb ... - Rademacher
und Bedienungsanleitung für den Garagentorantrieb ... - Rademacher
und Bedienungsanleitung für den Garagentorantrieb ... - Rademacher

Erfolgreiche ePaper selbst erstellen
Machen Sie aus Ihren PDF Publikationen ein blätterbares Flipbook mit unserer einzigartigen Google optimierten e-Paper Software.
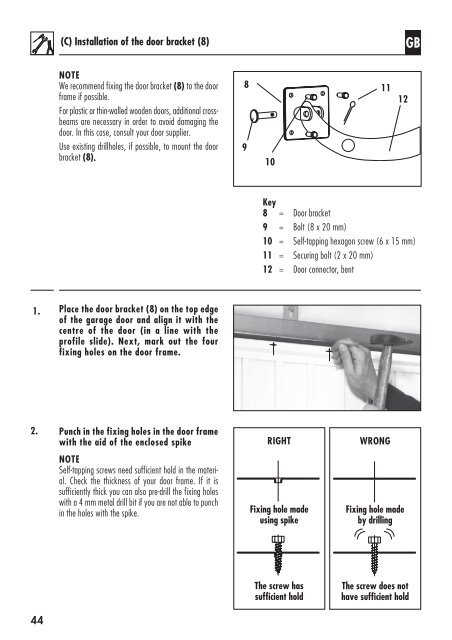
(C) Installation of the door bracket (8)GBNOTEWe recommend fixing the door bracket (8) to the doorframe if possible.For plastic or thin-walled woo<strong>den</strong> doors, additional crossbeamsare necessary in order to avoid damaging thedoor. In this case, consult your door supplier.Use existing drillholes, if possible, to mount the doorbracket (8).89101112Key8 = Door bracket9 = Bolt (8 x 20 mm)10 = Self-tapping hexagon screw (6 x 15 mm)11 = Securing bolt (2 x 20 mm)12 = Door connector, bent1.Place the door bracket (8) on the top edgeof the garage door and align it with thecentre of the door (in a line with theprofile slide). Next, mark out the fourfixing holes on the door frame.2.Punch in the fixing holes in the door framewith the aid of the enclosed spikeRIGHTWRONGNOTESelf-tapping screws need sufficient hold in the material.Check the thickness of your door frame. If it issufficiently thick you can also pre-drill the fixing holeswith a 4 mm metal drill bit if you are not able to punchin the holes with the spike.Fixing hole madeusing spikeFixing hole madeby drillingThe screw hassufficient holdThe screw does nothave sufficient hold44