und Bedienungsanleitung für den Garagentorantrieb ... - Rademacher
und Bedienungsanleitung für den Garagentorantrieb ... - Rademacher
und Bedienungsanleitung für den Garagentorantrieb ... - Rademacher

Sie wollen auch ein ePaper? Erhöhen Sie die Reichweite Ihrer Titel.
YUMPU macht aus Druck-PDFs automatisch weboptimierte ePaper, die Google liebt.
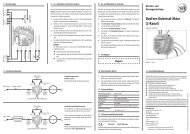
(C) Installation of the door bracket (8)GB3.4.5.Screw the door bracket (8) tight with theenclosed self-tapping hexagon screws(8 x 15 mm).Finally, fix the door connector (12) to thedoor bracket (8) with the enclosed bolt(9).NOTEA straight door connector is supplied pre-assembled, andthis is permanently fixed to the rail.If you wish to use the bent door connector (12)enclosed (depending upon your door particularconfiguration), you must attach this with two hexagonscrews (8 x 20) to the straight door connector.Finally, secure the bolt (9) by attachingthe securing bolt (11) to prevent it fromslipping out.9(B) Installation of the middle support clip (13)1.Fit the middle support (13) clip at asuitable place, as near as possible to themiddle point between the door and thedoor operator head.Key13 = Middle support clip14 = Hexagon screws (8 x 60 mm)131445