Operating Manual for COMMUNICATIONS SERVICE MONITOR
Operating Manual for COMMUNICATIONS SERVICE MONITOR
Operating Manual for COMMUNICATIONS SERVICE MONITOR

You also want an ePaper? Increase the reach of your titles
YUMPU automatically turns print PDFs into web optimized ePapers that Google loves.
LOCAL OPERATION<br />
Rear panel controls and connectors<br />
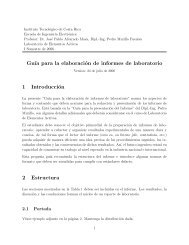
Fig. 3-3 Rear panel layout, (with optional GPIB fitted)<br />
On the rear panel of the instrument are: -<br />
(20) AC power supply input connector. One range <strong>for</strong> all mains voltages. See the Per<strong>for</strong>mance<br />
data section in Chapter 1. The AC supply fuse is contained within this connector.<br />
(21) DC input voltage selector. Switches the power supply DC input circuits to match the available<br />
supply voltage. Ranges are 11-20 V and 18-32 V.<br />
(22) Power switch. The power switch has three positions ON, OFF, CHARGE. The ON position<br />
connects the power source to the instrument, the CHARGE position allows the Service Monitor<br />
power supply to recharge the accessory battery pack (if connected) from the AC mains supply.<br />
See Getting started; on Page 3-9.<br />
(23) DC supply input voltage connector. For direct connection of optional accessory battery pack<br />
and <strong>for</strong> powering the instrument from other DC supplies. See Per<strong>for</strong>mance data, in Chapter 1.<br />
(24) DC supply pin connection diagram. Shows the polarity of the DC power connector<br />
(25) DC supply fuse.<br />
(26) GPIB interface connector. This connector is only present when the GPIB interface option is<br />
fitted. Connection details are given in Chapter 2, under Remote control connections, GPIB.<br />
(27) GPIB interface unit. Optional. See (26) above.<br />
(28) External frequency standard input. This can be 1, 2 5 or 10 MHz; the Service Monitor will<br />
identify the applied frequency. In the event of external standard failure, control will revert to the<br />
internal standard.<br />
(29) Demodulated signal output. The demodulated signal removed from the input RF signal is<br />
brought to this connector <strong>for</strong> feeding to external equipment.<br />
(30) EXT MOD IN (External modulation input) . A signal applied to this connector can be used as a<br />
modulation source <strong>for</strong> the receiver test signal. The input level of the applied signal should be<br />
1.00 V (RMS sinewave) in order to maintain the correlation with the modulation level<br />
calibration. The frequency of the signal should be within the range of the internal modulation<br />
source of 20 Hz to 20 kHz (AM), DC to 100 kHz (FM).<br />
3-8 46882-311D