Automotive Innovators Hit High Gear in - Xilinx
Automotive Innovators Hit High Gear in - Xilinx
Automotive Innovators Hit High Gear in - Xilinx

Create successful ePaper yourself
Turn your PDF publications into a flip-book with our unique Google optimized e-Paper software.
XPLANATION:FPGA101<br />
applicability <strong>in</strong> decod<strong>in</strong>g stream<strong>in</strong>g-media<br />
data, and because it clearly demonstrates<br />
how to make use of the APU by add<strong>in</strong>g a<br />
special-purpose <strong>in</strong>struction.<br />
Complex-number multiplication is<br />
def<strong>in</strong>ed as multiply<strong>in</strong>g two complex numbers,<br />
each hav<strong>in</strong>g a real value and an imag<strong>in</strong>ary<br />
value.<br />
(a_R + j a_I, where j*j = -1):<br />
(a_R + j a_I) * (b_R + j b_I) =<br />
(a_R * b_R - a_I * b_I) + j (a_I *<br />
b_R + a_R * b_I)<br />
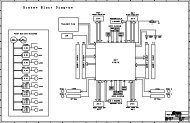
For efficiency, the complex-number<br />
multiplication hardware block (cmplxmul),<br />
performs the multiplication <strong>in</strong> three stages.<br />
This saves hardware resources by us<strong>in</strong>g<br />
only two multipliers and two adders <strong>in</strong> this<br />
multicycle implementation. Figure 2 shows<br />
a block diagram (<strong>in</strong> sketch form) of the<br />
complex-number multiplication FCM.<br />
As the VHDL code <strong>in</strong> cmplxmul.vhd<br />
demonstrates, we perform the complexnumber<br />
multiplication <strong>in</strong> three clock<br />
cycles. In file cmplxmul.vhd we have<br />
implemented the FCM to perform this<br />
complex-number multiplication. File fcmcmul.vhd<br />
provides the FCM/APU <strong>in</strong>terface<br />
wrapper to connect our FCM to the<br />
APU. As we will show <strong>in</strong> our step-by-step<br />
procedure (see sidebar), you can use this<br />
wrapper as a template to connect your own<br />
FCM to the APU when us<strong>in</strong>g the UDI<br />
method (the load-store method requires a<br />
different <strong>in</strong>terconnect).<br />
We synthesized our design with Xil<strong>in</strong>x<br />
EDK/XPS 10.1.02 us<strong>in</strong>g Xil<strong>in</strong>x ISE ®<br />
10.1.02. We simulated and tested the<br />
design with ModelSim 6.3d SE.<br />
The PowerPC processor APU that<br />
resides with<strong>in</strong> the Xil<strong>in</strong>x Virtex-5 FXT<br />
devices allows embedded eng<strong>in</strong>eers to<br />
accelerate their systems <strong>in</strong> a very efficient<br />
way, by add<strong>in</strong>g special-purpose userdef<strong>in</strong>ed<br />
<strong>in</strong>structions for hardware acceleration<br />
and coprocess<strong>in</strong>g. Us<strong>in</strong>g the example<br />
design described here as a start<strong>in</strong>g po<strong>in</strong>t<br />
will show you that master<strong>in</strong>g the APU is<br />
straightforward, and can give your designs<br />
a major performance boost without the use<br />
of special tools.<br />
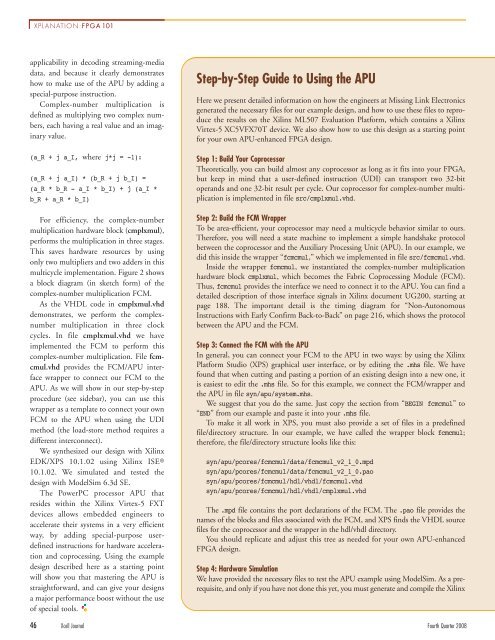
Step-by-Step Guide to Us<strong>in</strong>g the APU<br />
Here we present detailed <strong>in</strong>formation on how the eng<strong>in</strong>eers at Miss<strong>in</strong>g L<strong>in</strong>k Electronics<br />
generated the necessary files for our example design, and how to use these files to reproduce<br />
the results on the Xil<strong>in</strong>x ML507 Evaluation Platform, which conta<strong>in</strong>s a Xil<strong>in</strong>x<br />
Virtex-5 XC5VFX70T device. We also show how to use this design as a start<strong>in</strong>g po<strong>in</strong>t<br />
for your own APU-enhanced FPGA design.<br />
Step 1: Build Your Coprocessor<br />
Theoretically, you can build almost any coprocessor as long as it fits <strong>in</strong>to your FPGA,<br />
but keep <strong>in</strong> m<strong>in</strong>d that a user-def<strong>in</strong>ed <strong>in</strong>struction (UDI) can transport two 32-bit<br />
operands and one 32-bit result per cycle. Our coprocessor for complex-number multiplication<br />
is implemented <strong>in</strong> file src/cmplxmul.vhd.<br />
Step 2: Build the FCM Wrapper<br />
To be area-efficient, your coprocessor may need a multicycle behavior similar to ours.<br />
Therefore, you will need a state mach<strong>in</strong>e to implement a simple handshake protocol<br />
between the coprocessor and the Auxiliary Process<strong>in</strong>g Unit (APU). In our example, we<br />
did this <strong>in</strong>side the wrapper “fcmcmul,” which we implemented <strong>in</strong> file src/fcmcmul.vhd.<br />
Inside the wrapper fcmcmul, we <strong>in</strong>stantiated the complex-number multiplication<br />
hardware block cmplxmul, which becomes the Fabric Coprocess<strong>in</strong>g Module (FCM).<br />
Thus, fcmcmul provides the <strong>in</strong>terface we need to connect it to the APU. You can f<strong>in</strong>d a<br />
detailed description of those <strong>in</strong>terface signals <strong>in</strong> Xil<strong>in</strong>x document UG200, start<strong>in</strong>g at<br />
page 188. The important detail is the tim<strong>in</strong>g diagram for “Non-Autonomous<br />
Instructions with Early Confirm Back-to-Back” on page 216, which shows the protocol<br />
between the APU and the FCM.<br />
Step 3: Connect the FCM with the APU<br />
In general, you can connect your FCM to the APU <strong>in</strong> two ways: by us<strong>in</strong>g the Xil<strong>in</strong>x<br />
Platform Studio (XPS) graphical user <strong>in</strong>terface, or by edit<strong>in</strong>g the .mhs file. We have<br />
found that when cutt<strong>in</strong>g and past<strong>in</strong>g a portion of an exist<strong>in</strong>g design <strong>in</strong>to a new one, it<br />
is easiest to edit the .mhs file. So for this example, we connect the FCM/wrapper and<br />
the APU <strong>in</strong> file syn/apu/system.mhs.<br />
We suggest that you do the same. Just copy the section from “BEGIN fcmcmul” to<br />
“END” from our example and paste it <strong>in</strong>to your .mhs file.<br />
To make it all work <strong>in</strong> XPS, you must also provide a set of files <strong>in</strong> a predef<strong>in</strong>ed<br />
file/directory structure. In our example, we have called the wrapper block fcmcmul;<br />
therefore, the file/directory structure looks like this:<br />
syn/apu/pcores/fcmcmul/data/fcmcmul_v2_1_0.mpd<br />
syn/apu/pcores/fcmcmul/data/fcmcmul_v2_1_0.pao<br />
syn/apu/pcores/fcmcmul/hdl/vhdl/fcmcmul.vhd<br />
syn/apu/pcores/fcmcmul/hdl/vhdl/cmplxmul.vhd<br />
The .mpd file conta<strong>in</strong>s the port declarations of the FCM. The .pao file provides the<br />
names of the blocks and files associated with the FCM, and XPS f<strong>in</strong>ds the VHDL source<br />
files for the coprocessor and the wrapper <strong>in</strong> the hdl/vhdl directory.<br />
You should replicate and adjust this tree as needed for your own APU-enhanced<br />
FPGA design.<br />
Step 4: Hardware Simulation<br />
We have provided the necessary files to test the APU example us<strong>in</strong>g ModelSim. As a prerequisite,<br />
and only if you have not done this yet, you must generate and compile the Xil<strong>in</strong>x<br />
46 Xcell Journal Fourth Quarter 2008