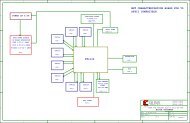
Automotive Innovators Hit High Gear in - Xilinx
Automotive Innovators Hit High Gear in - Xilinx
Automotive Innovators Hit High Gear in - Xilinx

Create successful ePaper yourself
Turn your PDF publications into a flip-book with our unique Google optimized e-Paper software.
F<strong>in</strong>d<strong>in</strong>g a puck on the screen was like<br />
try<strong>in</strong>g to f<strong>in</strong>d a doughnut on a conveyor<br />
belt by look<strong>in</strong>g through a p<strong>in</strong>hole. By<br />
choos<strong>in</strong>g an imag<strong>in</strong>ary l<strong>in</strong>e right above the<br />
flame tips that jump from the cyl<strong>in</strong>ders at<br />
the bottom of the screen, we found a relatively<br />
quiet spot from which to watch for<br />
the white centers of the pucks.<br />
The only <strong>in</strong>put to the system is a s<strong>in</strong>gle,<br />
1-volt peak-to-peak composite video signal<br />
conta<strong>in</strong><strong>in</strong>g all the <strong>in</strong>formation necessary to<br />
drive a video monitor. By separat<strong>in</strong>g the<br />
composite video <strong>in</strong>to horizontal and vertical<br />
sync, I could control counters <strong>in</strong> the<br />
comput<strong>in</strong>g platform to locate any spot on<br />
the screen. Programmatically, I could say<br />
“look at l<strong>in</strong>e 198, position 1340, and tell<br />
me if it’s white or dark.”<br />
Composite video <strong>in</strong>, comparator out at a<br />
s<strong>in</strong>gle spot (see Figure 2). I used a National<br />
LM1881 sync separator and a Zetex<br />
ZXFV089 video amplifier with dc restore<br />
to generate the tim<strong>in</strong>g signals for the comput<strong>in</strong>g<br />
platform. Between these two parts, I<br />
generated horizontal and vertical sync and a<br />
referenced copy of the orig<strong>in</strong>al video signal.<br />
From here, the video signal takes two<br />
paths. Path one is through an op-ampbased<br />
adder, so that I could selectively add<br />
a small offset voltage before the video<br />
passed through an amplifier/buffer and<br />
out to a monitor. By us<strong>in</strong>g the comput<strong>in</strong>g<br />
platform to signal “highlight,” I could<br />
make areas of the screen lighter than normal.<br />
This came <strong>in</strong> handy when I was troubleshoot<strong>in</strong>g<br />
the system, s<strong>in</strong>ce it let me<br />
highlight, for <strong>in</strong>stance, “areas where the<br />
comparator sees high values” or “this is<br />
where I’m sampl<strong>in</strong>g the screen.”<br />
Path two is to a 3.58-MHz trap to<br />
remove the color <strong>in</strong>formation from the signal.<br />
Color <strong>in</strong>formation rides on top of<br />
lum<strong>in</strong>ance <strong>in</strong>formation, and all I wanted<br />
to do was look at the brightness of a spot<br />
on the screen. If I left the color <strong>in</strong>formation<br />
<strong>in</strong> the signal, the next stage would<br />
have had a very difficult time deal<strong>in</strong>g with<br />
it. Next, it was on to a very fast (7nanosecond)<br />
comparator to generate the<br />
“white/not white” signal.<br />
Challenge No. 2: Controll<strong>in</strong>g the plastic<br />
guitar. There are five buttons on the guitar’s<br />
neck and a strum bar <strong>in</strong> its body. Each of<br />
XPERIMENT<br />
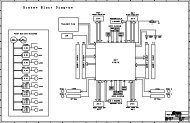
Figure 3 – The smaller green board is the guitar controller. Below it is the prototype board with<br />
the six optoisolators, used to electrically press the buttons on the guitar. The ribbon cable on the<br />
right goes to a DB9 connector mounted on the side of the guitar.<br />
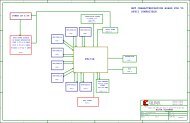
Figure 4 – Here’s the entire AutoGuitarHero system. Counterclockwise from the left, boards <strong>in</strong>clude the<br />
Digilent USB <strong>in</strong>terface, Digilent Spartan-3 FPGA demo board, driver board and analog <strong>in</strong>terface board.<br />
The small board <strong>in</strong> the middle of the picture is used to attach scope probes to the system for troubleshoot<strong>in</strong>g.<br />
Notice the yellow video-<strong>in</strong> connector and the SMA video-out connector.<br />
Fourth Quarter 2008 Xcell Journal 51