ProSeal Instructions for Yashica Electro 35 Series - Kyphoto.com
ProSeal Instructions for Yashica Electro 35 Series - Kyphoto.com
ProSeal Instructions for Yashica Electro 35 Series - Kyphoto.com

You also want an ePaper? Increase the reach of your titles
YUMPU automatically turns print PDFs into web optimized ePapers that Google loves.
normally use enough to saturate the old foam, but not to the point of dripping. Let it sit a minute or so<br />
and then begin scraping it off. You may use a toothpick with the end broken off, the wide end of your<br />
bamboo tool, a wooden cuticle stick, or you may use the tip of your small screwdriver. Work carefully and<br />
try not to scratch the painted surface. Your work will go better if you are patient and give the solvent<br />
time to dissolve and loosen the old adhesive. IMPORTANT NOTE: Observe the precautions on the<br />
solvent can. Work in a well-ventilated area and avoid too much skin contact or contact with eyes, and<br />
don’t drink it. Please see below:<br />
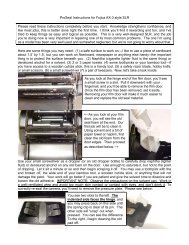
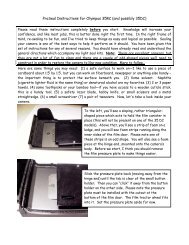
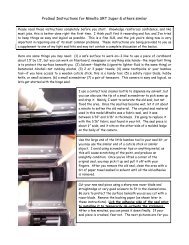
Pretty unimaginative work, but you need to be careful<br />
not to scratch the paint. You can see old seal material<br />
stuck to the film door and the camera body. In this<br />
case, I’m going to replace the seal on the film door, as<br />
that is clearly where it was originally located. I’m going<br />
to use the 1.5mm open-celled foam, and the strip I will<br />
cut is 3.5mm wide x 52mm long. After I have removed<br />
as much as possible with the bamboo tool, I will use a<br />
piece of paper towel soaked in solvent to finish cleaning.<br />
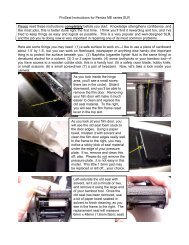
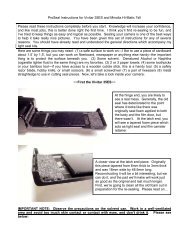
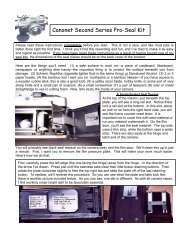
Left, cleaning the hinge seal<br />
area with a piece of paper<br />
towel soaked in solvent. To<br />
the right, I’m doing the same<br />
thing to the film door edges.<br />
There will be old sticky<br />
material left here, and I<br />
don’t want it to foul my new<br />
seal strips. You may also<br />
wipe the film pressure plate<br />
with solvent to clean it.<br />
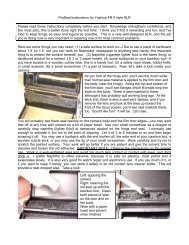
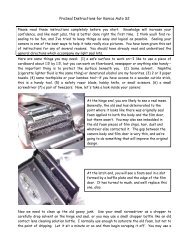
Now we’re going to clean out the rail slots on the camera body and replace those seals. Here’s how:<br />
First, run a toothpick with the end broken<br />
off or the narrow end of your bamboo tool<br />
through the slot to remove the gunk. Repeat<br />
if needed, working away from the frame<br />
counter reset lever. Be careful not to push<br />
old seal material into the frame counter<br />
reset area. Then run a small piece of paper<br />
towel with a little solvent on it through the<br />
slot to finish cleaning it. You may need to<br />
do this several times to get the slot fully<br />
cleaned.<br />
Next, take a long 2mm piece of seal material and press it into the slot using your fingertip. Start at the<br />
hinge end and work toward the film frame counter. Don’t let the seal material turn or twist. Don’t worry<br />
that there is no adhesive. With this seal you don’t need it. The pressure of the seal material against the<br />
channel walls will keep it in place perfectly and provide a full-channel and <strong>com</strong>pletely effective light