ProSeal Instructions for Yashica Electro 35 Series - Kyphoto.com
ProSeal Instructions for Yashica Electro 35 Series - Kyphoto.com
ProSeal Instructions for Yashica Electro 35 Series - Kyphoto.com

You also want an ePaper? Increase the reach of your titles
YUMPU automatically turns print PDFs into web optimized ePapers that Google loves.
<strong>ProSeal</strong> <strong>Instructions</strong> <strong>for</strong> <strong>Yashica</strong> <strong>Electro</strong> <strong>35</strong> <strong>Series</strong><br />
Please read these instructions <strong>com</strong>pletely be<strong>for</strong>e you start. Confidence increases with knowledge, and like<br />
most jobs, this is better done right the first time. I think you’ll find it rewarding and fun, and I’ve tried<br />
to keep things as easy and logical as possible. You’re working on a great rangefinder with excellent<br />
capabilities, and the job you’re doing now is very important in repairing one of its most <strong>com</strong>mon problems.<br />
You have been given this set of instructions <strong>for</strong> any of several reasons, and I think you have already read<br />
and understood the general directions which ac<strong>com</strong>pany my light seal kits.<br />
Here are some things you may need: (1) a safe surface to work on—I like to use a piece of cardboard<br />
about 1.5’ by 1.5’, but you can work on fiberboard, newspaper or anything else handy--the important thing<br />
is to protect the surface beneath you. (2) Some solvent. Naphtha (cigarette lighter fluid is the same<br />
thing) or denatured alcohol. (3) 2 or 3 paper towels. (4) some toothpicks or your bamboo tool—if you have<br />
access to a wooden cuticle stick, this is a handy tool. (5) a safety razor blade, hobby knife, or small<br />
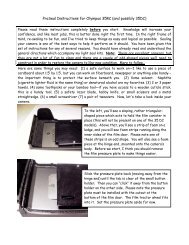
scissors. (6) a small screwdriver (7) a pair of tweezers. Now, let's take a look inside your camera:<br />
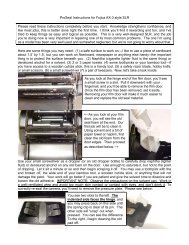
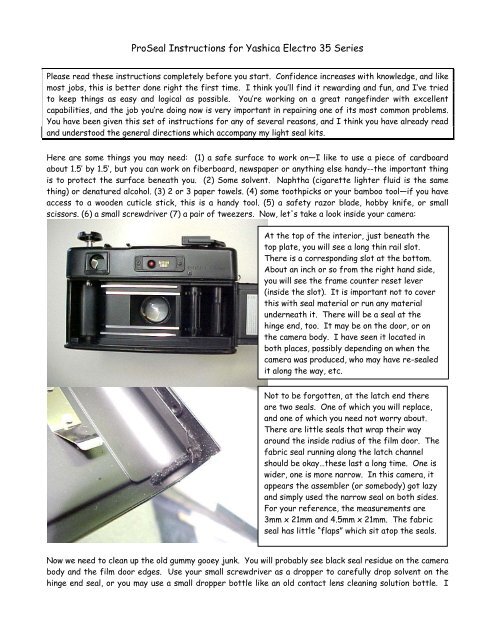
At the top of the interior, just beneath the<br />
top plate, you will see a long thin rail slot.<br />
There is a corresponding slot at the bottom.<br />
About an inch or so from the right hand side,<br />
you will see the frame counter reset lever<br />
(inside the slot). It is important not to cover<br />
this with seal material or run any material<br />
underneath it. There will be a seal at the<br />
hinge end, too. It may be on the door, or on<br />
the camera body. I have seen it located in<br />
both places, possibly depending on when the<br />
camera was produced, who may have re-sealed<br />
it along the way, etc.<br />
Not to be <strong>for</strong>gotten, at the latch end there<br />
are two seals. One of which you will replace,<br />
and one of which you need not worry about.<br />
There are little seals that wrap their way<br />
around the inside radius of the film door. The<br />
fabric seal running along the latch channel<br />
should be okay…these last a long time. One is<br />
wider, one is more narrow. In this camera, it<br />
appears the assembler (or somebody) got lazy<br />
and simply used the narrow seal on both sides.<br />
For your reference, the measurements are<br />
3mm x 21mm and 4.5mm x 21mm. The fabric<br />
seal has little “flaps” which sit atop the seals.<br />
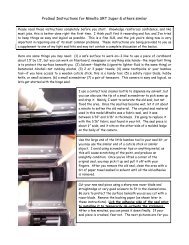
Now we need to clean up the old gummy gooey junk. You will probably see black seal residue on the camera<br />
body and the film door edges. Use your small screwdriver as a dropper to carefully drop solvent on the<br />
hinge end seal, or you may use a small dropper bottle like an old contact lens cleaning solution bottle. I
normally use enough to saturate the old foam, but not to the point of dripping. Let it sit a minute or so<br />
and then begin scraping it off. You may use a toothpick with the end broken off, the wide end of your<br />
bamboo tool, a wooden cuticle stick, or you may use the tip of your small screwdriver. Work carefully and<br />
try not to scratch the painted surface. Your work will go better if you are patient and give the solvent<br />
time to dissolve and loosen the old adhesive. IMPORTANT NOTE: Observe the precautions on the<br />
solvent can. Work in a well-ventilated area and avoid too much skin contact or contact with eyes, and<br />
don’t drink it. Please see below:<br />
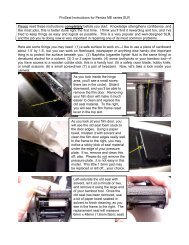
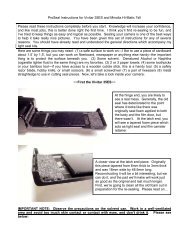
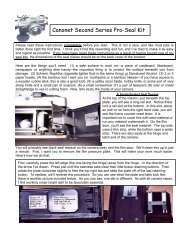
Pretty unimaginative work, but you need to be careful<br />
not to scratch the paint. You can see old seal material<br />
stuck to the film door and the camera body. In this<br />
case, I’m going to replace the seal on the film door, as<br />
that is clearly where it was originally located. I’m going<br />
to use the 1.5mm open-celled foam, and the strip I will<br />
cut is 3.5mm wide x 52mm long. After I have removed<br />
as much as possible with the bamboo tool, I will use a<br />
piece of paper towel soaked in solvent to finish cleaning.<br />
Left, cleaning the hinge seal<br />
area with a piece of paper<br />
towel soaked in solvent. To<br />
the right, I’m doing the same<br />
thing to the film door edges.<br />
There will be old sticky<br />
material left here, and I<br />
don’t want it to foul my new<br />
seal strips. You may also<br />
wipe the film pressure plate<br />
with solvent to clean it.<br />
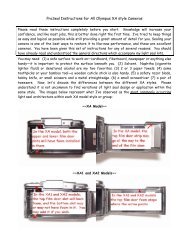
Now we’re going to clean out the rail slots on the camera body and replace those seals. Here’s how:<br />
First, run a toothpick with the end broken<br />
off or the narrow end of your bamboo tool<br />
through the slot to remove the gunk. Repeat<br />
if needed, working away from the frame<br />
counter reset lever. Be careful not to push<br />
old seal material into the frame counter<br />
reset area. Then run a small piece of paper<br />
towel with a little solvent on it through the<br />
slot to finish cleaning it. You may need to<br />
do this several times to get the slot fully<br />
cleaned.<br />
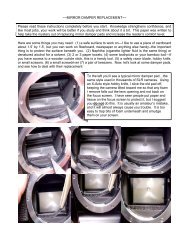
Next, take a long 2mm piece of seal material and press it into the slot using your fingertip. Start at the<br />
hinge end and work toward the film frame counter. Don’t let the seal material turn or twist. Don’t worry<br />
that there is no adhesive. With this seal you don’t need it. The pressure of the seal material against the<br />
channel walls will keep it in place perfectly and provide a full-channel and <strong>com</strong>pletely effective light
affle. When you reach the frame counter lever, use a razor blade, small knife or tiny scissors to trim<br />
the excess so the strip will finish at end of the rail slot. Repeat this procedure <strong>for</strong> the part of the slot<br />
starting at the film frame reset and extending to the latch end. Repeat <strong>for</strong> the lower slot, using a single<br />
long piece. Now, with a blunted toothpick trace the seal’s length, pressing it gently down into its slot to<br />
seat it. Don’t poke into it or damage it. Now, close your door. It is normal to feel resistance from your<br />
new seal material. Don’t worry unless the resistance seems excessive. If you encounter too much<br />
resistance, make sure you got your seal material neatly tucked into the ends at both rail slot end. Here<br />
are three images <strong>for</strong> you to see:<br />
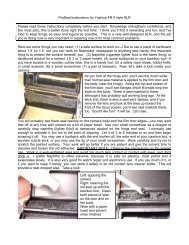
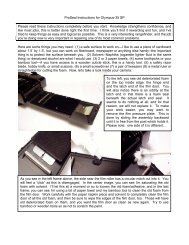
Let’s replace the hinge end seal. Remember the dimension I used was 3.5mm x 52mm. Lick or moisten the<br />
adhesive side of the piece after removing the paper backing. This will give you time to position it neatly.<br />
Now, close your film door and let your camera sit a few hours or overnight to allow the new seals to get<br />
happy with their new surroundings. You may use the 1/16” fabric seal or the 1.5mm open-celled sponge in<br />
this camera with equal success. The 1.5mm open-celled foam more closely matches what was originally<br />
used in your <strong>Yashica</strong>. Please do not use inferior seal products on your cameras. Using the best costs no<br />
more, and the benefit will be less strain on your film door plus a more professional product with a longer<br />
life expectancy.<br />
~~NOTES~~<br />
(a) The early <strong>Electro</strong> <strong>35</strong> (G Model) had a film canister cutout on the film door & body. Simply follow<br />
around the contour of this slot (after cleaning out old material) with your longer 2mm non-adhesive strip,<br />
and you’ll be sealed up nicely.<br />
Jon Goodman --- 2005<br />
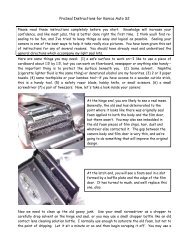
The hinge end seal installed, as<br />
shown below (left). Position it<br />
neatly along the door’s edge.<br />
The latch end seal installed, as<br />
shown above (right). Please lick or<br />
wet these be<strong>for</strong>e installing to allow<br />
time to adjust <strong>for</strong> position.