

INSTRUCTION BOOK - Janome
INSTRUCTION BOOK - Janome
INSTRUCTION BOOK - Janome

You also want an ePaper? Increase the reach of your titles
YUMPU automatically turns print PDFs into web optimized ePapers that Google loves.
z<br />
x<br />
q<br />
e<br />
w<br />
w<br />
w<br />
q<br />
q<br />
w<br />
q<br />
q<br />
e<br />
w e<br />
e<br />
w<br />
8<br />
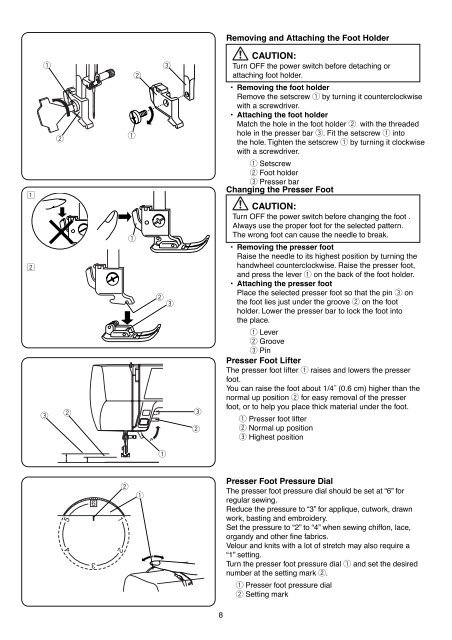
Removing and Attaching the Foot Holder<br />
CAUTION:<br />
Turn OFF the power switch before detaching or<br />
attaching foot holder.<br />
• Removing the foot holder<br />
Remove the setscrew q by turning it counterclockwise<br />
with a screwdriver.<br />
• Attaching the foot holder<br />
Match the hole in the foot holder w with the threaded<br />
hole in the presser bar e. Fit the setscrew q into<br />
the hole. Tighten the setscrew q by turning it clockwise<br />
with a screwdriver.<br />
q Setscrew<br />
w Foot holder<br />
e Presser bar<br />
Changing the Presser Foot<br />
CAUTION:<br />
Turn OFF the power switch before changing the foot .<br />
Always use the proper foot for the selected pattern.<br />
The wrong foot can cause the needle to break.<br />
• Removing the presser foot<br />
Raise the needle to its highest position by turning the<br />
handwheel counterclockwise. Raise the presser foot,<br />
and press the lever q on the back of the foot holder.<br />
• Attaching the presser foot<br />
Place the selected presser foot so that the pin e on<br />
the foot lies just under the groove w on the foot<br />
holder. Lower the presser bar to lock the foot into<br />
the place.<br />
q Lever<br />
w Groove<br />
e Pin<br />
Presser Foot Lifter<br />
The presser foot lifter q raises and lowers the presser<br />
foot.<br />
You can raise the foot about 1/4˝ (0.6 cm) higher than the<br />
normal up position w for easy removal of the presser<br />
foot, or to help you place thick material under the foot.<br />
q Presser foot lifter<br />
w Normal up position<br />
e Highest position<br />
Presser Foot Pressure Dial<br />
The presser foot pressure dial should be set at “6” for<br />
regular sewing.<br />
Reduce the pressure to “3” for applique, cutwork, drawn<br />
work, basting and embroidery.<br />
Set the pressure to “2” to “4” when sewing chiffon, lace,<br />
organdy and other fine fabrics.<br />
Velour and knits with a lot of stretch may also require a<br />
“1” setting.<br />
Turn the presser foot pressure dial q and set the desired<br />
number at the setting mark w.<br />
q Presser foot pressure dial<br />
w Setting mark


