

INSTRUCTION BOOK - Janome
INSTRUCTION BOOK - Janome
INSTRUCTION BOOK - Janome

You also want an ePaper? Increase the reach of your titles
YUMPU automatically turns print PDFs into web optimized ePapers that Google loves.
q w e<br />
q<br />
e<br />
y<br />
r<br />
t<br />
q w<br />
e<br />
w<br />
r<br />
38<br />
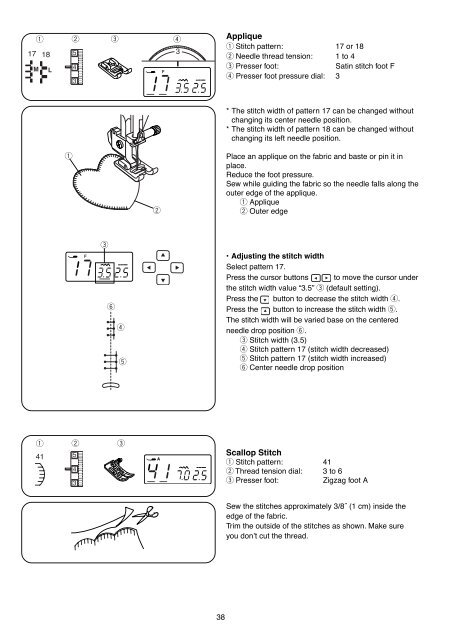
Applique<br />
q Stitch pattern: 17 or 18<br />
w Needle thread tension: 1 to 4<br />
e Presser foot: Satin stitch foot F<br />
r Presser foot pressure dial: 3<br />
* The stitch width of pattern 17 can be changed without<br />
changing its center needle position.<br />
* The stitch width of pattern 18 can be changed without<br />
changing its left needle position.<br />
Place an applique on the fabric and baste or pin it in<br />
place.<br />
Reduce the foot pressure.<br />
Sew while guiding the fabric so the needle falls along the<br />
outer edge of the applique.<br />
q Applique<br />
w Outer edge<br />
• Adjusting the stitch width<br />
Select pattern 17.<br />
Press the cursor buttons to move the cursor under<br />
the stitch width value “3.5” e (default setting).<br />
Press the button to decrease the stitch width r.<br />
Press the button to increase the stitch width t.<br />
The stitch width will be varied base on the centered<br />
needle drop position y.<br />
e Stitch width (3.5)<br />
r Stitch pattern 17 (stitch width decreased)<br />
t Stitch pattern 17 (stitch width increased)<br />
y Center needle drop position<br />
Scallop Stitch<br />
q Stitch pattern: 41<br />
w Thread tension dial: 3 to 6<br />
e Presser foot: Zigzag foot A<br />
Sew the stitches approximately 3/8˝ (1 cm) inside the<br />
edge of the fabric.<br />
Trim the outside of the stitches as shown. Make sure<br />
you don’t cut the thread.


