

INSTRUCTION BOOK - Janome
INSTRUCTION BOOK - Janome
INSTRUCTION BOOK - Janome

You also want an ePaper? Increase the reach of your titles
YUMPU automatically turns print PDFs into web optimized ePapers that Google loves.
q<br />
q<br />
t<br />
e<br />
e<br />
w<br />
w<br />
r<br />
r<br />
i<br />
y<br />
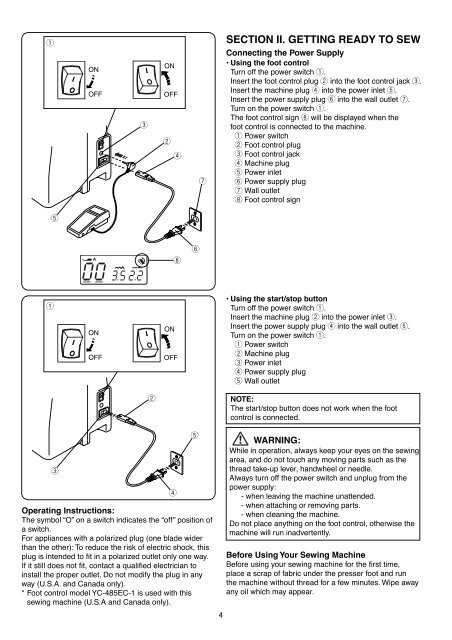
Operating Instructions:<br />
The symbol “O” on a switch indicates the “off” position of<br />
a switch.<br />
For appliances with a polarized plug (one blade wider<br />
than the other): To reduce the risk of electric shock, this<br />
plug is intended to fit in a polarized outlet only one way.<br />
If it still does not fit, contact a qualified electrician to<br />
install the proper outlet. Do not modify the plug in any<br />
way (U.S.A. and Canada only).<br />
*Foot control model YC-485EC-1 is used with this<br />
sewing machine (U.S.A and Canada only).<br />
t<br />
u<br />
4<br />
SECTION II. GETTING READY TO SEW<br />
Connecting the Power Supply<br />
• Using the foot control<br />
Turn off the power switch q.<br />
Insert the foot control plug w into the foot control jack e.<br />
Insert the machine plug r into the power inlet t.<br />
Insert the power supply plug y into the wall outlet u.<br />
Turn on the power switch q.<br />
The foot control sign i will be displayed when the<br />
foot control is connected to the machine.<br />
q Power switch<br />
w Foot control plug<br />
e Foot control jack<br />
r Machine plug<br />
t Power inlet<br />
y Power supply plug<br />
u Wall outlet<br />
i Foot control sign<br />
• Using the start/stop button<br />
Turn off the power switch q.<br />
Insert the machine plug w into the power inlet e.<br />
Insert the power supply plug r into the wall outlet t.<br />
Turn on the power switch q.<br />
q Power switch<br />
w Machine plug<br />
e Power inlet<br />
r Power supply plug<br />
t Wall outlet<br />
NOTE:<br />
The start/stop button does not work when the foot<br />
control is connected.<br />
WARNING:<br />
While in operation, always keep your eyes on the sewing<br />
area, and do not touch any moving parts such as the<br />
thread take-up lever, handwheel or needle.<br />
Always turn off the power switch and unplug from the<br />
power supply:<br />
- when leaving the machine unattended.<br />
- when attaching or removing parts.<br />
- when cleaning the machine.<br />
Do not place anything on the foot control, otherwise the<br />
machine will run inadvertently.<br />
Before Using Your Sewing Machine<br />
Before using your sewing machine for the first time,<br />
place a scrap of fabric under the presser foot and run<br />
the machine without thread for a few minutes. Wipe away<br />
any oil which may appear.


