

INSTRUCTION BOOK - Janome
INSTRUCTION BOOK - Janome
INSTRUCTION BOOK - Janome

You also want an ePaper? Increase the reach of your titles
YUMPU automatically turns print PDFs into web optimized ePapers that Google loves.
q w e<br />
w<br />
t<br />
q w e<br />
e<br />
q<br />
w<br />
e<br />
r<br />
r<br />
q<br />
33<br />
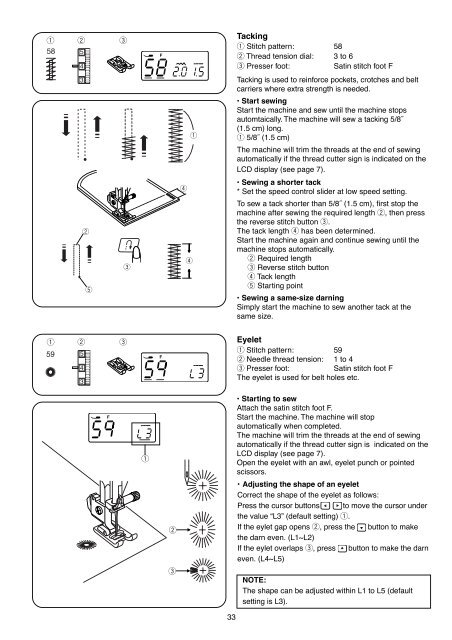
Tacking<br />
q Stitch pattern: 58<br />
w Thread tension dial: 3 to 6<br />
e Presser foot: Satin stitch foot F<br />
Tacking is used to reinforce pockets, crotches and belt<br />
carriers where extra strength is needed.<br />
• Start sewing<br />
Start the machine and sew until the machine stops<br />
automtaically. The machine will sew a tacking 5/8˝<br />
(1.5 cm) long.<br />
q 5/8˝ (1.5 cm)<br />
The machine will trim the threads at the end of sewing<br />
automatically if the thread cutter sign is indicated on the<br />
LCD display (see page 7).<br />
• Sewing a shorter tack<br />
* Set the speed control slider at low speed setting.<br />
To sew a tack shorter than 5/8˝ (1.5 cm), first stop the<br />
machine after sewing the required length w, then press<br />
the reverse stitch button e.<br />
The tack length r has been determined.<br />
Start the machine again and continue sewing until the<br />
machine stops automatically.<br />
w Required length<br />
e Reverse stitch button<br />
r Tack length<br />
t Starting point<br />
• Sewing a same-size darning<br />
Simply start the machine to sew another tack at the<br />
same size.<br />
Eyelet<br />
q Stitch pattern: 59<br />
w Needle thread tension: 1 to 4<br />
e Presser foot: Satin stitch foot F<br />
The eyelet is used for belt holes etc.<br />
• Starting to sew<br />
Attach the satin stitch foot F.<br />
Start the machine. The machine will stop<br />
automatically when completed.<br />
The machine will trim the threads at the end of sewing<br />
automatically if the thread cutter sign is indicated on the<br />
LCD display (see page 7).<br />
Open the eyelet with an awl, eyelet punch or pointed<br />
scissors.<br />
• Adjusting the shape of an eyelet<br />
Correct the shape of the eyelet as follows:<br />
Press the cursor buttons to move the cursor under<br />
the value “L3” (default setting) q.<br />
If the eylet gap opens w, press the button to make<br />
the darn even. (L1~L2)<br />
If the eylet overlaps e, press button to make the darn<br />
even. (L4~L5)<br />
NOTE:<br />
The shape can be adjusted within L1 to L5 (default<br />
setting is L3).


