

INSTRUCTION BOOK - Janome
INSTRUCTION BOOK - Janome
INSTRUCTION BOOK - Janome

You also want an ePaper? Increase the reach of your titles
YUMPU automatically turns print PDFs into web optimized ePapers that Google loves.
z<br />
x<br />
c<br />
q w e<br />
q<br />
e<br />
r<br />
w<br />
31<br />
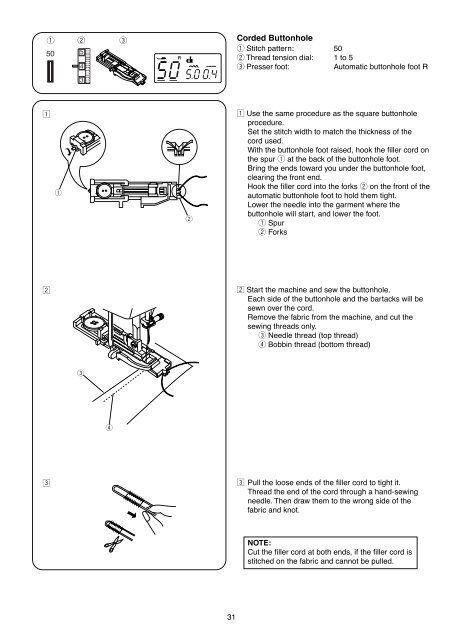
Corded Buttonhole<br />
q Stitch pattern: 50<br />
w Thread tension dial: 1 to 5<br />
e Presser foot: Automatic buttonhole foot R<br />
z Use the same procedure as the square buttonhole<br />
procedure.<br />
Set the stitch width to match the thickness of the<br />
cord used.<br />
With the buttonhole foot raised, hook the filler cord on<br />
the spur q at the back of the buttonhole foot.<br />
Bring the ends toward you under the buttonhole foot,<br />
clearing the front end.<br />
Hook the filler cord into the forks w on the front of the<br />
automatic buttonhole foot to hold them tight.<br />
Lower the needle into the garment where the<br />
buttonhole will start, and lower the foot.<br />
q Spur<br />
w Forks<br />
x Start the machine and sew the buttonhole.<br />
Each side of the buttonhole and the bartacks will be<br />
sewn over the cord.<br />
Remove the fabric from the machine, and cut the<br />
sewing threads only.<br />
e Needle thread (top thread)<br />
r Bobbin thread (bottom thread)<br />
c Pull the loose ends of the filler cord to tight it.<br />
Thread the end of the cord through a hand-sewing<br />
needle. Then draw them to the wrong side of the<br />
fabric and knot.<br />
NOTE:<br />
Cut the filler cord at both ends, if the filler cord is<br />
stitched on the fabric and cannot be pulled.


