

INSTRUCTION BOOK - Janome
INSTRUCTION BOOK - Janome
INSTRUCTION BOOK - Janome

You also want an ePaper? Increase the reach of your titles
YUMPU automatically turns print PDFs into web optimized ePapers that Google loves.
q<br />
z<br />
q w e<br />
q w e<br />
x c<br />
w w<br />
w<br />
w<br />
q<br />
39<br />
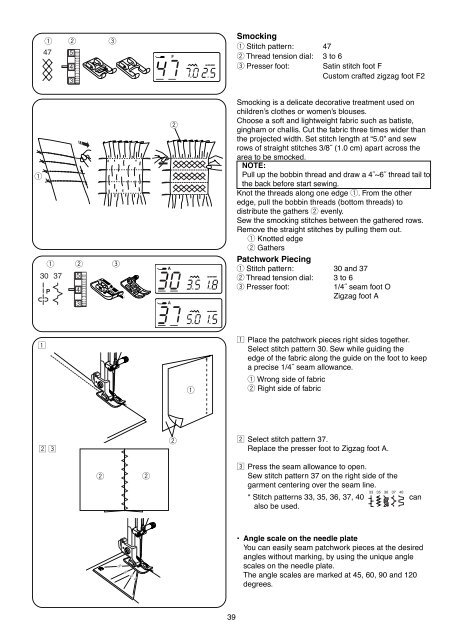
Smocking<br />
q Stitch pattern: 47<br />
w Thread tension dial: 3 to 6<br />
e Presser foot: Satin stitch foot F<br />
Custom crafted zigzag foot F2<br />
Smocking is a delicate decorative treatment used on<br />
children’s clothes or women’s blouses.<br />
Choose a soft and lightweight fabric such as batiste,<br />
gingham or challis. Cut the fabric three times wider than<br />
the projected width. Set stitch length at “5.0” and sew<br />
rows of straight stitches 3/8˝ (1.0 cm) apart across the<br />
area to be smocked.<br />
NOTE:<br />
Pull up the bobbin thread and draw a 4˝~6˝ thread tail to<br />
the back before start sewing.<br />
Knot the threads along one edge q. From the other<br />
edge, pull the bobbin threads (bottom threads) to<br />
distribute the gathers w evenly.<br />
Sew the smocking stitches between the gathered rows.<br />
Remove the straight stitches by pulling them out.<br />
q Knotted edge<br />
w Gathers<br />
Patchwork Piecing<br />
q Stitch pattern: 30 and 37<br />
w Thread tension dial: 3 to 6<br />
e Presser foot: 1/4˝ seam foot O<br />
Zigzag foot A<br />
z Place the patchwork pieces right sides together.<br />
Select stitch pattern 30. Sew while guiding the<br />
edge of the fabric along the guide on the foot to keep<br />
a precise 1/4˝ seam allowance.<br />
q Wrong side of fabric<br />
w Right side of fabric<br />
x Select stitch pattern 37.<br />
Replace the presser foot to Zigzag foot A.<br />
c Press the seam allowance to open.<br />
Sew stitch pattern 37 on the right side of the<br />
garment centering over the seam line.<br />
* Stitch patterns 33, 35, 36, 37, 40 can<br />
also be used.<br />
• Angle scale on the needle plate<br />
You can easily seam patchwork pieces at the desired<br />
angles without marking, by using the unique angle<br />
scales on the needle plate.<br />
The angle scales are marked at 45, 60, 90 and 120<br />
degrees.


