

INSTRUCTION BOOK - Janome
INSTRUCTION BOOK - Janome
INSTRUCTION BOOK - Janome

You also want an ePaper? Increase the reach of your titles
YUMPU automatically turns print PDFs into web optimized ePapers that Google loves.
z<br />
x<br />
c<br />
v<br />
q w e<br />
t<br />
e<br />
q<br />
r<br />
y u<br />
!1<br />
w<br />
r<br />
u<br />
i<br />
!0<br />
o<br />
27<br />
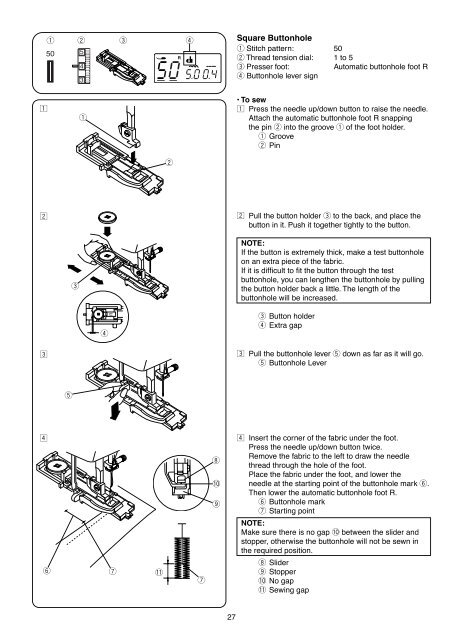
Square Buttonhole<br />
q Stitch pattern: 50<br />
w Thread tension dial: 1 to 5<br />
e Presser foot: Automatic buttonhole foot R<br />
r Buttonhole lever sign<br />
• To sew<br />
z Press the needle up/down button to raise the needle.<br />
Attach the automatic buttonhole foot R snapping<br />
the pin w into the groove q of the foot holder.<br />
q Groove<br />
w Pin<br />
x Pull the button holder e to the back, and place the<br />
button in it. Push it together tightly to the button.<br />
NOTE:<br />
If the button is extremely thick, make a test buttonhole<br />
on an extra piece of the fabric.<br />
If it is difficult to fit the button through the test<br />
buttonhole, you can lengthen the buttonhole by pulling<br />
the button holder back a little. The length of the<br />
buttonhole will be increased.<br />
e Button holder<br />
r Extra gap<br />
c Pull the buttonhole lever t down as far as it will go.<br />
t Buttonhole Lever<br />
v Insert the corner of the fabric under the foot.<br />
Press the needle up/down button twice.<br />
Remove the fabric to the left to draw the needle<br />
thread through the hole of the foot.<br />
Place the fabric under the foot, and lower the<br />
needle at the starting point of the buttonhole mark y.<br />
Then lower the automatic buttonhole foot R.<br />
y Buttonhole mark<br />
u Starting point<br />
NOTE:<br />
Make sure there is no gap !0 between the slider and<br />
stopper, otherwise the buttonhole will not be sewn in<br />
the required position.<br />
i Slider<br />
o Stopper<br />
!0 No gap<br />
!1 Sewing gap


