DJD External Fixator, Stryker - ShoulderDoc.co.uk
DJD External Fixator, Stryker - ShoulderDoc.co.uk
DJD External Fixator, Stryker - ShoulderDoc.co.uk

Create successful ePaper yourself
Turn your PDF publications into a flip-book with our unique Google optimized e-Paper software.
10<br />
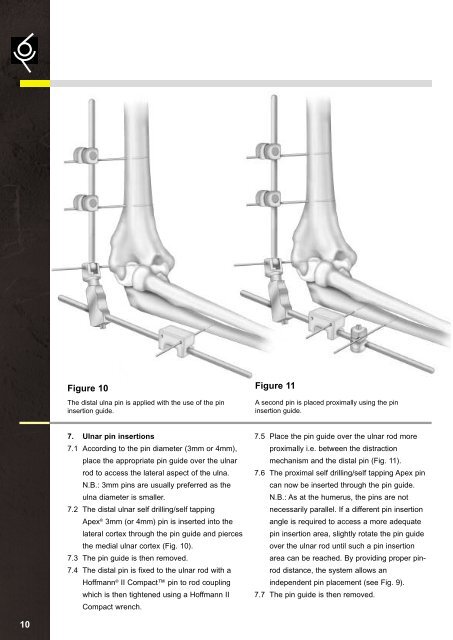
Figure 10<br />
The distal ulna pin is applied with the use of the pin<br />
insertion guide.<br />
7. Ulnar pin insertions<br />
7.1 Ac<strong>co</strong>rding to the pin diameter (3mm or 4mm),<br />
place the appropriate pin guide over the ulnar<br />
rod to access the lateral aspect of the ulna.<br />
N.B.: 3mm pins are usually preferred as the<br />
ulna diameter is smaller.<br />
7.2 The distal ulnar self drilling/self tapping<br />
Apex ® 3mm (or 4mm) pin is inserted into the<br />
lateral <strong>co</strong>rtex through the pin guide and pierces<br />
the medial ulnar <strong>co</strong>rtex (Fig. 10).<br />
7.3 The pin guide is then removed.<br />
7.4 The distal pin is fixed to the ulnar rod with a<br />
Hoffmann ® II Compact pin to rod <strong>co</strong>upling<br />
which is then tightened using a Hoffmann II<br />
Compact wrench.<br />
Figure 11<br />
A se<strong>co</strong>nd pin is placed proximally using the pin<br />
insertion guide.<br />
7.5 Place the pin guide over the ulnar rod more<br />
proximally i.e. between the distraction<br />
mechanism and the distal pin (Fig. 11).<br />
7.6 The proximal self drilling/self tapping Apex pin<br />
can now be inserted through the pin guide.<br />
N.B.: As at the humerus, the pins are not<br />
necessarily parallel. If a different pin insertion<br />
angle is required to access a more adequate<br />
pin insertion area, slightly rotate the pin guide<br />
over the ulnar rod until such a pin insertion<br />
area can be reached. By providing proper pinrod<br />
distance, the system allows an<br />
independent pin placement (see Fig. 9).<br />
7.7 The pin guide is then removed.