DJD External Fixator, Stryker - ShoulderDoc.co.uk
DJD External Fixator, Stryker - ShoulderDoc.co.uk
DJD External Fixator, Stryker - ShoulderDoc.co.uk

Create successful ePaper yourself
Turn your PDF publications into a flip-book with our unique Google optimized e-Paper software.
Frame Construction Step by Step<br />
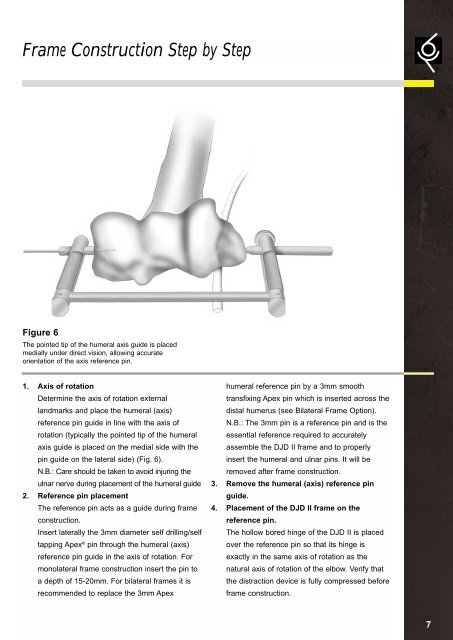
Figure 6<br />
The pointed tip of the humeral axis guide is placed<br />
medially under direct vision, allowing accurate<br />
orientation of the axis reference pin.<br />
1. Axis of rotation<br />
Determine the axis of rotation external<br />
landmarks and place the humeral (axis)<br />
reference pin guide in line with the axis of<br />
rotation (typically the pointed tip of the humeral<br />
axis guide is placed on the medial side with the<br />
pin guide on the lateral side) (Fig. 6).<br />
2. Reference pin placement<br />
The reference pin acts as a guide during frame<br />
<strong>co</strong>nstruction.<br />
Insert laterally the 3mm diameter self<br />
drilling/self tapping Apex ® 1. Axis of rotation<br />
Determine the axis of rotation external<br />
landmarks and place the humeral (axis)<br />
reference pin guide in line with the axis of<br />
rotation (typically the pointed tip of the humeral<br />
axis guide is placed on the medial side with the<br />
pin guide on the lateral side) (Fig. 6).<br />
N.B.: Care should be taken to avoid injuring th<br />
2. Reference pin placement<br />
The reference pin acts as a guide during frame<br />
<strong>co</strong>nstruction.<br />
Insert laterally the 3mm diameter pin through self the<br />
drilling/self humeral (axis) tapping reference Apex pin guide in the axis<br />
of rotation. For monolateral frame <strong>co</strong>nstruction<br />
insert the pin to a depth of 15-20mm. For<br />
bilateral frames it is re<strong>co</strong>mmended to replace<br />
the 3mm Apex humeral reference pin by a<br />
3mm smooth transfixing Apex pin which is<br />
inserted across the distal humerus (see<br />
Bilateral Frame Option).<br />
® 1. Axis of rotation<br />
Determine the axis of rotation external<br />
landmarks and place the humeral (axis)<br />
reference pin guide in line with the axis of<br />
rotation (typically the pointed tip of the humeral<br />
axis guide is placed on the medial side with the<br />
pin guide on the lateral side) (Fig. 6).<br />
N.B.: Care should be taken to avoid injuring the<br />
ulnar nerve during placement of the humeral guide<br />
2. Reference pin placement<br />
The reference pin acts as a guide during frame<br />
<strong>co</strong>nstruction.<br />
Insert laterally the 3mm diameter pin through self drilling/self the<br />
tapping humeral Apex (axis) reference pin guide in the axis<br />
of rotation. For monolateral frame <strong>co</strong>nstruction<br />
insert the pin to a depth of 15-20mm. For<br />
bilateral frames it is re<strong>co</strong>mmended to replace<br />
the 3mm Apex humeral reference pin by a<br />
3mm smooth transfixing Apex pin which is<br />
inserted across the distal humerus (see<br />
Bilateral Frame Option).<br />
® pin through the humeral (axis)<br />
reference pin guide in the axis of rotation. For<br />
monolateral frame <strong>co</strong>nstruction insert the pin to<br />
a depth of 15-20mm. For bilateral frames it is<br />
re<strong>co</strong>mmended to replace the 3mm Apex<br />
N.B.: humeral The reference 3mm pin pin is a by reference a 3mm smooth pin and is the<br />
essential transfixing reference Apex pin required which is to inserted accurately across the<br />
assemble distal humerus the <strong>DJD</strong> (see II Bilateral frame and Frame to properly Option).<br />
insert N.B.: The the humeral 3mm pin and is a ulnar reference pins. It pin will and be beis<br />
the<br />
removed essential after reference frame required <strong>co</strong>nstruction. to accurately<br />
3. Remove assemble the the humeral <strong>DJD</strong> II frame (axis) reference and reference to properly pin pin<br />
guide. insert the humeral and ulnar pins. It will be<br />
4. Placement removed after of the frame <strong>DJD</strong> <strong>co</strong>nstruction.<br />
II II frame on on the the<br />
3. reference Remove the pin. humeral (axis) reference pin<br />
The guide. hollow bored hinge of the <strong>DJD</strong> II is placed<br />
4. over Placement the reference of the pin <strong>DJD</strong> so II that frame its hinge on the is<br />
exactly reference in the pin. same axis of rotation as the<br />
natural The hollow axis bored of rotation hinge of of the the elbow. <strong>DJD</strong> II Verify is placed that<br />
the over distraction the reference device pin is so fully that <strong>co</strong>mpressed its hinge is<br />
before exactly frame in the <strong>co</strong>nstruction.<br />
same axis of rotation as the<br />
natural axis of rotation of the elbow. Verify that<br />
the distraction device is fully <strong>co</strong>mpressed before<br />
frame <strong>co</strong>nstruction.<br />
7