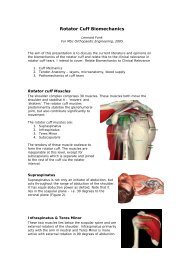
DJD External Fixator, Stryker - ShoulderDoc.co.uk
DJD External Fixator, Stryker - ShoulderDoc.co.uk
DJD External Fixator, Stryker - ShoulderDoc.co.uk

You also want an ePaper? Increase the reach of your titles
YUMPU automatically turns print PDFs into web optimized ePapers that Google loves.
8<br />
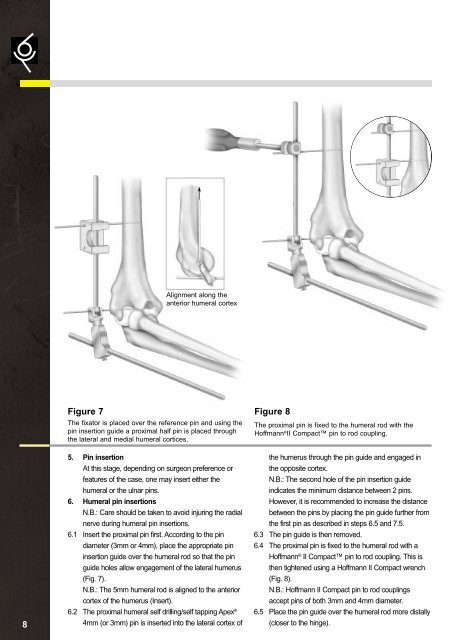
Figure 7<br />
Alignment along the<br />
anterior humeral <strong>co</strong>rtex<br />
The fixator is placed over the reference pin and using the<br />
pin insertion guide a proximal half pin is placed through<br />
the lateral and medial humeral <strong>co</strong>rtices.<br />
5. Pin insertion<br />
At this stage, depending on surgeon<br />
preference or features of the case, one may<br />
insert either the humeral or the ulnar pins.<br />
6. Humeral pin insertions<br />
6.1 Insert the proximal pin first. Ac<strong>co</strong>rding to the<br />
pin diameter (3mm or 4mm), place the<br />
appropriate pin insertion guide over the<br />
humeral rod so that the pin guide holes allow<br />
engagement of the lateral humerus (Fig. 7).<br />
N.B.: The 5mm humeral rod is aligned to the<br />
anterior <strong>co</strong>rtex of the humerus (Insert).<br />
6.2 The proximal humeral self drilling/self tapping<br />
Apex ® 5. Pin insertion<br />
At this stage, depending on surgeon preference or<br />
features of the case, one may insert either the<br />
humeral or the ulnar pins.<br />
6. Humeral pin insertions<br />
N.B.: Care should be taken to avoid injuring the radial<br />
nerve during humeral pin insertions.<br />
6.1 Insert the proximal pin first. Ac<strong>co</strong>rding to the pin<br />
diameter (3mm or 4mm), place the appropriate pin<br />
insertion guide over the humeral rod so that the pin<br />
guide holes allow engagement of the lateral humerus<br />
(Fig. 7).<br />
N.B.: The 5mm humeral rod is aligned to the anterior<br />
<strong>co</strong>rtex of 4mm the humerus (or 3mm) (Insert). pin is inserted into the<br />
6.2 The lateral proximal <strong>co</strong>rtex humeral of the self humerus drilling/self through tapping the Apex pin<br />
guide and engaged in the opposite <strong>co</strong>rtex.<br />
®<br />
4mm (or 3mm) pin is inserted into the lateral <strong>co</strong>rtex of<br />
Figure 8<br />
The proximal pin is fixed to the humeral rod with the<br />
Hoffmann ® II Compact pin to rod <strong>co</strong>upling.<br />
N.B.: The se<strong>co</strong>nd hole of the pin insertion<br />
guide indicates the minimum distance between<br />
2 pins. However, it is re<strong>co</strong>mmended to<br />
increase the distance between the pins by<br />
placing the pin guide further from the first pin<br />
as described in steps 6.5 and 7.5.<br />
6.3 The pin guide is then removed.<br />
6.4 The proximal pin is fixed to the humeral rod<br />
with a Hoffmann ® the humerus through the pin guide and engaged in<br />
the opposite <strong>co</strong>rtex.<br />
N.B.: The se<strong>co</strong>nd hole of the pin insertion guide<br />
indicates the minimum distance between 2 pins.<br />
However, it is re<strong>co</strong>mmended to increase the distance<br />
between the pins by placing the pin guide further from<br />
the first pin as described in steps 6.5 and 7.5.<br />
6.3 The pin guide is then removed.<br />
6.4 The proximal pin is fixed II Compact to the humeral pin rod to rod with a<br />
Hoffmann <strong>co</strong>upling. This is then tightened using a<br />
Hoffmann II Compact wrench (Fig. 8).<br />
N.B.: Hoffmann II Compact pin to rod <strong>co</strong>uplings<br />
accept pins of both 3mm and 4mm diameter.<br />
6.5 Place the pin guide over the humeral rod more<br />
distally (closer to the hinge).<br />
® II Compact pin to rod <strong>co</strong>upling. This is<br />
then tightened using a Hoffmann II Compact wrench<br />
(Fig. 8).<br />
N.B.: Hoffmann II Compact pin to rod <strong>co</strong>uplings<br />
accept pins of both 3mm and 4mm diameter.<br />
6.5 Place the pin guide over the humeral rod more distally<br />
(closer to the hinge).