2609 Quilting Made Easy with Kothy Hafersat ... - Husqvarna Viking
2609 Quilting Made Easy with Kothy Hafersat ... - Husqvarna Viking
2609 Quilting Made Easy with Kothy Hafersat ... - Husqvarna Viking

You also want an ePaper? Increase the reach of your titles
YUMPU automatically turns print PDFs into web optimized ePapers that Google loves.
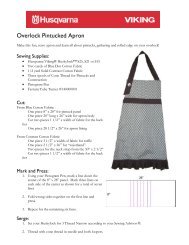
<strong>2609</strong> Quick Project<br />
Pintuck and Felted Scarf<br />
<strong>with</strong> Lynn Lunoe<br />
A simple Sari Print sheer fabric can become a<br />
sensational accessory, using metallic thread, a twin<br />
needle and the Huskylock serger.<br />
Machine Set-Up:<br />
1. Wind a bobbin <strong>with</strong> Robison Anton Super Poly<br />
sewing thread to match the fabric and insert<br />
bobbin in bobbin case.<br />
2. Remove regular sewing machine needle and<br />
insert the twin needle.<br />
3. If your sewing machine has a twin needle safety<br />
setting, activate it in the Set Menu.<br />
4. The <strong>Husqvarna</strong> <strong>Viking</strong> Designer SE and<br />
Designer SE Limited Edition have a twin needle<br />
setting selection box in the Set Menu. Select the<br />
size twin needle you are using and the Designer<br />
SE automatically changes the width of the<br />
stitch to a safe setting for that size twin needle.<br />
NOTE: If you do not have a twin needle safety,<br />
be sure your stitch plate opening is wide enough<br />
to accept the twin needle for the stitch you have<br />
selected. Narrow the width as needed.<br />
5. Thread <strong>with</strong> two spools of Robison Anton<br />
Metallic thread on top and thread the twin<br />
needle. Consult your Users Guide for additional<br />
instructions.<br />
6. Snap on the 5 Groove Pin Tuck Foot.<br />
7. Slide the Quilt Guide into the hole on the back<br />
of the sewing machine ankle, behind the needle,<br />
so that the arm of quilt guide is 1” from the<br />
center of the two needles.<br />
Measure and Cut:<br />
1. Use the entire width of the fabric, selvage edge<br />
to selvage edge for the scarf length.<br />
2. Pull a thread across the width of the fabric,<br />
about 1” from the top cut edge, to mark the fi rst<br />
cutting line.<br />
3. Cut along that pulled thread.<br />
4. Measure down 15” and pull another thread. Cut<br />
along that pulled thread.<br />
5. Along the top and bottom selvage edge, mark<br />
1-1/2” in from one cut edge to mark your fi rst<br />
row of stitching.<br />
Sue Hausmann, <strong>Kothy</strong> <strong>Hafersat</strong><br />
and Lynn Lunoe<br />
Sewing Supplies:<br />
•<strong>Husqvarna</strong> <strong>Viking</strong> Sewing Machine<br />
•<strong>Husqvarna</strong> <strong>Viking</strong> Huskylock Serger<br />
•5-Groove Pintuck Foot #412369945<br />
•1/2 yard sheer Sari silk or polyester fabric<br />
•2 spools Robison Anton metallic thread<br />
•1 spool Robison Anton Super Poly sewing thread to<br />
match fabric<br />
•2 cones Robison Anton Serger thread to match<br />
fabric<br />
•3.0/90 Inspira Twin Needle<br />
•Quilt Guide (included <strong>with</strong> most <strong>Husqvarna</strong> <strong>Viking</strong><br />
Sewing Machines)<br />
Thanks to the Underwriter<br />
of our Quick Project:<br />
www.robisonantonthread.com
![[pdf] husqvarna viking sewing machine stitch comparison chart](https://img.yumpu.com/11869478/1/190x146/pdf-husqvarna-viking-sewing-machine-stitch-comparison-chart.jpg?quality=85)