SolarEdge Configuration Tool Software Guide - Solon
SolarEdge Configuration Tool Software Guide - Solon
SolarEdge Configuration Tool Software Guide - Solon

You also want an ePaper? Increase the reach of your titles
YUMPU automatically turns print PDFs into web optimized ePapers that Google loves.
22<br />
Configuring an Inverter<br />
<strong>SolarEdge</strong> <strong>Configuration</strong> <strong>Tool</strong> <strong>Software</strong> <strong>Guide</strong><br />
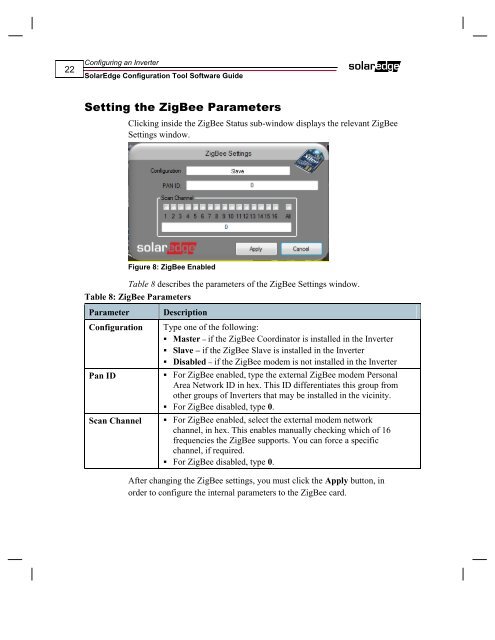
Setting the ZigBee Parameters<br />
Clicking inside the ZigBee Status sub-window displays the relevant ZigBee<br />
Settings window.<br />
Figure 8: ZigBee Enabled<br />
Table 8 describes the parameters of the ZigBee Settings window.<br />
Table 8: ZigBee Parameters<br />
Parameter Description<br />
<strong>Configuration</strong> Type one of the following:<br />
Master – if the ZigBee Coordinator is installed in the Inverter<br />
Slave – if the ZigBee Slave is installed in the Inverter<br />
Disabled – if the ZigBee modem is not installed in the Inverter<br />
Pan ID For ZigBee enabled, type the external ZigBee modem Personal<br />
Area Network ID in hex. This ID differentiates this group from<br />
other groups of Inverters that may be installed in the vicinity.<br />
For ZigBee disabled, type 0.<br />
Scan Channel For ZigBee enabled, select the external modem network<br />
channel, in hex. This enables manually checking which of 16<br />
frequencies the ZigBee supports. You can force a specific<br />
channel, if required.<br />
For ZigBee disabled, type 0.<br />
After changing the ZigBee settings, you must click the Apply button, in<br />
order to configure the internal parameters to the ZigBee card.