Pioneer 3™ Operations Manual
Pioneer 3™ Operations Manual
Pioneer 3™ Operations Manual

You also want an ePaper? Increase the reach of your titles
YUMPU automatically turns print PDFs into web optimized ePapers that Google loves.
Specifications & Controls<br />
Nose<br />
The nose is where we put the onboard PC. The nose is readily removable for access:<br />
Simply remove two screws from underneath the front sonar array. A third screw holds the<br />
nose to the bottom of the AT’s body. The DX nose is hinged at the bottom.<br />
Once the mounting screws are removed, simply pull the nose away from the body. 6 This<br />
provides a quick and easy way to get to the accessory boards and disk drive of the<br />
onboard PC, as well as to the sonar gain adjustment for the front sonar array. The nose<br />
also is an ideal place for you to attach your own custom accessories and sensors.<br />
Access Panels<br />
All DX’s come with a removable right-side panel through which you may install accessory<br />
connectors and controls. A special side panel comes with the onboard PC option, for<br />
example, which provides connectors for a monitor, keyboard, mouse, and 10Base-T<br />
Ethernet, as well as the means to reset and switch power for the onboard computer.<br />
AT’s come with a single access panel in the deck. Fastened down with finger-tight<br />
screws, the User Control Panel and onboard computer controls are accessible beneath<br />
the hinged door.<br />
All models come with an access port near the center of the deck through which to run<br />
cables to the internal components.<br />
SONAR<br />
Natively, ARCOS-based robots<br />
support up to four sonar arrays, each<br />
with up to eight transducers that<br />
provide object detection and range<br />
information for collision avoidance,<br />
features recognition, localization,<br />
and navigation. The sonar positions<br />
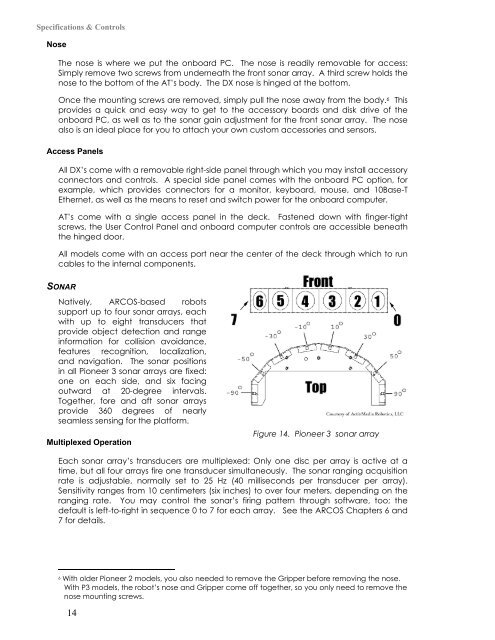
in all <strong>Pioneer</strong> 3 sonar arrays are fixed:<br />
one on each side, and six facing<br />
outward at 20-degree intervals.<br />
Together, fore and aft sonar arrays<br />
provide 360 degrees of nearly<br />
seamless sensing for the platform.<br />
Multiplexed Operation<br />
Figure 14. <strong>Pioneer</strong> 3 sonar array<br />
Each sonar array’s transducers are multiplexed: Only one disc per array is active at a<br />
time, but all four arrays fire one transducer simultaneously. The sonar ranging acquisition<br />
rate is adjustable, normally set to 25 Hz (40 milliseconds per transducer per array).<br />
Sensitivity ranges from 10 centimeters (six inches) to over four meters, depending on the<br />
ranging rate. You may control the sonar’s firing pattern through software, too; the<br />
default is left-to-right in sequence 0 to 7 for each array. See the ARCOS Chapters 6 and<br />
7 for details.<br />
6 With older <strong>Pioneer</strong> 2 models, you also needed to remove the Gripper before removing the nose.<br />
With P3 models, the robot’s nose and Gripper come off together, so you only need to remove the<br />
nose mounting screws.<br />
14