Pioneer 3™ Operations Manual
Pioneer 3™ Operations Manual
Pioneer 3™ Operations Manual

You also want an ePaper? Increase the reach of your titles
YUMPU automatically turns print PDFs into web optimized ePapers that Google loves.
Quick Start<br />
First, please note well that you cannot connect with and control your robot through its<br />
controller directly from a remote client over the network without special hardware<br />
(wireless Ethernet-to-serial device) or, alternatively, special software that runs on the<br />
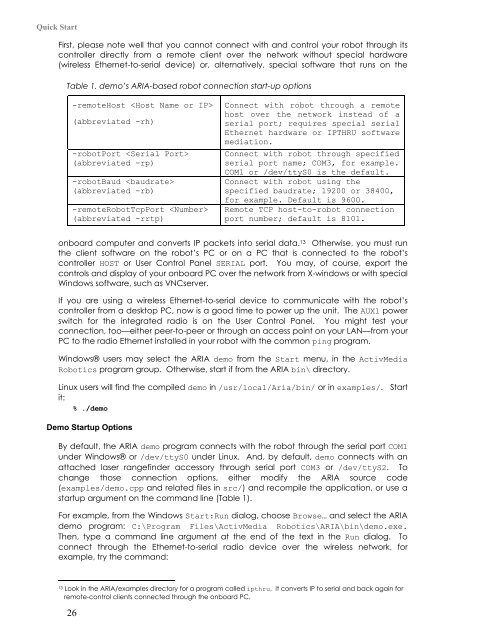
Table 1. demo’s ARIA-based robot connection start-up options<br />
-remoteHost <br />
(abbreviated -rh)<br />
-robotPort <br />
(abbreviated -rp)<br />
-robotBaud <br />
(abbreviated -rb)<br />
-remoteRobotTcpPort <br />
(abbreviated -rrtp)<br />
Connect with robot through a remote<br />
host over the network instead of a<br />
serial port; requires special serial<br />
Ethernet hardware or IPTHRU software<br />
mediation.<br />
Connect with robot through specified<br />
serial port name; COM3, for example.<br />
COM1 or /dev/ttyS0 is the default.<br />
Connect with robot using the<br />
specified baudrate; 19200 or 38400,<br />
for example. Default is 9600.<br />
Remote TCP host-to-robot connection<br />
port number; default is 8101.<br />
onboard computer and converts IP packets into serial data. 13 Otherwise, you must run<br />
the client software on the robot’s PC or on a PC that is connected to the robot’s<br />
controller HOST or User Control Panel SERIAL port. You may, of course, export the<br />
controls and display of your onboard PC over the network from X-windows or with special<br />
Windows software, such as VNCserver.<br />
If you are using a wireless Ethernet-to-serial device to communicate with the robot’s<br />
controller from a desktop PC, now is a good time to power up the unit. The AUX1 power<br />
switch for the integrated radio is on the User Control Panel. You might test your<br />
connection, too—either peer-to-peer or through an access point on your LAN—from your<br />
PC to the radio Ethernet installed in your robot with the common ping program.<br />
Windows® users may select the ARIA demo from the Start menu, in the ActivMedia<br />
Robotics program group. Otherwise, start if from the ARIA bin\ directory.<br />
Linux users will find the compiled demo in /usr/local/Aria/bin/ or in examples/. Start<br />
it:<br />
% ./demo<br />
Demo Startup Options<br />
By default, the ARIA demo program connects with the robot through the serial port COM1<br />
under Windows® or /dev/ttyS0 under Linux. And, by default, demo connects with an<br />
attached laser rangefinder accessory through serial port COM3 or /dev/ttyS2. To<br />
change those connection options, either modify the ARIA source code<br />
(examples/demo.cpp and related files in src/) and recompile the application, or use a<br />
startup argument on the command line (Table 1).<br />
For example, from the Windows Start:Run dialog, choose Browse… and select the ARIA<br />
demo program: C:\Program Files\ActivMedia Robotics\ARIA\bin\demo.exe.<br />
Then, type a command line argument at the end of the text in the Run dialog. To<br />
connect through the Ethernet-to-serial radio device over the wireless network, for<br />
example, try the command:<br />
13 Look in the ARIA/examples directory for a program called ipthru. It converts IP to serial and back again for<br />
remote-control clients connected through the onboard PC.<br />
26