

Operator's Manual 10 in. COMPOUND MITER SAW WITH ... - Sears
Operator's Manual 10 in. COMPOUND MITER SAW WITH ... - Sears
Operator's Manual 10 in. COMPOUND MITER SAW WITH ... - Sears

Create successful ePaper yourself
Turn your PDF publications into a flip-book with our unique Google optimized e-Paper software.
TO INSTALL THE REAR EXTENSION STAY<br />
(FIG. F)<br />
1. Loosen the extension stay lock<strong>in</strong>g screw (1)<br />
under the saw base (2).<br />
2. Place the rear extension stay (3) <strong>in</strong>to the<br />
holes provided <strong>in</strong> the miter saw base. Make<br />
sure the angle of stay is <strong>in</strong> the down position<br />
(as shown <strong>in</strong> Fig. F) for maximum support.<br />
3. Insert the extension stay lock<strong>in</strong>g screw back<br />
to hole and tighten to hold the extension.<br />
Fig. F<br />
2<br />
1 3<br />
INSTALLING THE HOLD-DOWN CLAMP<br />
ASSEMBLY (FIG. G)<br />
1. Loosen the lock knob (3) from the rear side of<br />
the saw base (4).<br />
2. Place the hold-down clamp assembly (1) <strong>in</strong><br />
one of the mount<strong>in</strong>g holes (2).<br />
3. Tighten the lock knob (3).<br />
Fig. G<br />
1<br />
3<br />
4<br />
2<br />
14<br />
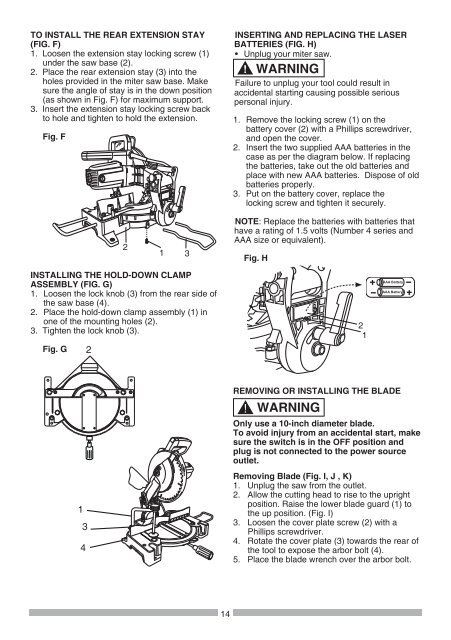
INSERTING AND REPLACING THE LASER<br />
BATTERIES (FIG. H)<br />
• Unplug your miter saw.<br />
! WARNING<br />
Failure to unplug your tool could result <strong>in</strong><br />
accidental start<strong>in</strong>g caus<strong>in</strong>g possible serious<br />
personal <strong>in</strong>jury.<br />
1. Remove the lock<strong>in</strong>g screw (1) on the<br />
battery cover (2) with a Phillips screwdriver,<br />
and open the cover.<br />
2. Insert the two supplied AAA batteries <strong>in</strong> the<br />
case as per the diagram below. If replac<strong>in</strong>g<br />
the batteries, take out the old batteries and<br />
place with new AAA batteries. Dispose of old<br />
batteries properly.<br />
3. Put on the battery cover, replace the<br />
lock<strong>in</strong>g screw and tighten it securely.<br />
NOTE: Replace the batteries with batteries that<br />
have a rat<strong>in</strong>g of 1.5 volts (Number 4 series and<br />
AAA size or equivalent).<br />
!<br />
Fig. H<br />
REMOVING OR INSTALLING THE BLADE<br />
WARNING<br />
2<br />
1<br />
AAA Battery<br />
AAA Battery<br />
Only use a <strong>10</strong>-<strong>in</strong>ch diameter blade.<br />
To avoid <strong>in</strong>jury from an accidental start, make<br />
sure the switch is <strong>in</strong> the OFF position and<br />
plug is not connected to the power source<br />
outlet.<br />
Remov<strong>in</strong>g Blade (Fig. I, J , K)<br />
1. Unplug the saw from the outlet.<br />
2. Allow the cutt<strong>in</strong>g head to rise to the upright<br />
position. Raise the lower blade guard (1) to<br />
the up position. (Fig. I)<br />
3. Loosen the cover plate screw (2) with a<br />
Phillips screwdriver.<br />
4. Rotate the cover plate (3) towards the rear of<br />
the tool to expose the arbor bolt (4).<br />
5. Place the blade wrench over the arbor bolt.


