Operator's Manual 10 in. COMPOUND MITER SAW WITH ... - Sears
Operator's Manual 10 in. COMPOUND MITER SAW WITH ... - Sears
Operator's Manual 10 in. COMPOUND MITER SAW WITH ... - Sears
Create successful ePaper yourself
Turn your PDF publications into a flip-book with our unique Google optimized e-Paper software.
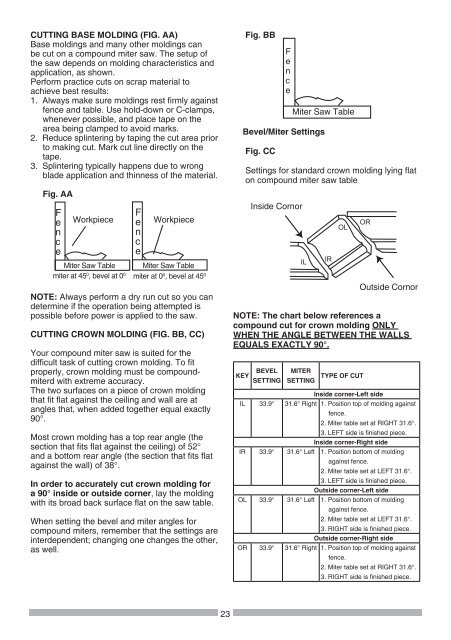
CUTTING BASE MOLDING (FIG. AA)<br />
Base mold<strong>in</strong>gs and many other mold<strong>in</strong>gs can<br />
be cut on a compound miter saw. The setup of<br />
the saw depends on mold<strong>in</strong>g characteristics and<br />
application, as shown.<br />
Perform practice cuts on scrap material to<br />
achieve best results:<br />
1. Always make sure mold<strong>in</strong>gs rest firmly aga<strong>in</strong>st<br />
fence and table. Use hold-down or C-clamps,<br />
whenever possible, and place tape on the<br />
area be<strong>in</strong>g clamped to avoid marks.<br />
2. Reduce spl<strong>in</strong>ter<strong>in</strong>g by tap<strong>in</strong>g the cut area prior<br />
to mak<strong>in</strong>g cut. Mark cut l<strong>in</strong>e directly on the<br />
tape.<br />
3. Spl<strong>in</strong>ter<strong>in</strong>g typically happens due to wrong<br />
blade application and th<strong>in</strong>ness of the material.<br />
Fig. AA<br />
miter at 450 , bevel at 00 miter at 00 , bevel at 450 F<br />
e<br />
n<br />
c<br />
e<br />
Workpiece<br />
F<br />
e<br />
n<br />
c<br />
e<br />
Workpiece<br />
Miter Saw Table Miter Saw Table<br />
NOTE: Always perform a dry run cut so you can<br />
determ<strong>in</strong>e if the operation be<strong>in</strong>g attempted is<br />
possible before power is applied to the saw.<br />
CUTTING CROWN MOLDING (FIG. BB, CC)<br />
Your compound miter saw is suited for the<br />
difficult task of cutt<strong>in</strong>g crown mold<strong>in</strong>g. To fit<br />
properly, crown mold<strong>in</strong>g must be compoundmiterd<br />
with extreme accuracy.<br />
The two surfaces on a piece of crown mold<strong>in</strong>g<br />
that fit flat aga<strong>in</strong>st the ceil<strong>in</strong>g and wall are at<br />
angles that, when added together equal exactly<br />
90°.<br />
Most crown mold<strong>in</strong>g has a top rear angle (the<br />
section that fits flat aga<strong>in</strong>st the ceil<strong>in</strong>g) of 52°<br />
and a bottom rear angle (the section that fits flat<br />
aga<strong>in</strong>st the wall) of 38°.<br />
In order to accurately cut crown mold<strong>in</strong>g for<br />
a 90° <strong>in</strong>side or outside corner, lay the mold<strong>in</strong>g<br />
with its broad back surface flat on the saw table.<br />
When sett<strong>in</strong>g the bevel and miter angles for<br />
compound miters, remember that the sett<strong>in</strong>gs are<br />
<strong>in</strong>terdependent; chang<strong>in</strong>g one changes the other,<br />
as well.<br />
23<br />
Fig. BB<br />
Bevel/Miter Sett<strong>in</strong>gs<br />
Fig. CC<br />
Sett<strong>in</strong>gs for standard crown mold<strong>in</strong>g ly<strong>in</strong>g flat<br />
on compound miter saw table<br />
NOTE: The chart below references a<br />
compound cut for crown mold<strong>in</strong>g ONLY<br />
WHEN THE ANGLE BETWEEN THE WALLS<br />
EQUALS EXACTLY 90°.<br />
KEY BEVEL<br />
SETTING<br />
F<br />
e<br />
n<br />
c<br />
e<br />
Inside Cornor<br />
Miter Saw Table<br />
IL<br />
<strong>MITER</strong><br />
SETTING<br />
TYPE OF CUT<br />
Inside corner-Left side<br />
IL 33.9° 31.6° Right 1. Position top of mold<strong>in</strong>g aga<strong>in</strong>st<br />
fence.<br />
2. Miter table set at RIGHT 31.6°.<br />
3. LEFT side is f<strong>in</strong>ished piece.<br />
Inside corner-Right side<br />
IR 33.9° 31.6° Left 1. Position bottom of mold<strong>in</strong>g<br />
aga<strong>in</strong>st fence.<br />
2. Miter table set at LEFT 31.6°.<br />
3. LEFT side is f<strong>in</strong>ished piece.<br />
Outside corner-Left side<br />
OL 33.9° 31.6° Left 1. Position bottom of mold<strong>in</strong>g<br />
IR<br />
OL<br />
aga<strong>in</strong>st fence.<br />
2. Miter table set at LEFT 31.6°.<br />
3. RIGHT side is f<strong>in</strong>ished piece.<br />
Outside corner-Right side<br />
OR 33.9° 31.6° Right 1. Position top of mold<strong>in</strong>g aga<strong>in</strong>st<br />
fence.<br />
OR<br />
Outside Cornor<br />
2. Miter table set at RIGHT 31.6°.<br />
3. RIGHT side is f<strong>in</strong>ished piece.


