

Operator's Manual 10 in. COMPOUND MITER SAW WITH ... - Sears
Operator's Manual 10 in. COMPOUND MITER SAW WITH ... - Sears
Operator's Manual 10 in. COMPOUND MITER SAW WITH ... - Sears

You also want an ePaper? Increase the reach of your titles
YUMPU automatically turns print PDFs into web optimized ePapers that Google loves.
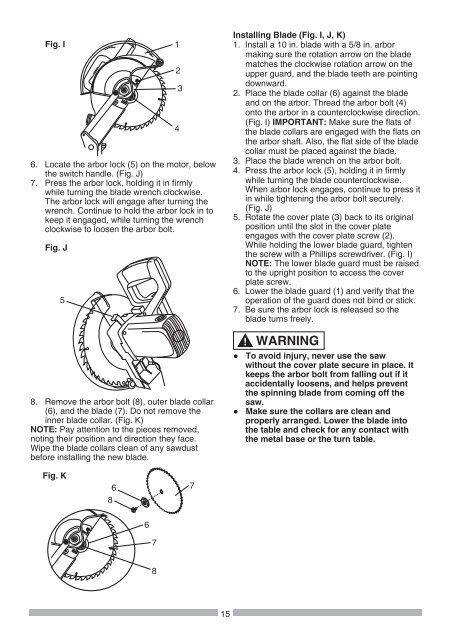
Fig. I<br />
6. Locate the arbor lock (5) on the motor, below<br />
the switch handle. (Fig. J)<br />
7. Press the arbor lock, hold<strong>in</strong>g it <strong>in</strong> firmly<br />
while turn<strong>in</strong>g the blade wrench clockwise.<br />
The arbor lock will engage after turn<strong>in</strong>g the<br />
wrench. Cont<strong>in</strong>ue to hold the arbor lock <strong>in</strong> to<br />
keep it engaged, while turn<strong>in</strong>g the wrench<br />
clockwise to loosen the arbor bolt.<br />
Fig. J<br />
5<br />
8. Remove the arbor bolt (8), outer blade collar<br />
(6), and the blade (7). Do not remove the<br />
<strong>in</strong>ner blade collar. (Fig. K)<br />
NOTE: Pay attention to the pieces removed,<br />
not<strong>in</strong>g their position and direction they face.<br />
Wipe the blade collars clean of any sawdust<br />
before <strong>in</strong>stall<strong>in</strong>g the new blade.<br />
Fig. K<br />
6<br />
8<br />
6<br />
7<br />
8<br />
1<br />
2<br />
4<br />
3<br />
7<br />
15<br />
Install<strong>in</strong>g Blade (Fig. I, J, K)<br />
1. Install a <strong>10</strong> <strong>in</strong>. blade with a 5/8 <strong>in</strong>. arbor<br />
mak<strong>in</strong>g sure the rotation arrow on the blade<br />
matches the clockwise rotation arrow on the<br />
upper guard, and the blade teeth are po<strong>in</strong>t<strong>in</strong>g<br />
downward.<br />
2. Place the blade collar (6) aga<strong>in</strong>st the blade<br />
and on the arbor. Thread the arbor bolt (4)<br />
onto the arbor <strong>in</strong> a counterclockwise direction.<br />
(Fig. I) IMPORTANT: Make sure the flats of<br />
the blade collars are engaged with the flats on<br />
the arbor shaft. Also, the flat side of the blade<br />
collar must be placed aga<strong>in</strong>st the blade.<br />
3. Place the blade wrench on the arbor bolt.<br />
4. Press the arbor lock (5), hold<strong>in</strong>g it <strong>in</strong> firmly<br />
while turn<strong>in</strong>g the blade counterclockwise.<br />
When arbor lock engages, cont<strong>in</strong>ue to press it<br />
<strong>in</strong> while tighten<strong>in</strong>g the arbor bolt securely.<br />
(Fig. J)<br />
5. Rotate the cover plate (3) back to its orig<strong>in</strong>al<br />
position until the slot <strong>in</strong> the cover plate<br />
engages with the cover plate screw (2).<br />
While hold<strong>in</strong>g the lower blade guard, tighten<br />
the screw with a Phillips screwdriver. (Fig. I)<br />
NOTE: The lower blade guard must be raised<br />
to the upright position to access the cover<br />
plate screw.<br />
6. Lower the blade guard (1) and verify that the<br />
operation of the guard does not b<strong>in</strong>d or stick.<br />
7. Be sure the arbor lock is released so the<br />
blade turns freely.<br />
WARNING<br />
!<br />
● To avoid <strong>in</strong>jury, never use the saw<br />
without the cover plate secure <strong>in</strong> place. It<br />
keeps the arbor bolt from fall<strong>in</strong>g out if it<br />
accidentally loosens, and helps prevent<br />
the sp<strong>in</strong>n<strong>in</strong>g blade from com<strong>in</strong>g off the<br />
saw.<br />
● Make sure the collars are clean and<br />
properly arranged. Lower the blade <strong>in</strong>to<br />
the table and check for any contact with<br />
the metal base or the turn table.


