

Operator's Manual 10 in. COMPOUND MITER SAW WITH ... - Sears
Operator's Manual 10 in. COMPOUND MITER SAW WITH ... - Sears
Operator's Manual 10 in. COMPOUND MITER SAW WITH ... - Sears

Create successful ePaper yourself
Turn your PDF publications into a flip-book with our unique Google optimized e-Paper software.
MAINTENANCE<br />
! DANGER<br />
To avoid <strong>in</strong>jury, never put lubricants on the<br />
blade while it is sp<strong>in</strong>n<strong>in</strong>g.<br />
! WARNING<br />
To avoid fire or toxic reaction, never use<br />
gasol<strong>in</strong>e, naphtha acetone, lacquer th<strong>in</strong>ner or<br />
similar highly volatile solvents to clean the<br />
miter saw.<br />
! WARNING<br />
To avoid <strong>in</strong>jury from unexpected start<strong>in</strong>g<br />
or electrical shock, unplug the power cord<br />
before work<strong>in</strong>g on the saw.<br />
! WARNING<br />
For your safety, this saw is double-<strong>in</strong>sulated.<br />
To avoid electrical shock, fire or <strong>in</strong>jury, use<br />
only parts identical to those identified <strong>in</strong> the<br />
parts list. Reassemble exactly as the orig<strong>in</strong>al<br />
assembly to avoid electrical shock.<br />
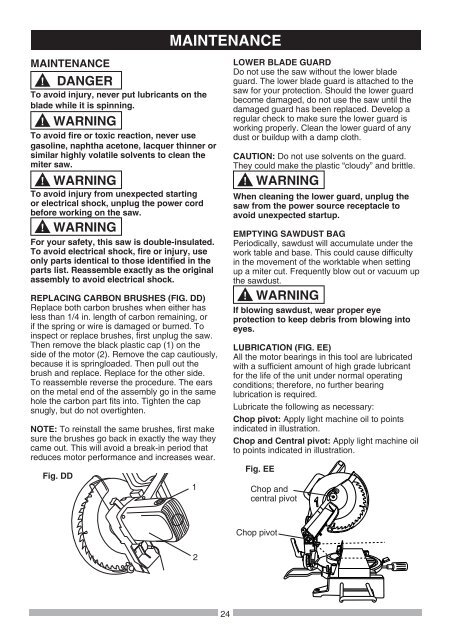
REPLACING CARBON BRUSHES (FIG. DD)<br />
Replace both carbon brushes when either has<br />
less than 1/4 <strong>in</strong>. length of carbon rema<strong>in</strong><strong>in</strong>g, or<br />
if the spr<strong>in</strong>g or wire is damaged or burned. To<br />
<strong>in</strong>spect or replace brushes, first unplug the saw.<br />
Then remove the black plastic cap (1) on the<br />
side of the motor (2). Remove the cap cautiously,<br />
because it is spr<strong>in</strong>gloaded. Then pull out the<br />
brush and replace. Replace for the other side.<br />
To reassemble reverse the procedure. The ears<br />
on the metal end of the assembly go <strong>in</strong> the same<br />
hole the carbon part fits <strong>in</strong>to. Tighten the cap<br />
snugly, but do not overtighten.<br />
NOTE: To re<strong>in</strong>stall the same brushes, first make<br />
sure the brushes go back <strong>in</strong> exactly the way they<br />
came out. This will avoid a break-<strong>in</strong> period that<br />
reduces motor performance and <strong>in</strong>creases wear.<br />
Fig. DD<br />
MAINTENANCE<br />
1<br />
2<br />
24<br />
LOWER BLADE GUARD<br />
Do not use the saw without the lower blade<br />
guard. The lower blade guard is attached to the<br />
saw for your protection. Should the lower guard<br />
become damaged, do not use the saw until the<br />
damaged guard has been replaced. Develop a<br />
regular check to make sure the lower guard is<br />
work<strong>in</strong>g properly. Clean the lower guard of any<br />
dust or buildup with a damp cloth.<br />
CAUTION: Do not use solvents on the guard.<br />
They could make the plastic “cloudy” and brittle.<br />
! WARNING<br />
When clean<strong>in</strong>g the lower guard, unplug the<br />
saw from the power source receptacle to<br />
avoid unexpected startup.<br />
EMPTYING <strong>SAW</strong>DUST BAG<br />
Periodically, sawdust will accumulate under the<br />
work table and base. This could cause difficulty<br />
<strong>in</strong> the movement of the worktable when sett<strong>in</strong>g<br />
up a miter cut. Frequently blow out or vacuum up<br />
the sawdust.<br />
! WARNING<br />
If blow<strong>in</strong>g sawdust, wear proper eye<br />
protection to keep debris from blow<strong>in</strong>g <strong>in</strong>to<br />
eyes.<br />
LUBRICATION (FIG. EE)<br />
All the motor bear<strong>in</strong>gs <strong>in</strong> this tool are lubricated<br />
with a sufficient amount of high grade lubricant<br />
for the life of the unit under normal operat<strong>in</strong>g<br />
conditions; therefore, no further bear<strong>in</strong>g<br />
lubrication is required.<br />
Lubricate the follow<strong>in</strong>g as necessary:<br />
Chop pivot: Apply light mach<strong>in</strong>e oil to po<strong>in</strong>ts<br />
<strong>in</strong>dicated <strong>in</strong> illustration.<br />
Chop and Central pivot: Apply light mach<strong>in</strong>e oil<br />
to po<strong>in</strong>ts <strong>in</strong>dicated <strong>in</strong> illustration.<br />
Fig. EE<br />
Chop and<br />
central pivot<br />
Chop pivot


