

Operator's Manual 10 in. COMPOUND MITER SAW WITH ... - Sears
Operator's Manual 10 in. COMPOUND MITER SAW WITH ... - Sears
Operator's Manual 10 in. COMPOUND MITER SAW WITH ... - Sears

Create successful ePaper yourself
Turn your PDF publications into a flip-book with our unique Google optimized e-Paper software.
<strong>MITER</strong> CUT (FIG. W)<br />
1. When a miter cut is required, unlock the<br />
miter table by turn<strong>in</strong>g the miter handle (1)<br />
counterclockwise.<br />
2. While hold<strong>in</strong>g the miter handle, press down<br />
on the positive stop lock<strong>in</strong>g lever (2) to<br />
disengage the positive stop lock<strong>in</strong>g lever.<br />
3. Rotate the miter table to the right or left with<br />
the miter handle.<br />
4. When the table is <strong>in</strong> the desired position as<br />
shown on the miter scale (3), release the<br />
positive stop lock<strong>in</strong>g lever handle and tighten<br />
the miter handle. The table is now locked at<br />
the desired angle. Positive stops are provided<br />
at 0°,15°, 22.5°, 31.6° and 45°.<br />
IMPORTANT: ALWAYS TIGHTEN the miter<br />
table lock handle before cutt<strong>in</strong>g.<br />
Fig. W<br />
3<br />
2<br />
1<br />
BEVEL CUT (FIG. X)<br />
1. When a bevel cut is required, loosen the bevel<br />
lock handle (1).<br />
2. Tilt the cutt<strong>in</strong>g head to the desired angle as<br />
shown on the bevel scale (2). The blade can<br />
be positioned at any angle, from a 90° straight<br />
cut (0° on the scale) to a 45° left bevel.<br />
3. Tighten the bevel lock handle (1) to lock the<br />
cutt<strong>in</strong>g head <strong>in</strong> position.<br />
4. Positive stops are provided at 0° and 45°.<br />
1<br />
Fig. X<br />
2<br />
22<br />
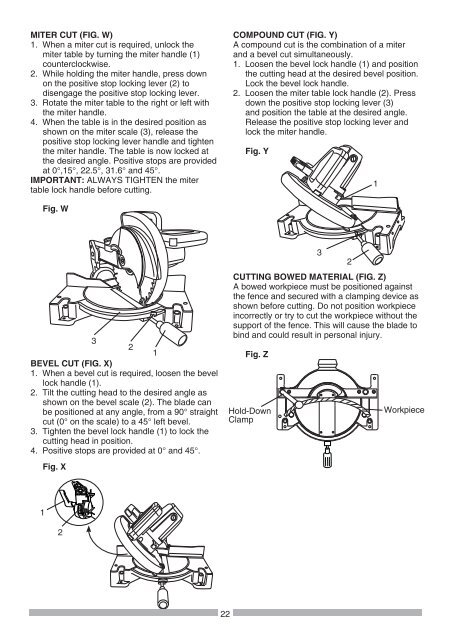
<strong>COMPOUND</strong> CUT (FIG. Y)<br />
A compound cut is the comb<strong>in</strong>ation of a miter<br />
and a bevel cut simultaneously.<br />
1. Loosen the bevel lock handle (1) and position<br />
the cutt<strong>in</strong>g head at the desired bevel position.<br />
Lock the bevel lock handle.<br />
2. Loosen the miter table lock handle (2). Press<br />
down the positive stop lock<strong>in</strong>g lever (3)<br />
and position the table at the desired angle.<br />
Release the positive stop lock<strong>in</strong>g lever and<br />
lock the miter handle.<br />
Fig. Y<br />
3<br />
CUTTING BOWED MATERIAL (FIG. Z)<br />
A bowed workpiece must be positioned aga<strong>in</strong>st<br />
the fence and secured with a clamp<strong>in</strong>g device as<br />
shown before cutt<strong>in</strong>g. Do not position workpiece<br />
<strong>in</strong>correctly or try to cut the workpiece without the<br />
support of the fence. This will cause the blade to<br />
b<strong>in</strong>d and could result <strong>in</strong> personal <strong>in</strong>jury.<br />
Fig. Z<br />
Hold-Down<br />
Clamp<br />
2<br />
1<br />
Workpiece


