- Page 1 and 2:
User’s Guide X500 Series If you n
- Page 3 and 4:
Critical Applications The computer
- Page 5 and 6: Connection to party line service is
- Page 7 and 8: Wireless Interoperability NOTE The
- Page 9 and 10: Canada - Industry Canada (IC) NOTE
- Page 11 and 12: VCCI Class B Information Modem Warn
- Page 13 and 14: The indication shown below appears
- Page 15 and 16: 15 Malawi Malaysia Malta Martinique
- Page 17 and 18: Europe - Restrictions for Use of 5
- Page 19 and 20: China Colombia Costa Rica Croatia C
- Page 21 and 22: Approved Countries/Regions for the
- Page 23 and 24: Approved Countries/Regions for the
- Page 25 and 26: Approved Countries/Regions for use
- Page 27 and 28: 27 The legal communications mention
- Page 29 and 30: Trademarks 29 Qosmio, ConfigFree, a
- Page 31 and 32: Contents 31 Turning on the power ..
- Page 33 and 34: Contents 33 Toshiba’s online reso
- Page 35 and 36: Contents 35 USB Sleep and Charge Ut
- Page 37 and 38: Introduction Welcome to the world o
- Page 39 and 40: NOTE This guide Introduction This g
- Page 41 and 42: Your computer’s features and spec
- Page 43 and 44: Getting Started Selecting a place t
- Page 45 and 46: Getting Started Setting up your com
- Page 47 and 48: _ + Getting Started Connecting to a
- Page 49 and 50: NOTE Getting Started Using the comp
- Page 51 and 52: Setting up your software NOTE Getti
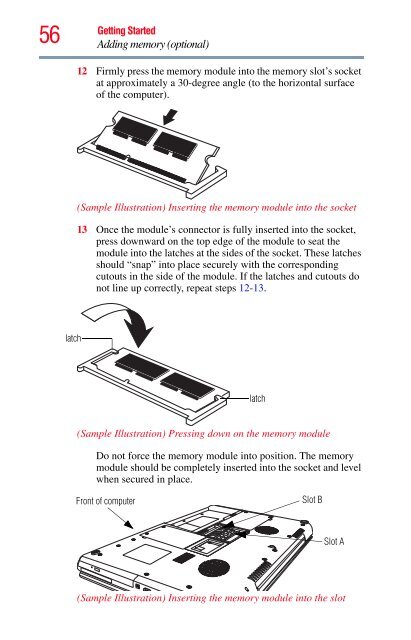
- Page 53 and 54: NOTE Getting Started Adding memory
- Page 55: NOTE NOTE NOTE latch Getting Starte
- Page 59 and 60: Getting Started Adding memory (opti
- Page 61 and 62: Recovery option Description Recover
- Page 63 and 64: Getting Started Recovering the Inte
- Page 65 and 66: Getting Started Recovering the Inte
- Page 67 and 68: Getting Started Recovering the Inte
- Page 69 and 70: Getting Started Recovering the Inte
- Page 71 and 72: Getting Started Erasing the Interna
- Page 73 and 74: Getting Started Checking the intern
- Page 75 and 76: Getting Started Using the TouchPad
- Page 77 and 78: NOTE Getting Started Using external
- Page 79 and 80: NOTE Getting Started Using external
- Page 81 and 82: Adjusting the quality of the extern
- Page 83 and 84: Getting Started Turning off the com
- Page 85 and 86: Using the Shut down command Getting
- Page 87 and 88: Restarting your computer Getting St
- Page 89 and 90: 6 Click Apply. 7 Click OK. Getting
- Page 91 and 92: NOTE Getting Started Turning off th
- Page 93 and 94: Moving the computer Getting Started
- Page 95 and 96: NOTE Learning the Basics Using the
- Page 97 and 98: Special Windows ® keys (Sample Ill
- Page 99 and 100: Learning the Basics Starting a prog
- Page 101 and 102: File names Learning the Basics Prin
- Page 103 and 104: Restoring your work Learning the Ba
- Page 105 and 106: Media control buttons Learning the
- Page 107 and 108:
Learning the Basics Using the optic
- Page 109 and 110:
Learning the Basics Toshiba’s onl
- Page 111 and 112:
Battery Notice NOTE Mobile Computin
- Page 113 and 114:
Charging the main battery Mobile Co
- Page 115 and 116:
Power button Mobile Computing Monit
- Page 117 and 118:
Mobile Computing Monitoring main ba
- Page 119 and 120:
Mobile Computing Monitoring main ba
- Page 121 and 122:
Mobile Computing Changing the main
- Page 123 and 124:
Mobile Computing Taking care of you
- Page 125 and 126:
Mobile Computing Disposing of used
- Page 127 and 128:
Chapter 4 Exploring Your Computer
- Page 129 and 130:
NOTE Start button Exploring Your Co
- Page 131 and 132:
Connecting your computer to a netwo
- Page 133 and 134:
Internet features Exploring Your Co
- Page 135 and 136:
Using external speakers or headphon
- Page 137 and 138:
Exploring Your Computer’s Feature
- Page 139 and 140:
Using the i.LINK ® port Exploring
- Page 141 and 142:
❖ TOSHIBA Button Support ❖ TOSH
- Page 143 and 144:
Secure The features available in th
- Page 145 and 146:
Optimize Utilities TOSHIBA Assist T
- Page 147 and 148:
Setting passwords NOTE Utilities Se
- Page 149 and 150:
4 Click Registered. Utilities Setti
- Page 151 and 152:
TOSHIBA Face Recognition Utility NO
- Page 153 and 154:
TOSHIBA HDD Protection Utility Util
- Page 155 and 156:
TOSHIBA Hardware Setup NOTE Utiliti
- Page 157 and 158:
Utilities TOSHIBA Hardware Setup
- Page 159 and 160:
NOTE Utilities USB Sleep and Charge
- Page 161 and 162:
TOSHIBA Zooming Utility Utilities T
- Page 163 and 164:
TOSHIBA Accessibility Utilities TOS
- Page 165 and 166:
TOSHIBA Service Station Utilities T
- Page 167 and 168:
NOTE Utilities ConfigFree® 167 ❖
- Page 169 and 170:
3 Click Open Settings. Utilities Co
- Page 171 and 172:
If Something Goes Wrong Problems wh
- Page 173 and 174:
If Something Goes Wrong Problems wh
- Page 175 and 176:
If Something Goes Wrong The Windows
- Page 177 and 178:
If Something Goes Wrong Fixing a pr
- Page 179 and 180:
If Something Goes Wrong Memory prob
- Page 181 and 182:
If Something Goes Wrong Display pro
- Page 183 and 184:
If Something Goes Wrong Disk or sto
- Page 185 and 186:
If Something Goes Wrong Sound syste
- Page 187 and 188:
If Something Goes Wrong Printer pro
- Page 189 and 190:
NOTE NOTE If Something Goes Wrong W
- Page 191 and 192:
If Something Goes Wrong Develop goo
- Page 193 and 194:
If Something Goes Wrong Develop goo
- Page 195 and 196:
If Something Goes Wrong Develop goo
- Page 197 and 198:
If you need further assistance If S
- Page 199 and 200:
Latin America and Caribbean Toshiba
- Page 201 and 202:
Using the Hot Key Cards NOTE Hot Ke
- Page 203 and 204:
NOTE Using the Application Cards Ho
- Page 205 and 206:
Volume Mute Fn + or Hot Keys/TOSHIB
- Page 207 and 208:
Power plan Fn + or Hot Keys/TOSHIBA
- Page 209 and 210:
Hibernation mode Fn + or Hot Keys/T
- Page 211 and 212:
NOTE Display brightness Hot Keys/TO
- Page 213 and 214:
Disabling or enabling the TouchPad
- Page 215 and 216:
Keyboard hot key functions Hot Keys
- Page 217 and 218:
Glossary Acronyms TECHNICAL NOTE: S
- Page 219 and 220:
Terms A RFI radio frequency interfe
- Page 221 and 222:
CD — An individual compact disc.
- Page 223 and 224:
E Glossary 223 document — Any fil
- Page 225 and 226:
I K L Glossary 225 Hibernation —
- Page 227 and 228:
N O P Glossary 227 network — A co
- Page 229 and 230:
S Glossary 229 restart — Synonymo
- Page 231 and 232:
Index A AC adaptor 46 AC power (DC-
- Page 233 and 234:
checklist 185 computer stops workin
- Page 235 and 236:
port RGB 77 power computer will not
- Page 237:
TOSHIBA PC Diagnostic Tool Utility