Download - D-Link
Download - D-Link
Download - D-Link

You also want an ePaper? Increase the reach of your titles
YUMPU automatically turns print PDFs into web optimized ePapers that Google loves.
DES-3028 DES-3028P DES-3028G DES-3052 DES-3052P Layer 2 Fast Ethernet Managed Switch<br />
Attribute-Specific field Used to assign the<br />
bandwidth of the port<br />
Unit (Kbits) Required<br />
If the user has configured the bandwidth attribute of the RADIUS server (for example, ingress bandwidth 1000Kbps) and the<br />
802.1X authentication is successful, the device will assign the correct bandwidth (according to the RADIUS server) to the port.<br />
However, if the user does not configure the bandwidth attribute but authenticates successfully, the device will not assign<br />
bandwidth to the port. When the bandwidth attribute is configured on the RADIUS with a value of “0” or more than the effective<br />
bandwidth (100Mbps on an Ethernet port or 1Gbps on a Gigabit port) of the port will be set to no_limit.<br />
To assign 802.1p default priority by RADIUS server, proper parameters should be configured on the RADIUS Server. See below<br />
for the parameters of a user account.<br />
The parameters of the Vendor-Specific attribute are:<br />
Vendor-Specific attribute Description Value Usage<br />
Vendor-ID Defines the vendor 171 (DLINK) Required<br />
Vendor-Type The definition of this<br />
attribute<br />
Attribute-Specific field Used to assign the<br />
802.1p default priority<br />
of the port<br />
4 Required<br />
0-7 Required<br />
If the user has configured the 802.1p priority attribute of the RADIUS server (for example, priority 7) and the 802.1X<br />
authentication is successful, the device will assign the correct 802.1p default priority (according to the RADIUS server) to the port.<br />
However, if the user does not configure the priority attribute but authenticates successfully, the device will not assign a priority to<br />
this port. If the priority attribute configured on the RADIUS is a value out of range (>7), it will not be set to the device.<br />
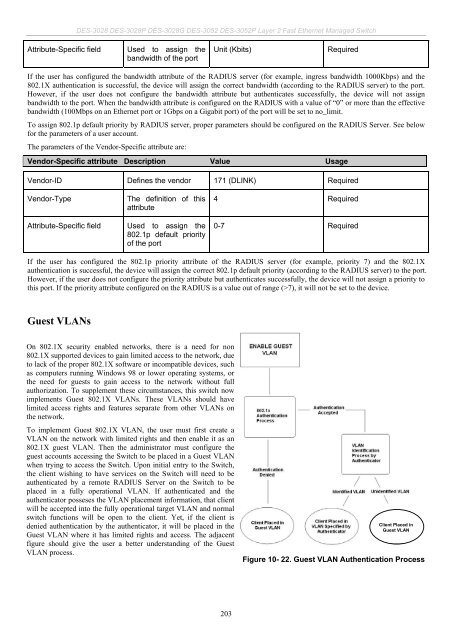
Guest VLANs<br />
On 802.1X security enabled networks, there is a need for non<br />
802.1X supported devices to gain limited access to the network, due<br />
to lack of the proper 802.1X software or incompatible devices, such<br />
as computers running Windows 98 or lower operating systems, or<br />
the need for guests to gain access to the network without full<br />
authorization. To supplement these circumstances, this switch now<br />
implements Guest 802.1X VLANs. These VLANs should have<br />
limited access rights and features separate from other VLANs on<br />
the network.<br />
To implement Guest 802.1X VLAN, the user must first create a<br />
VLAN on the network with limited rights and then enable it as an<br />
802.1X guest VLAN. Then the administrator must configure the<br />
guest accounts accessing the Switch to be placed in a Guest VLAN<br />
when trying to access the Switch. Upon initial entry to the Switch,<br />
the client wishing to have services on the Switch will need to be<br />
authenticated by a remote RADIUS Server on the Switch to be<br />
placed in a fully operational VLAN. If authenticated and the<br />
authenticator posseses the VLAN placement information, that client<br />
will be accepted into the fully operational target VLAN and normal<br />
switch functions will be open to the client. Yet, if the client is<br />
denied authentication by the authenticator, it will be placed in the<br />
Guest VLAN where it has limited rights and access. The adjacent<br />
figure should give the user a better understanding of the Guest<br />
VLAN process.<br />
203<br />
Client Placed in<br />
Guest VLAN<br />
Figure 10- 22. Guest VLAN Authentication Process