RM2235 Manual PDF - University of Utah
RM2235 Manual PDF - University of Utah
RM2235 Manual PDF - University of Utah

You also want an ePaper? Increase the reach of your titles
YUMPU automatically turns print PDFs into web optimized ePapers that Google loves.
4. Startup<br />
4.6 Inserting the knife holder<br />
52<br />
20<br />
55<br />
53<br />
Enlarged detail:<br />
Scale for better<br />
repositioning <strong>of</strong> the 51<br />
knife holder for<br />
varying specimen<br />
heights. 54<br />
57<br />
56<br />
50<br />
Fig. 11<br />
71<br />
58<br />
Fig. 12<br />
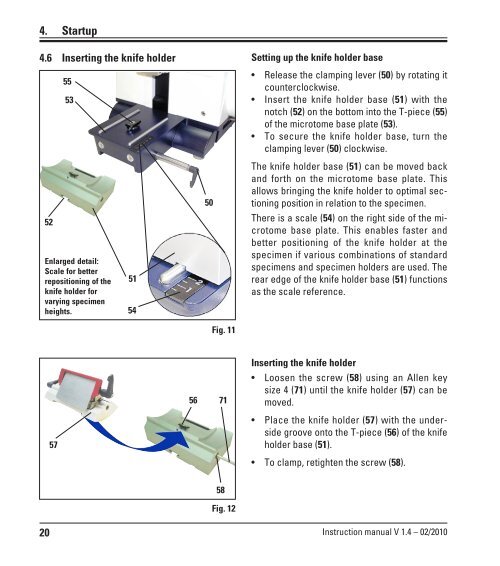
Setting up the knife holder base<br />
Release the clamping lever (50) by rotating it<br />
counterclockwise.<br />
Insert the knife holder base (51) with the<br />
notch (52) on the bottom into the T-piece (55)<br />
<strong>of</strong> the microtome base plate (53).<br />
To secure the knife holder base, turn the<br />
clamping lever (50) clockwise.<br />
The knife holder base (51) can be moved back<br />
and forth on the microtome base plate. This<br />
allows bringing the knife holder to optimal sectioning<br />
position in relation to the specimen.<br />
There is a scale (54) on the right side <strong>of</strong> the microtome<br />
base plate. This enables faster and<br />
better positioning <strong>of</strong> the knife holder at the<br />
specimen if various combinations <strong>of</strong> standard<br />
specimens and specimen holders are used. The<br />
rear edge <strong>of</strong> the knife holder base (51) functions<br />
as the scale reference.<br />
Inserting the knife holder<br />
Loosen the screw (58) using an Allen key<br />
size 4 (71) until the knife holder (57) can be<br />
moved.<br />
Place the knife holder (57) with the underside<br />
groove onto the T-piece (56) <strong>of</strong> the knife<br />
holder base (51).<br />
To clamp, retighten the screw (58).<br />
Instruction manual V 1.4 – 02/2010