RMX 1500 Hardware Guide.book - Polycom
RMX 1500 Hardware Guide.book - Polycom
RMX 1500 Hardware Guide.book - Polycom

Create successful ePaper yourself
Turn your PDF publications into a flip-book with our unique Google optimized e-Paper software.
Chapter 1-<strong>Hardware</strong> Description<br />
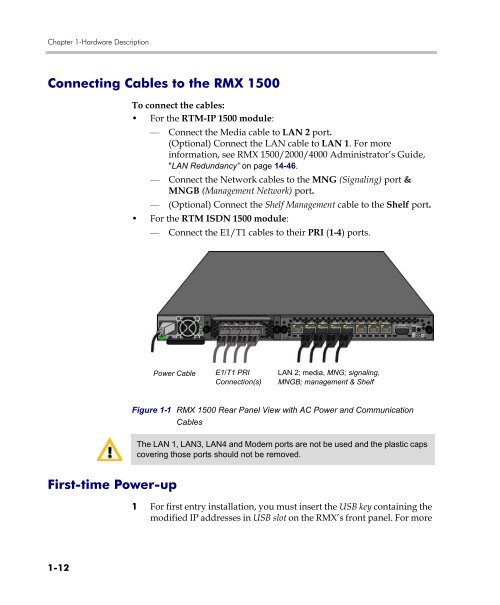
Connecting Cables to the <strong>RMX</strong> <strong>1500</strong><br />
1-12<br />
To connect the cables:<br />
• For the RTM-IP <strong>1500</strong> module:<br />
— Connect the Media cable to LAN 2 port.<br />
(Optional) Connect the LAN cable to LAN 1. For more<br />
information, see <strong>RMX</strong> <strong>1500</strong>/2000/4000 Administrator’s <strong>Guide</strong>,<br />
"LAN Redundancy” on page 14-46.<br />
— Connect the Network cables to the MNG (Signaling) port &<br />
MNGB (Management Network) port.<br />
— (Optional) Connect the Shelf Management cable to the Shelf port.<br />
• For the RTM ISDN <strong>1500</strong> module:<br />
— Connect the E1/T1 cables to their PRI (1-4) ports.<br />
Power Cable<br />
First-time Power-up<br />
E1/T1 PRI<br />
Connection(s)<br />
LAN 2; media, MNG; signaling,<br />
MNGB; management & Shelf<br />
Figure 1-1 <strong>RMX</strong> <strong>1500</strong> Rear Panel View with AC Power and Communication<br />
Cables<br />
The LAN 1, LAN3, LAN4 and Modem ports are not be used and the plastic caps<br />
covering those ports should not be removed.<br />
1 For first entry installation, you must insert the USB key containing the<br />
modified IP addresses in USB slot on the <strong>RMX</strong>’s front panel. For more