

CUTSKILL® C-35A - Victor Technologies
CUTSKILL® C-35A - Victor Technologies
CUTSKILL® C-35A - Victor Technologies

Create successful ePaper yourself
Turn your PDF publications into a flip-book with our unique Google optimized e-Paper software.
6.04 Open Circuit Voltage Check<br />
1. Attach shop air to unit.<br />
2. Remove torch consumables from torch head and replace the shield cup.<br />
3. Turn unit power on.<br />
4. Measure output voltage on bridge diode (red and black). It should be 325VDC.<br />
5. Depress the torch trigger.<br />
6. Check for illumination of the "SOL" LED and that the "EN" (Enable) LED brightens on the Logic PCB.<br />
7. Measure terminal TB2, Pins 1 and 3. It should be 220VAC.<br />
8. Measure output to Main Transformer Input. It should be 218VAC.<br />
9. Measure Main Transformer secondary voltage. It should be 315VAC.<br />
10. Measure output OCV to work. It should be 325VDC.<br />
11. Turn off the unit power and replace the torch consumables removed in step 2 above.<br />
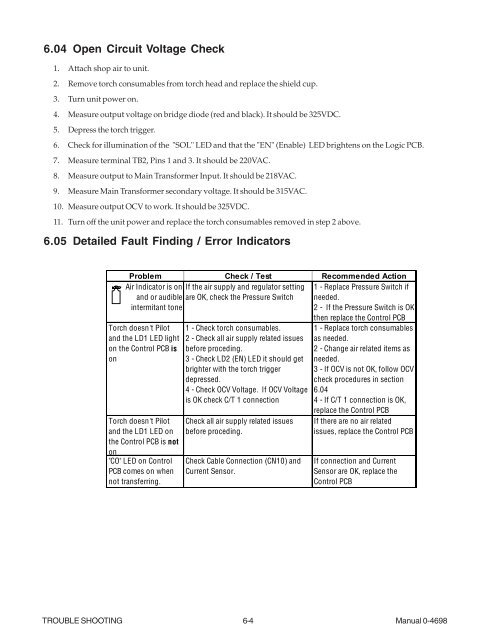
6.05 Detailed Fault Finding / Error Indicators<br />
Problem Check / Test Recommended Action<br />
Air Indicator is on If the air supply and regulator setting<br />
and or audible are OK, check the Pressure Switch<br />
intermitant tone<br />
Torch doesn't Pilot<br />
and the LD1 LED light<br />
on the Control PCB is<br />
on<br />
Torch doesn't Pilot<br />
and the LD1 LED on<br />
the Control PCB is not<br />
on<br />
"CO" LED on Control<br />
PCB comes on when<br />
not transferring.<br />
1 - Check torch consumables.<br />
2 - Check all air supply related issues<br />
before proceding.<br />
3 - Check LD2 (EN) LED it should get<br />
brighter with the torch trigger<br />
depressed.<br />
4 - Check OCV Voltage. If OCV Voltage<br />
is OK check C/T 1 connection<br />
Check all air supply related issues<br />
before proceding.<br />
Check Cable Connection (CN10) and<br />
Current Sensor.<br />
1 - Replace Pressure Switch if<br />
needed.<br />
2 - If the Pressure Switch is OK<br />
then replace the Control PCB<br />
1 - Replace torch consumables<br />
as needed.<br />
2 - Change air related items as<br />
needed.<br />
3 - If OCV is not OK, follow OCV<br />
check procedures in section<br />
6.04<br />
4 - If C/T 1 connection is OK,<br />
replace the Control PCB<br />
If there are no air related<br />
issues, replace the Control PCB<br />
If connection and Current<br />
Sensor are OK, replace the<br />
Control PCB<br />
TROUBLE SHOOTING 6-4 Manual 0-4698


