

CUTSKILL® C-35A - Victor Technologies
CUTSKILL® C-35A - Victor Technologies
CUTSKILL® C-35A - Victor Technologies

You also want an ePaper? Increase the reach of your titles
YUMPU automatically turns print PDFs into web optimized ePapers that Google loves.
6.06 Torch Tests<br />
WARNING<br />
Disconnect primary power at the source before disassembling the power supply, torch, or torch leads.<br />
1. PIP and Torch Switch Adapter Check<br />
a. Disconnect input power from power supply.<br />
b. Confirm that the torch parts are in place and that they match the parts consumables label on the power supply<br />
cover.<br />
c. Refer to Appendix 2 for torch connection and access. With the power supply on it's side and the panel removed,<br />
disconnect the Power Supply Adapter from the power supply.<br />
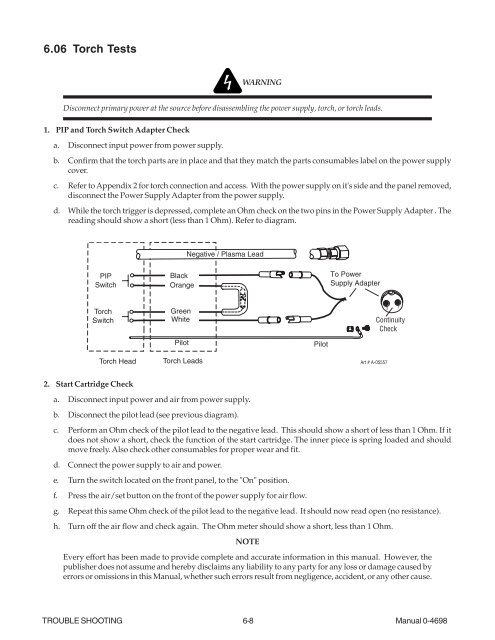
d. While the torch trigger is depressed, complete an Ohm check on the two pins in the Power Supply Adapter . The<br />
reading should show a short (less than 1 Ohm). Refer to diagram.<br />
PIP<br />
Switch<br />
Torch<br />
Switch<br />
Torch Head<br />
2. Start Cartridge Check<br />
Black<br />
Orange<br />
Green<br />
White<br />
Pilot<br />
Torch Leads<br />
Negative / Plasma Lead<br />
a. Disconnect input power and air from power supply.<br />
b. Disconnect the pilot lead (see previous diagram).<br />
To Power<br />
Supply Adapter<br />
TROUBLE SHOOTING 6-8 Manual 0-4698<br />
Pilot<br />
Art # A-05557<br />
2<br />
1<br />
Continuity<br />
Check<br />
c. Perform an Ohm check of the pilot lead to the negative lead. This should show a short of less than 1 Ohm. If it<br />
does not show a short, check the function of the start cartridge. The inner piece is spring loaded and should<br />
move freely. Also check other consumables for proper wear and fit.<br />
d. Connect the power supply to air and power.<br />
e. Turn the switch located on the front panel, to the "On" position.<br />
f. Press the air/set button on the front of the power supply for air flow.<br />
g. Repeat this same Ohm check of the pilot lead to the negative lead. It should now read open (no resistance).<br />
h. Turn off the air flow and check again. The Ohm meter should show a short, less than 1 Ohm.<br />
NOTE<br />
Every effort has been made to provide complete and accurate information in this manual. However, the<br />
publisher does not assume and hereby disclaims any liability to any party for any loss or damage caused by<br />
errors or omissions in this Manual, whether such errors result from negligence, accident, or any other cause.


